
Newsletter Subscribe
Enter your email address below and subscribe to our newsletter

All voices matter
All voices matter

 ByTravis
A D-loop is a small braided-cord loop tied to your bowstring that gives your release aid a consistent attachment point - here's how to tie one properly.
Affiliate Disclaimer: We are a participant in the Amazon Services LLC Associates Program, an affiliate advertising program designed to provide a means for sites to earn advertising fees by advertising and linking to Amazon.com. As an Amazon Associate I earn from qualifying purchases. We also participate in other affiliate programs.

A D-loop is a small loop of braided cord tied to your compound bow’s string that provides a consistent attachment point for your mechanical release aid. Tying a D-loop involves wrapping specialized braided cord around the bow string above the arrow nocking point, securing it with tight knots on both ends, and trimming the excess material. The process takes about 5-10 minutes and requires only D-loop material, a bow square, and scissors, no bow press needed.
A D-loop is a small loop of braided cord material tied directly onto a compound bow’s string that serves as the attachment point for mechanical release aids. The loop gets its name from its D-shape when pulled back at full draw, creating a consistent anchor point that separates your release mechanism from direct contact with the bow string.
The D-loop serves multiple critical functions for compound bow shooters:
Most compound bow archers who use mechanical releases consider a D-loop essential equipment. The loop typically measures 1.5 to 2.5 inches in total length when tied, though the exact size depends on your release aid and personal preference.
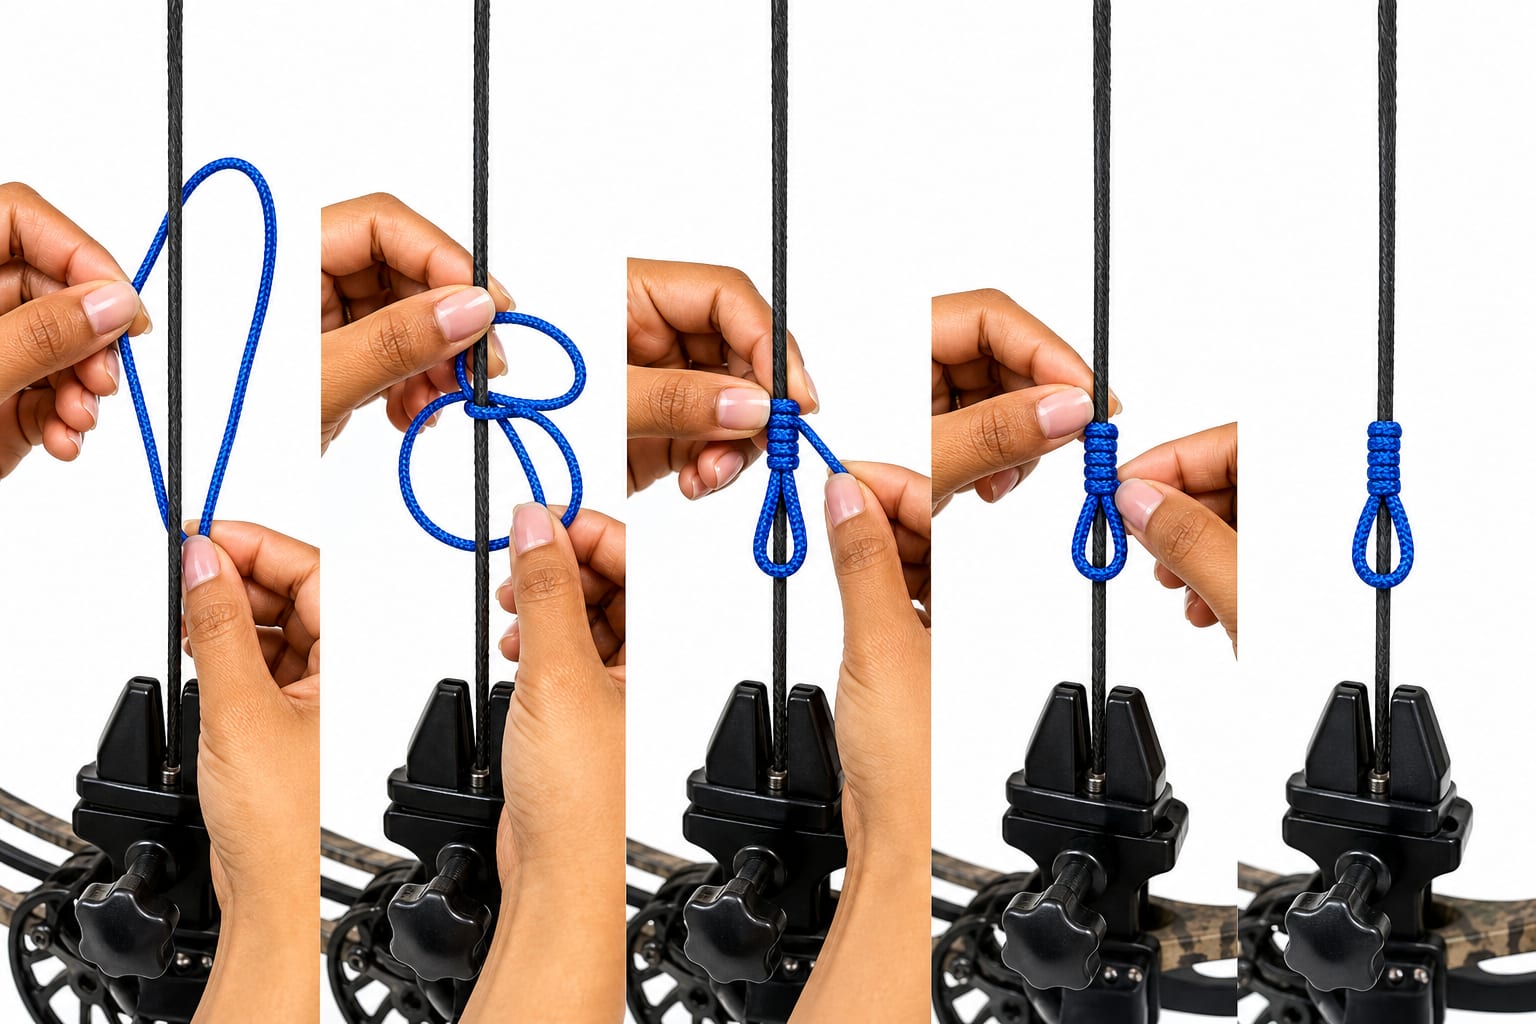
A D-loop is not technically required for all compound bow shooting, but it has become standard equipment for anyone using a mechanical release aid. If you shoot with a mechanical release (wrist strap, thumb trigger, or handheld), a D-loop is essentially necessary for proper function and string longevity.
When you need a D-loop:
When you might not need one:
The accuracy advantage of a D-loop comes from its consistency. When you clip your release to the same loop position every time, you eliminate one variable from your shot sequence. Without a D-loop, attaching a release directly to the string’s serving can create inconsistent pressure points and gradually damage the serving material. For more on proper shooting technique, see our guide on how to draw a bow smoothly.
Using a D-loop is objectively better than shooting without one if you use a mechanical release aid. The D-loop provides superior consistency, protects your equipment, and improves shot execution compared to clipping a release directly to the string or shooting with fingers.
Advantages of using a D-loop:
Disadvantages of shooting without a D-loop:
The only scenario where shooting without a D-loop makes sense is when using fingers directly on the string, which is uncommon with modern compound bows. Most serious archers consider the D-loop a fundamental component of their setup, similar to how proper bow tuning is essential for accuracy.
Tying a D-loop requires following a specific sequence to ensure the knots hold securely under the tension of repeated draw cycles. The entire process takes 5-10 minutes once you understand the technique.
Materials needed:
Step-by-step instructions:
Locate your nocking point: Use a bow square to identify where your arrow nocks onto the string. The D-loop will sit above this point.
Measure and cut cord: Cut approximately 4-5 inches of D-loop material. This provides enough length for the loop and knots with some excess to trim.
Position the cord: Place the center of your cord section against the bow string about 1/4 inch above your nocking point, with equal lengths extending on both sides.
Tie the bottom knot: Take one end of the cord and wrap it around the bow string 3-4 times, working away from the nocking point. Thread the end back through the wraps you just created, forming a clinch knot. Pull tight using pliers if needed.
Form the loop: Bring both cord ends together above the string to create the loop shape. The loop should be large enough to accommodate your release aid comfortably, typically 1.5 to 2 inches total.
Tie the top knot: Repeat the wrapping process with the other cord end, creating 3-4 wraps around the string above the loop. Thread the end back through and pull tight.
Trim and seal: Cut excess cord close to the knots, leaving about 1/8 inch. Carefully melt the cut ends with a lighter to prevent fraying, being careful not to damage the bow string.
Test the loop: Clip your release aid to the loop and draw the bow slowly to verify the knots hold and the loop doesn’t slide.
The key to a secure D-loop is tight, even wraps that compress against each other. Loose wraps will allow the loop to slide or rotate on the string during shooting. For proper shooting form after installing your D-loop, check out our guide on anchor points.
The best material for tying a D-loop is purpose-made braided D-loop cord, typically constructed from ultra-high-molecular-weight polyethylene (UHMWPE) fibers like Spectra or Dyneema. These materials offer exceptional strength-to-weight ratios and abrasion resistance specifically designed for the repeated stress of bow shooting.
Recommended D-loop materials:
Material characteristics to look for:
Materials to avoid:
The diameter you choose depends on your release aid. Larger release jaws work better with thicker cord (.120), while compact thumb releases may require thinner material (.090) to fit properly. Most archers find .120 diameter provides the best balance of durability and compatibility. Color choice is purely aesthetic, though bright colors make the loop easier to see in low light conditions.
A properly tied D-loop should be tight enough that it cannot slide along the bow string when pulled but not so tight that it compresses or damages the string’s serving material. When you tug on the loop with moderate hand pressure, it should remain stationary on the string without any movement.
Proper tightness indicators:
Signs your D-loop is too loose:
Signs your D-loop is too tight:
When tying the knots, pull each wrap firmly but not with maximum force. The goal is to create compression between the wraps themselves, which locks them in place, rather than crushing the underlying string. If you’re unsure, err on the side of slightly tighter, a loop that’s marginally too tight is safer than one that slides during a shot.
The D-loop should be positioned 1/8 to 1/4 inch above your arrow’s nocking point to ensure proper arrow clearance and consistent nock travel. This spacing allows the arrow to release cleanly without interference from the bottom knot of the D-loop while maintaining a level nock position.
Proper placement procedure:
Install your nocking point: Use nocking point pliers or tied nock sets to establish where your arrow sits on the string. Most setups place the arrow so it sits level or slightly nock-high (1/16 to 1/8 inch).
Measure from the nock point: Using a bow square, measure 1/8 to 1/4 inch above the top of your nocking point. This is where the bottom knot of your D-loop will sit.
Tie the bottom knot first: Secure the bottom knot at your measured position, as this is the critical reference point.
Form the loop: Create the loop portion above the bottom knot, ensuring adequate size for your release aid.
Verify clearance: Place an arrow on the string and verify the bottom D-loop knot doesn’t contact the arrow nock. There should be visible space between them.
Common placement mistakes:
The exact spacing depends on your nocking point setup and arrow nock style. Larger nocks or those with extended throats may require more clearance. After installation, shoot a few arrows and inspect for any signs of contact between the D-loop and nock, such as scuff marks or inconsistent arrow flight. For comprehensive shooting technique, explore our archery training resources.
Yes, you can tie a D-loop without a bow press because the loop attaches directly to the bow string without requiring any adjustment to the bow’s limbs or cables. Tying a D-loop is one of the simplest bow maintenance tasks that requires no specialized equipment beyond the cord itself and basic hand tools.
Why no bow press is needed:
Tools you actually need:
When you DO need a bow press:
The confusion about needing a bow press often comes from mixing up D-loop installation with full string replacement. A D-loop is tied onto your existing string while it’s still on the bow at normal tension. You can tie, replace, or adjust a D-loop in your garage, at the range, or even in the field if needed. This makes D-loop maintenance one of the most accessible aspects of bow upkeep for archers at any skill level.
The ideal D-loop size depends on your release aid type and jaw opening, but most archers use a loop with an internal opening of 1.5 to 2 inches measured from the inside of the bottom knot to the inside of the top knot. The loop must be large enough to accommodate your release jaws comfortably while remaining small enough to maintain consistent positioning.
D-loop sizing by release type:
How to measure your release:
Signs your D-loop is the wrong size:
When in doubt, slightly larger is better than too small. A loop that’s 1/4 inch larger than necessary won’t significantly affect accuracy, but a loop that’s too tight can make clipping in difficult and may cause premature wear on both the loop and your release jaws. Most archers find that a 1.75-inch loop works well with the majority of modern release aids.
Replace your D-loop every 3-6 months of regular shooting, or immediately if you notice any fraying, loosening, discoloration, or visible damage to the material. The replacement frequency depends on your shooting volume, with competitive archers who shoot daily often replacing loops monthly, while recreational hunters might go a full season.
Replacement schedule by shooting frequency:
Visual inspection checklist:
When to replace immediately:
D-loop material is inexpensive (typically under five dollars for enough cord to make multiple loops), making replacement a low-cost insurance policy against equipment failure. Many archers keep spare D-loop cord in their bow case for quick field repairs. The few minutes required to tie a fresh loop is worthwhile compared to the risk of a loop failure during a critical shot. For other essential maintenance tasks, review our guide on bow tuning.

A D-loop paired with a mechanical release is more accurate than a rope release (shooting with fingers) for compound bow shooting because it provides superior consistency, eliminates torque, and allows the bow’s mechanical advantage to be fully utilized. The D-loop creates an identical attachment point for every shot, while finger releases introduce variables in pressure, angle, and release timing.
Accuracy advantages of D-loop with mechanical release:
When rope/finger release might be preferred:
The accuracy difference is measurable and significant. Most compound bow archers can achieve tighter groups with a mechanical release and D-loop compared to shooting with fingers, particularly at longer distances beyond 30 yards. The mechanical release eliminates the finger-induced string deflection that occurs when fingers roll off the string during release.
However, accuracy also depends on proper technique. A poorly executed mechanical release can still produce bad shots, while a skilled finger shooter can achieve impressive accuracy. For most compound bow applications, especially hunting and target competition, the D-loop and mechanical release combination is the standard setup. To improve your release technique, see our guide on how to stop punching the trigger.
D-loops typically break due to using inadequate material, over-tightening the knots, improper release aid technique, or shooting beyond the loop’s service life. If your D-loop breaks repeatedly, you’re likely experiencing one of several common issues that can be corrected with proper setup and maintenance.
Common causes of D-loop failure:
Wrong material: Using paracord, fishing line, or other non-archery cord that lacks the necessary strength and abrasion resistance
Worn-out loop: Continuing to shoot with a loop that shows visible wear, fraying, or damage
Sharp release jaws: Burrs or sharp edges on release aid jaws that cut into the loop material with each shot
Excessive draw weight: Shooting draw weights that exceed the loop material’s capacity (rare with proper D-loop cord)
Punching the trigger: Aggressive trigger activation that creates shock loading on the loop rather than smooth back tension
UV damage: Prolonged sun exposure degrading the cord material
Improper knot tying: Loose or incorrectly tied knots that create weak points
Solutions to prevent breaking:
If you’ve addressed these factors and still experience breaks, have a qualified archery technician inspect your bow setup. Occasionally, issues like excessive cam lean, string angle problems, or release aid alignment can create unusual stress on the D-loop. A loop should easily last hundreds of shots when properly installed and maintained.
You cannot effectively repair a frayed D-loop, the only safe solution is complete replacement. Once D-loop material begins to fray, the structural integrity is compromised, and attempting to seal or repair the frayed section creates an unreliable weak point that can fail during a critical shot.
Why repair doesn’t work:
Proper response to a frayed D-loop:
Temporary field fix (emergency only):
If you’re hunting or at a remote location without replacement cord, you can carefully melt the frayed fibers with a lighter to temporarily seal them. This is only a short-term emergency measure to complete your current session, replace the loop before your next shooting session.
Prevention strategies:
D-loop cord is inexpensive and replacement takes only minutes, making preventive replacement far superior to attempting repairs. Many experienced archers tie a fresh loop at the start of each season or after every few hundred shots as standard maintenance, never waiting for visible wear to appear.
The most common mistakes when tying a D-loop include incorrect placement relative to the nocking point, tying knots too loose, using inadequate material, and failing to properly seal the cord ends. These errors compromise accuracy, equipment safety, and loop longevity.
Critical mistakes to avoid:
Placing the loop too close to the nock: Creates contact between the bottom knot and arrow nock, causing erratic flight and potential nock damage. Always maintain 1/8 to 1/4 inch clearance.
Loose knots: Insufficient tension when tying allows the loop to slide on the string during shooting. Pull each wrap firmly and use pliers if needed to achieve proper tightness.
Using wrong material: Paracord, utility cord, or fishing line lack the strength and abrasion resistance needed. Only use purpose-made D-loop cord.
Inconsistent wrap count: Using different numbers of wraps on the top and bottom knots creates uneven strength. Use 3-4 wraps on both knots.
Cutting cord too short: Not leaving enough material to complete both knots properly. Start with 4-5 inches of cord to ensure adequate length.
Failing to seal ends: Not melting the cut cord ends allows fraying to begin immediately. Always carefully melt ends with a lighter.
Wrong loop size: Making the loop too small for your release aid or unnecessarily large. Measure your release jaws and add 1/4 to 1/2 inch.
Ignoring serving damage: Tying a new loop over damaged serving material. Inspect and repair serving before installing a fresh loop.
Over-tightening: Crushing the serving material underneath the knots by pulling with excessive force. Firm tension is needed, not maximum force.
Skipping the test draw: Not verifying the loop holds before shooting at full power. Always test with a slow, controlled draw first.
Best practices for success:
Most archers make several imperfect loops before developing consistent technique. If you’re uncertain about your first attempt, many archery pro shops will tie a D-loop for a minimal fee (typically five to ten dollars) and you can observe their technique for future reference. For additional shooting fundamentals, explore our resources on beginner archery.
Can I use the same D-loop for different release aids?
Yes, you can use the same D-loop with different release aids as long as all your releases fit comfortably within the loop opening. Most standard D-loops sized at 1.75 inches accommodate the majority of wrist strap, thumb, and handheld releases. If you switch between a very small and very large release, you may need to adjust loop size.
Does D-loop color affect performance?
No, D-loop color has no effect on performance, it’s purely aesthetic. However, bright colors like neon yellow, orange, or pink make the loop easier to see in low-light hunting conditions, while darker colors are less visible to game animals. Choose based on your preference and shooting conditions.
Can I tie a D-loop on a recurve bow?
Yes, you can tie a D-loop on a recurve bow if you’re using a mechanical release aid, though this is uncommon in traditional recurve shooting. Most recurve archers shoot with fingers directly on the string. If you do use a release with a recurve, the D-loop tying process is identical to compound bows.
How do I know if my D-loop is positioned correctly?
Your D-loop is positioned correctly if the bottom knot sits 1/8 to 1/4 inch above your nocking point with no contact between the knot and arrow nock, and your arrow sits level or slightly nock-high when measured with a bow square. After shooting, inspect for any scuff marks on the nock that would indicate contact.
Can a D-loop cause accuracy problems?
Yes, a poorly installed or worn D-loop can cause accuracy problems. A loop that slides on the string creates inconsistent release points, while a loop that’s too tight or positioned incorrectly can affect nock travel. A properly tied, well-maintained D-loop should improve accuracy by providing consistency.
What’s the difference between D-loop material brands?
Different D-loop material brands use similar UHMWPE fiber construction but may vary in coating, color selection, and exact diameter. BCY and Brownell are the most trusted brands in archery. Performance differences between quality brands are minimal, any purpose-made D-loop cord from a reputable manufacturer will perform well.
Should I wax my D-loop?
No, you should not apply bowstring wax to your D-loop. The braided material doesn’t require wax, and applying it can attract dirt and debris that accelerates wear. Keep your D-loop clean and dry, replacing it when it shows signs of wear rather than attempting to maintain it with wax.
Can I tie a D-loop while the bow is strung?
Yes, you tie a D-loop while the bow is strung, in fact, this is the only way to do it. The bow remains at normal string tension throughout the process. You never need to unstring or press the bow to install or replace a D-loop.
How much does professional D-loop installation cost?
Professional D-loop installation at an archery pro shop typically costs between five and fifteen dollars, including materials. Many shops offer free installation if you purchase the D-loop cord from them. Given the low cost and quick service, professional installation is a good option if you’re uncertain about doing it yourself.
Will a D-loop work with a thumb release?
Yes, D-loops work excellently with thumb releases. In fact, many thumb release users prefer D-loops because they provide a consistent attachment point that complements the thumb release’s precision. Ensure your loop is sized appropriately for your specific thumb release head dimensions.
Can I adjust D-loop size after tying it?
No, you cannot adjust D-loop size after tying, you must cut off the old loop and tie a new one at the desired size. This is why it’s important to measure your release aid and determine the correct size before tying. Keep spare cord available for re-ties if your first attempt isn’t the right size.
Does a D-loop add weight to my bow?
Yes, but the weight is negligible, typically less than 5 grams (0.2 ounces). This minimal weight addition has no measurable effect on bow performance, arrow speed, or accuracy. The consistency benefits of a D-loop far outweigh any theoretical weight concern.
Learning how to tie a D-loop is an essential skill for any compound bow archer using a mechanical release aid. This simple but critical component provides the consistency, equipment protection, and accuracy advantages that separate casual shooting from precision archery. By following the step-by-step process outlined in this guide, using proper materials, achieving correct placement, and tying secure knots, you can install a reliable D-loop in less than ten minutes without any specialized tools or bow press.
Remember the key principles: position your loop 1/8 to 1/4 inch above the nocking point, use purpose-made D-loop cord, tie knots with firm but not excessive tension, and replace your loop every 3-6 months or at the first sign of wear. Avoid common mistakes like using inadequate materials, positioning the loop incorrectly, or continuing to shoot with a frayed loop.
Take action now:
With proper installation and regular maintenance, your D-loop will provide thousands of consistent, accurate shots. Master this fundamental skill to take control of your equipment maintenance and ensure your bow is always ready to perform when it matters most. For continued improvement in your archery journey, explore additional resources on compound bow techniques and target archery fundamentals.


