
Newsletter Subscribe
Enter your email address below and subscribe to our newsletter

All voices matter
All voices matter

 ByTravis
Trigger punching is jerking the release instead of applying steady pressure - fix it with dry-fire drills, the ball-and-dummy drill, and training for a surprise break.
Affiliate Disclaimer: We are a participant in the Amazon Services LLC Associates Program, an affiliate advertising program designed to provide a means for sites to earn advertising fees by advertising and linking to Amazon.com. As an Amazon Associate I earn from qualifying purchases. We also participate in other affiliate programs.
Punching the trigger is a common shooting flaw where an archer jerks or slaps the release trigger instead of applying smooth, steady pressure. To stop punching the trigger, practice dry firing with proper back tension, use the ball-and-dummy drill to identify flinching, focus on surprise breaks, and train your subconscious to execute a controlled release through repetition. Most archers see measurable improvement within 2-4 weeks of dedicated daily practice.

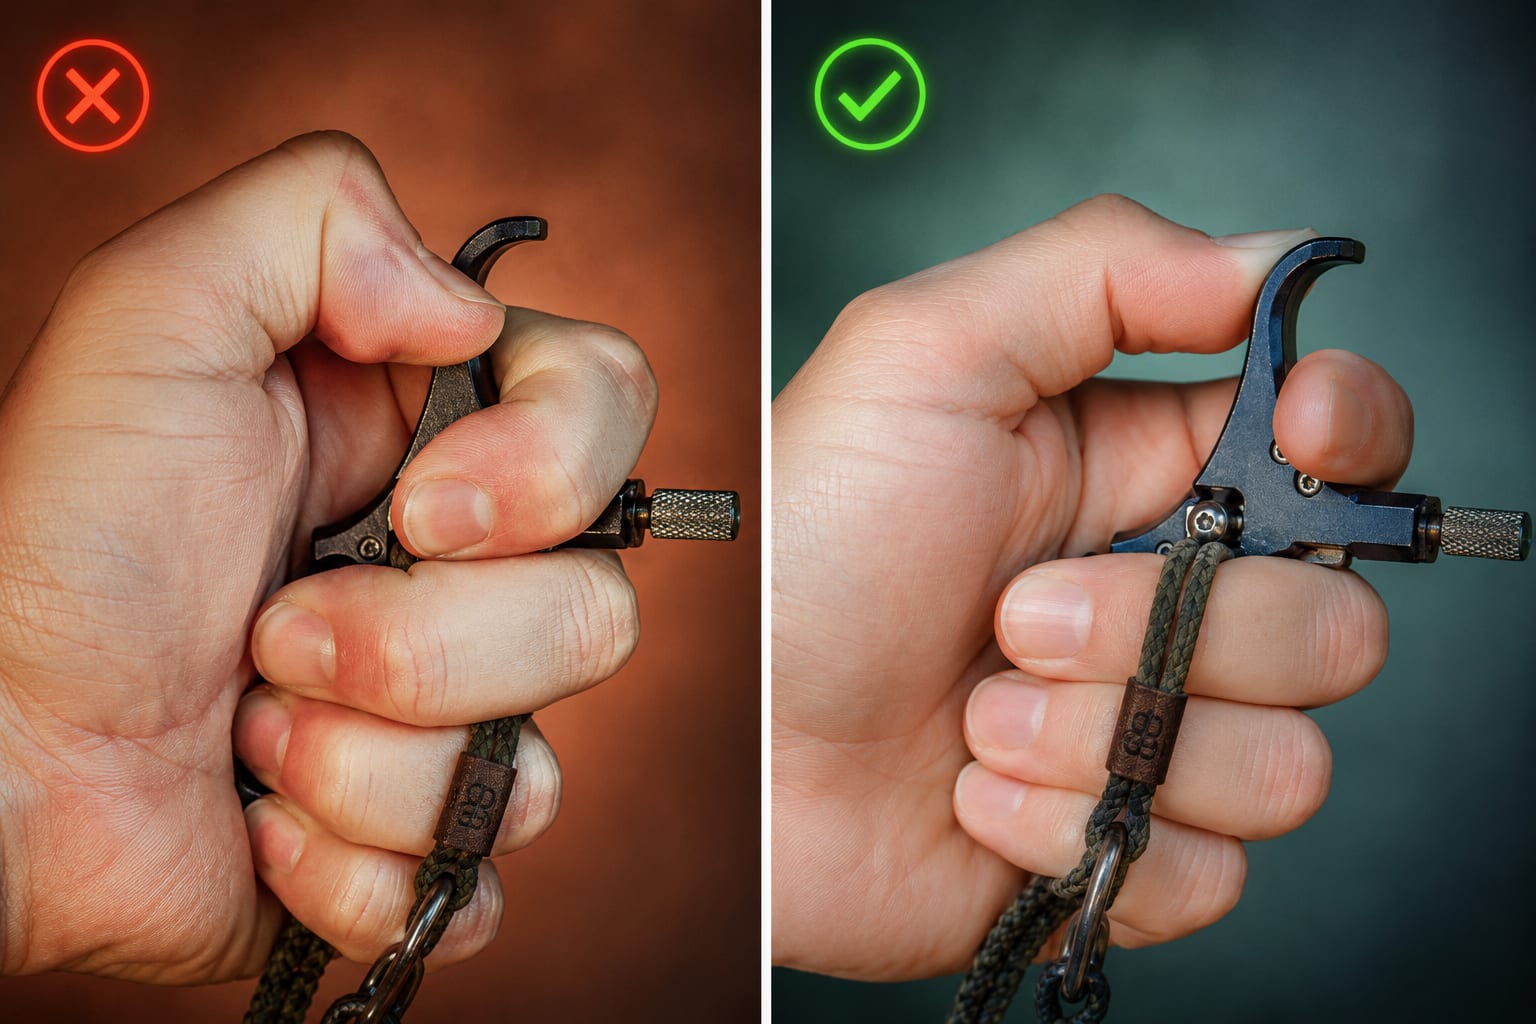
Punching the trigger refers to the act of consciously and abruptly activating the release mechanism with a quick finger movement rather than allowing the shot to break naturally through steady back tension. This flaw occurs when an archer anticipates the moment of release and commands their trigger finger to fire, creating a jerking motion that disrupts bow stability and arrow flight.
The problem stems from the archer’s conscious mind trying to control the exact moment of release. When you punch the trigger, your brain sends a signal to your finger to move quickly, which simultaneously causes micro-movements in your bow hand, shoulder, and entire upper body. These movements occur in the milliseconds before and during arrow release, when the bow is most sensitive to disturbance.
Common characteristics of trigger punching include:
Trigger punching often develops alongside target panic, a psychological condition where archers feel unable to hold their sight pin on target or control when the shot breaks. The two issues reinforce each other: anxiety about aiming leads to punching the trigger to “get the shot over with,” which produces poor results that increase anxiety.
You can identify trigger punching through several diagnostic methods, with the most reliable being the ball-and-dummy drill and video analysis of your shooting form. If you’re punching the trigger, you’ll notice your pin or sight picture jumping significantly at the moment of release, and your groups will show vertical and horizontal stringing rather than tight clusters.
Self-assessment indicators:
The ball-and-dummy drill provides definitive proof of trigger punching. Have a coach or friend randomly load your quiver with some arrows and some empty nocks (or occasionally hand you an unloaded bow). Draw and execute your shot without knowing whether an arrow will fire. If you’re punching the trigger, you’ll see obvious jerking motion on the dummy shots when nothing releases, revealing the flinch you’ve been masking with actual arrow flight.
Video analysis offers another diagnostic tool. Record yourself shooting from a side angle that captures your release hand, shoulder, and bow arm. Play back the footage in slow motion and watch for these red flags: sudden finger movement, hand tension visible through white knuckles, forward bow arm movement at release, or shoulder collapse just before the shot breaks.
Dry firing without an arrow allows you to focus entirely on trigger control mechanics without the distraction, cost, or target anxiety associated with live shooting. Practice dry firing for 15-20 minutes daily, executing 30-50 repetitions with perfect form, and you’ll retrain your neural pathways to execute smooth releases within 2-3 weeks.
Proper dry fire technique:
Use a designated dry fire bow or release – Never dry fire a compound bow without a proper dry fire system, as releasing without an arrow can damage limbs and cams. Use a bow specifically designed for dry firing, a resistance band training system, or a bow with a draw stop that prevents full release.
Focus on back tension – At full draw, concentrate on pulling your shoulder blades together rather than thinking about your trigger finger. Imagine squeezing a tennis ball between your shoulder blades, gradually increasing pressure until the release activates.
Aim at a blank wall or target – Remove the pressure of hitting a bullseye by practicing on a featureless surface. This eliminates target panic triggers and lets you concentrate purely on execution.
Let the shot surprise you – The release should break as a natural consequence of increasing back tension, not because you decided to fire. You should feel slightly surprised each time the trigger activates.
Hold your follow-through – After the release clicks, maintain your anchor point and back tension for 2-3 seconds. This prevents anticipatory collapse and reinforces proper form.
Progressive dry fire program:
The key advantage of dry fire practice is volume. You can execute 50 perfect repetitions in 20 minutes, building muscle memory far faster than shooting arrows at a range where you might only take 30-40 shots in an hour while dealing with arrow retrieval, scoring, and other distractions.
The ball-and-dummy drill exposes flinching and trigger anticipation by randomly introducing shots where nothing happens, revealing the involuntary movements you make in anticipation of release. This drill works because your subconscious flinch response occurs whether an arrow fires or not, making the problem visible when the expected recoil doesn’t mask it.
How to execute the drill:
Prepare mixed shots – Have a coach, training partner, or friend randomly hand you arrows or empty nocks without you knowing which is which. Alternatively, they can randomly tell you “live” or “blank” after you’ve drawn but before you’ve settled into your aim.
Shoot your normal process – Execute each shot exactly as you would in competition. Don’t change your technique or try to “be extra careful” because you’re being tested.
Observe the blank shots – On shots where no arrow releases (or where you’re told “blank” and should let down), watch for jerking, flinching, or punching movements. These reveal what your body does on every shot, masked by arrow flight on live rounds.
Identify specific movements – Common flinch patterns include: trigger finger jerking, bow arm dropping or pushing forward, release hand pulling back toward your face, shoulder collapsing forward, or head lifting off the string.
Interpreting results:
Run this drill weekly during your practice sessions, even after you’ve corrected trigger punch. The drill serves as both diagnostic tool and training exercise, keeping your subconscious honest about release execution. Many competitive archers incorporate 5-10 ball-and-dummy shots into every practice session as preventive maintenance.

Beginners should start with resistance band training, blank bale shooting at 2-3 yards, and the “surprise break” drill to build proper trigger control habits before bad patterns become ingrained. These exercises establish the fundamental feeling of back tension-driven releases without the complexity of aiming at distance or scoring pressure.
Resistance band training:
Use a bow-specific resistance band or exercise band anchored to a wall. Practice your full draw cycle, anchor, and release 20-30 times daily. The band provides resistance similar to your bow’s holding weight but eliminates the mechanical complexity and danger of dry firing. Focus entirely on smooth trigger activation through increasing back tension, not finger movement.
Blank bale shooting (2-3 yards):
Stand 2-3 yards from a large target butt with no target face visible. Shoot 20-30 arrows focusing exclusively on execution, not arrow placement. At this distance, arrows will group tightly regardless of minor form flaws, removing the anxiety of “missing” and letting you concentrate on feeling the proper release sequence. Close your eyes for some shots to eliminate visual input and heighten proprioceptive awareness.
Surprise break drill:
At full draw, aim at your target and gradually increase back tension while telling yourself “I will not release this arrow.” Continue pulling through your back until the release triggers despite your mental intention not to shoot. This drill breaks the conscious command pattern that causes trigger punching. The shot should genuinely surprise you each time.
Counting drill:
Draw your bow and count slowly from one to ten while maintaining back tension and aim. The release should break randomly somewhere during your count, not on a predetermined number. If you consistently release on the same count, you’re still commanding the shot. Vary your counting speed and occasionally count backward to prevent pattern development.
Progressive distance training:
Beginners who invest 3-4 weeks in these foundational exercises before progressing to scored shooting at distance develop significantly better trigger control than those who immediately start shooting for score at 20+ yards.
Right-handed archers who consistently hit low and left are typically punching the trigger combined with collapsing their bow arm or front shoulder at release. The leftward component comes from the jerking trigger finger pulling the release and string slightly left, while the low impact results from dropping the bow arm or collapsing posture in anticipation of the shot.
Mechanical explanation:
When you punch the trigger, your release hand jerks backward and slightly outward (away from your face). This movement pulls the string off its ideal release path, imparting a slight leftward rotation to the arrow. Simultaneously, anticipating the shot causes many archers to relax their bow arm or front shoulder microseconds before release, dropping the bow and sending arrows low.
For left-handed archers, the pattern reverses: trigger punching produces low-right impacts because the mechanics mirror in the opposite direction.
Diagnostic test:
Shoot a group at 20 yards with your normal form, then shoot another group while consciously exaggerating your back tension and holding your bow arm firm through follow-through. If the second group moves up and right (toward center), trigger punch and bow arm collapse are your primary issues.
Correction strategy:
Some archers also pull low-left due to poor anchor point consistency or peeping through the wrong part of their peep sight, so verify your basic form fundamentals are solid before assuming trigger punch is the sole culprit.
Trigger squeeze refers to gradually increasing pressure on the trigger through back tension until the release breaks, while trigger pull describes consciously commanding your finger to activate the trigger at a chosen moment. Proper archery technique requires trigger squeeze driven by back tension, not conscious trigger pull, because the squeeze method eliminates anticipatory movements that degrade accuracy.
Trigger squeeze characteristics:
Trigger pull characteristics:
The distinction matters because your conscious mind cannot execute precise motor control at the millisecond level required for clean arrow release. When you consciously pull the trigger, you inevitably introduce micro-movements in your bow hand, shoulders, and core that occur faster than your conscious mind can detect but slow enough to disrupt arrow flight.
Training the squeeze:
Think of your trigger finger as passive rather than active. It simply rests on the trigger while your back muscles do the work. As you pull your shoulder blades together, your release hand naturally moves backward, which gradually increases trigger pressure until the mechanical threshold is reached and the release fires. Your finger never “does” anything; it merely transmits the force generated by your back.
Many coaches use the analogy of a surprise break in rifle shooting: you know the shot will break soon, but the exact instant surprises you because you’re not consciously controlling it. This mental model helps archers transition from conscious trigger pulling to subconscious trigger squeezing.
Most archers see measurable improvement in trigger control within 2-4 weeks of dedicated daily practice, with complete habit replacement typically requiring 6-8 weeks of consistent work. The timeline varies based on how deeply ingrained the bad habit is, how much quality practice you invest daily, and whether you’re simultaneously dealing with target panic or other psychological barriers.
Realistic timeline:
Factors that accelerate progress:
Factors that slow progress:
Maintenance requirements:
Even after successfully correcting trigger punch, periodic maintenance is necessary. Most competitive archers incorporate 5-10 minutes of dry fire practice or blank bale shooting into their weekly routine to prevent regression. Trigger punch can resurface during high-stress competitions, after breaks from shooting, or when experimenting with new equipment.
A lighter trigger pull weight can improve accuracy for archers who have already mastered proper trigger control, but it will worsen trigger punch problems for those still learning to execute clean releases. The optimal trigger weight balances sensitivity for surprise breaks against enough resistance to prevent accidental or jerky activation.
Trigger weight considerations:
Most compound bow releases offer trigger pull weights ranging from a few ounces to several pounds. Competition target archers often use very light triggers (2-6 ounces) because they’ve trained their trigger control to the point where minimal pressure produces clean breaks. Hunting archers typically prefer heavier triggers (8-16 ounces) to prevent accidental releases in cold weather with gloves or during high-adrenaline situations.
For archers fighting trigger punch: Start with a heavier trigger setting (12-16 ounces). The additional resistance forces you to use proper back tension rather than finger movement to activate the release. As your technique improves over 4-6 weeks, gradually reduce trigger weight in small increments (1-2 ounces at a time), verifying your form remains solid at each adjustment.
For experienced archers with good control: Lighter triggers (4-8 ounces) allow for more surprise breaks and less conscious effort to activate the release. The reduced resistance means back tension naturally triggers the shot without requiring excessive pulling force that might disturb bow stability.
Warning signs your trigger is too light:
Warning signs your trigger is too heavy:
The trigger weight itself doesn’t create accuracy; proper technique does. A quality release with adjustable trigger tension helps, but focus 90% of your effort on training proper execution and only 10% on equipment optimization.
Experienced shooters can develop or redevelop trigger punch during high-pressure competitions, after extended breaks from shooting, when switching to new release aids, or when dealing with performance anxiety. Even Olympic-level archers occasionally struggle with trigger control issues, though they typically recognize and correct problems faster than beginners due to their deeper understanding of proper technique.
Common scenarios for experienced archers:
Competition pressure: The psychological stress of important tournaments can cause even seasoned competitors to revert to conscious trigger control, trying to “make sure” they execute the shot perfectly. This conscious interference often produces the exact trigger punch they’re trying to avoid.
Equipment changes: Switching to a new release aid with different trigger geometry, weight, or sensitivity can temporarily disrupt established motor patterns. Experienced archers need 1-2 weeks of focused practice to fully adapt to new equipment.
Extended breaks: Taking several weeks or months off from shooting allows trigger punch habits to creep back in, especially if the archer had previously struggled with the issue. Muscle memory for proper technique degrades faster than many archers expect.
Target panic recurrence: Experienced archers who develop or redevelop target panic often simultaneously develop trigger punch as a coping mechanism. The two issues feed each other in a negative cycle that requires deliberate intervention to break.
Prevention strategies for experienced archers:
The advantage experienced archers have is recognition speed. Where a beginner might shoot poorly for weeks without identifying trigger punch as the cause, an experienced archer typically recognizes the problem within one or two practice sessions and knows exactly which drills to employ for correction.
The most common mistake archers make when correcting trigger punch is continuing to shoot scored rounds at distance instead of stepping back to fundamental drills at close range. Other frequent errors include practicing with poor technique (reinforcing bad habits), expecting immediate results, and focusing on equipment changes rather than skill development.
Mistake 1: Shooting for score too soon
Archers want to see their groups improve immediately, so they continue shooting scored rounds at 20-40 yards while trying to implement new technique. This approach fails because the pressure of scoring and the feedback of arrow placement trigger the same anxiety and conscious control that caused trigger punch originally. Instead, spend 2-3 weeks on blank bale shooting and dry fire before returning to scored rounds.
Mistake 2: Inconsistent practice
Shooting 200 arrows on Saturday doesn’t build muscle memory as effectively as shooting 30 arrows daily for a week. Neural pathway development requires consistent repetition over time, not high-volume sporadic practice. Commit to 15-20 minutes daily rather than occasional marathon sessions.
Mistake 3: Practicing the wrong thing
If you practice trigger punch with poor technique, you’re simply reinforcing the bad habit faster. Every repetition matters. One properly executed shot with perfect back tension and surprise break is worth more than ten shots where you revert to punching the trigger. Quality trumps quantity.
Mistake 4: Ignoring the mental component
Trigger punch is often a symptom of target panic, performance anxiety, or other psychological issues. Addressing only the mechanical aspects without working on the mental side produces limited results. Consider working with a sports psychologist or mental performance coach if anxiety is a significant factor.
Mistake 5: Blaming equipment
While a quality release aid helps, buying a new release won’t fix trigger punch caused by poor technique. Many archers waste money on equipment upgrades when they need skill development. Master proper trigger control with your current equipment before considering upgrades.
Mistake 6: Skipping video analysis
You can’t fix what you can’t see. Many archers think they’re executing proper technique when video reveals obvious trigger punch. Record yourself regularly and compare your actual form to your mental image of your form. The discrepancy is often surprising and enlightening.
Mistake 7: Giving up too soon
Habit replacement takes time. Many archers practice correctly for 1-2 weeks, don’t see dramatic improvement, and conclude “it’s not working.” Trust the process. If you’re executing proper technique during practice, improvement will come. The timeline is 4-6 weeks for most archers, not 4-6 days.
A poorly designed or malfunctioning release trigger can contribute to trigger punch by requiring excessive force, providing inconsistent break points, or creating unpredictable activation. However, equipment issues account for less than 20% of trigger punch cases; the vast majority stem from technique and psychological factors rather than hardware problems.
Trigger characteristics that encourage punching:
Diagnostic test:
Borrow or rent a different release aid (preferably a high-quality model known for crisp, consistent triggers) and shoot 20-30 arrows. If your trigger punch immediately improves, your equipment may be contributing to the problem. If the issue persists unchanged, technique is the primary culprit.
When to consider equipment changes:
Quality release characteristics:
Even with a perfect release aid, you must still train proper technique. Equipment provides the platform for good shooting, but skill development produces results. Invest 80% of your effort in training and 20% in equipment optimization, not the reverse.
Home-based trigger control training using resistance bands, dry fire systems, and mental rehearsal can be as effective as range practice for correcting trigger punch. These at-home drills eliminate travel time, range fees, and weather dependencies, allowing for consistent daily practice that builds muscle memory faster than sporadic range sessions.
Resistance band training system:
Purchase an archery-specific resistance band system or use a heavy-duty exercise band anchored to a door frame or wall. These systems simulate your bow’s draw weight and holding weight, allowing full draw cycles and release practice. Execute 30-50 repetitions daily, focusing exclusively on smooth trigger activation through back tension. The band provides immediate feedback: if you punch the trigger, you’ll feel the jerking motion clearly.
Dry fire release trainer:
Several manufacturers offer release trainers designed specifically for at-home practice. These devices provide realistic trigger feel and resistance without requiring a bow. Practice your anchor, aim (at a spot on the wall), and release sequence. The advantage over resistance bands is portability; you can practice while watching TV or during work breaks.
Mental rehearsal and visualization:
Spend 10-15 minutes daily visualizing perfect shot execution. Sit quietly, close your eyes, and mentally rehearse your entire shot sequence in vivid detail: drawing the bow, settling into anchor, feeling your back tension increase, experiencing the surprise break, and holding your follow-through. Neuroscience research shows that detailed mental practice activates similar neural pathways as physical practice, reinforcing proper motor patterns.
Mirror work:
Stand in front of a mirror with your release aid and practice your hand position, anchor point, and trigger finger placement. While you can’t execute full releases, you can verify your setup and practice the feeling of increasing back tension while maintaining proper hand position. This drill builds awareness of tension patterns and hand positioning.
Finger strength and independence training:
Use grip strengtheners or finger exercise tools to build the specific muscles involved in trigger control. Strong, independent finger control allows you to activate the trigger smoothly without recruiting other muscles that create tension and jerking. Practice isolating your trigger finger movement while keeping other fingers relaxed.
Progressive relaxation practice:
Trigger punch often involves excess tension throughout the hand, arm, and shoulder. Practice progressive muscle relaxation: tense each muscle group for 5 seconds, then release and notice the difference. This trains your awareness of tension and your ability to maintain relaxation in non-essential muscles while activating only the specific muscles needed for back tension.
Structured at-home program:
Archers who commit to this type of structured at-home program often see faster improvement than those who only practice during weekly range sessions, because daily repetition builds neural pathways more effectively than sporadic high-volume practice.
How quickly can I fix trigger punch?
Most archers see noticeable improvement within 2-4 weeks of daily focused practice, with complete habit replacement typically requiring 6-8 weeks. The timeline depends on how ingrained the bad habit is and how consistently you practice proper technique.
Can trigger punch come back after I’ve fixed it?
Yes, trigger punch can resurface during high-pressure competitions, after extended breaks from shooting, or when dealing with target panic. Maintain regular dry fire practice and periodic ball-and-dummy drills to prevent regression.
Should I use a thumb release or wrist release for better trigger control?
Both release styles can produce excellent trigger control when used properly. Thumb releases (handheld) often encourage better back tension naturally, while wrist releases provide more consistency for some archers. Choose based on comfort and shooting style, not as a fix for trigger punch.
Is trigger punch the same as target panic?
No, but they’re closely related. Target panic is a psychological condition involving anxiety about aiming and shot execution, while trigger punch is the mechanical flaw of jerking the trigger. Target panic often causes trigger punch as a symptom, and fixing one usually requires addressing both.
Do I need a coach to fix trigger punch?
While not strictly necessary, a qualified coach accelerates improvement by providing immediate feedback, identifying subtle form issues you can’t see yourself, and keeping you accountable to proper practice. Many archers successfully self-correct using video analysis and structured drills.
Should I lower my draw weight to fix trigger punch?
Lowering draw weight can help if you’re struggling to maintain back tension due to fatigue or insufficient strength. However, most trigger punch cases aren’t caused by excessive draw weight. Focus on technique first, and only reduce draw weight if you’re genuinely struggling to hold at full draw.
Can I compete while working on trigger control?
You can, but competition pressure often causes regression to old habits. Consider taking 4-6 weeks away from scored competitions to focus on fundamentals, or treat early competitions as practice opportunities where you prioritize execution over results.
What’s the difference between punching and plucking the trigger?
Punching refers to jerking the trigger with your finger, while plucking describes pulling your entire release hand away from your face at the moment of release. Both are forms of anticipatory movement that degrade accuracy, and both respond to similar training methods.
How do I know if my trigger weight is set correctly?
Your trigger should be light enough to activate through back tension without excessive force, but heavy enough that you don’t experience accidental releases. Most target archers use 4-8 ounces, while hunters prefer 8-16 ounces. Adjust based on your control and comfort level.
Will a back tension release eliminate trigger punch?
Back tension releases (which fire automatically when you achieve sufficient back tension) can help retrain proper mechanics, but they’re not a magic solution. Some archers simply learn to punch back tension releases differently. They’re a useful training tool but not a substitute for proper technique development.
Can I practice trigger control without a bow?
Yes, resistance band systems, dry fire trainers, and mental rehearsal all provide effective trigger control practice without requiring a bow. These methods often produce faster improvement than range practice because they allow higher repetition volume and eliminate distractions.
Why does my trigger punch get worse under pressure?
Stress and anxiety cause your conscious mind to try to control the shot more tightly, overriding the subconscious motor patterns you’ve trained. This conscious interference manifests as trigger punch. Mental training and competition simulation practice help maintain technique under pressure.
Stopping trigger punch requires understanding the mechanical and psychological factors that cause the problem, then systematically retraining your neural pathways through focused practice. The key is shifting from conscious trigger pulling to subconscious trigger squeezing driven by back tension, allowing the shot to break as a surprise rather than a commanded action.
Start with diagnostic tools like the ball-and-dummy drill and video analysis to confirm trigger punch is your issue and understand its specific manifestation in your shooting. Then commit to a structured training program emphasizing dry fire practice, blank bale shooting, and back tension drills for 15-20 minutes daily. Most archers see measurable improvement within 2-4 weeks and achieve reliable trigger control within 6-8 weeks.
Your action plan:
Remember that trigger punch is a learned behavior, which means it can be unlearned through proper training. The timeline requires patience, but the improvement in accuracy and consistency makes the investment worthwhile. Focus on process over results during the correction phase, trusting that proper technique will produce better scores once the fundamentals are solid.


