Newsletter Subscribe
Enter your email address below and subscribe to our newsletter

All voices matter
All voices matter
 ByTravis
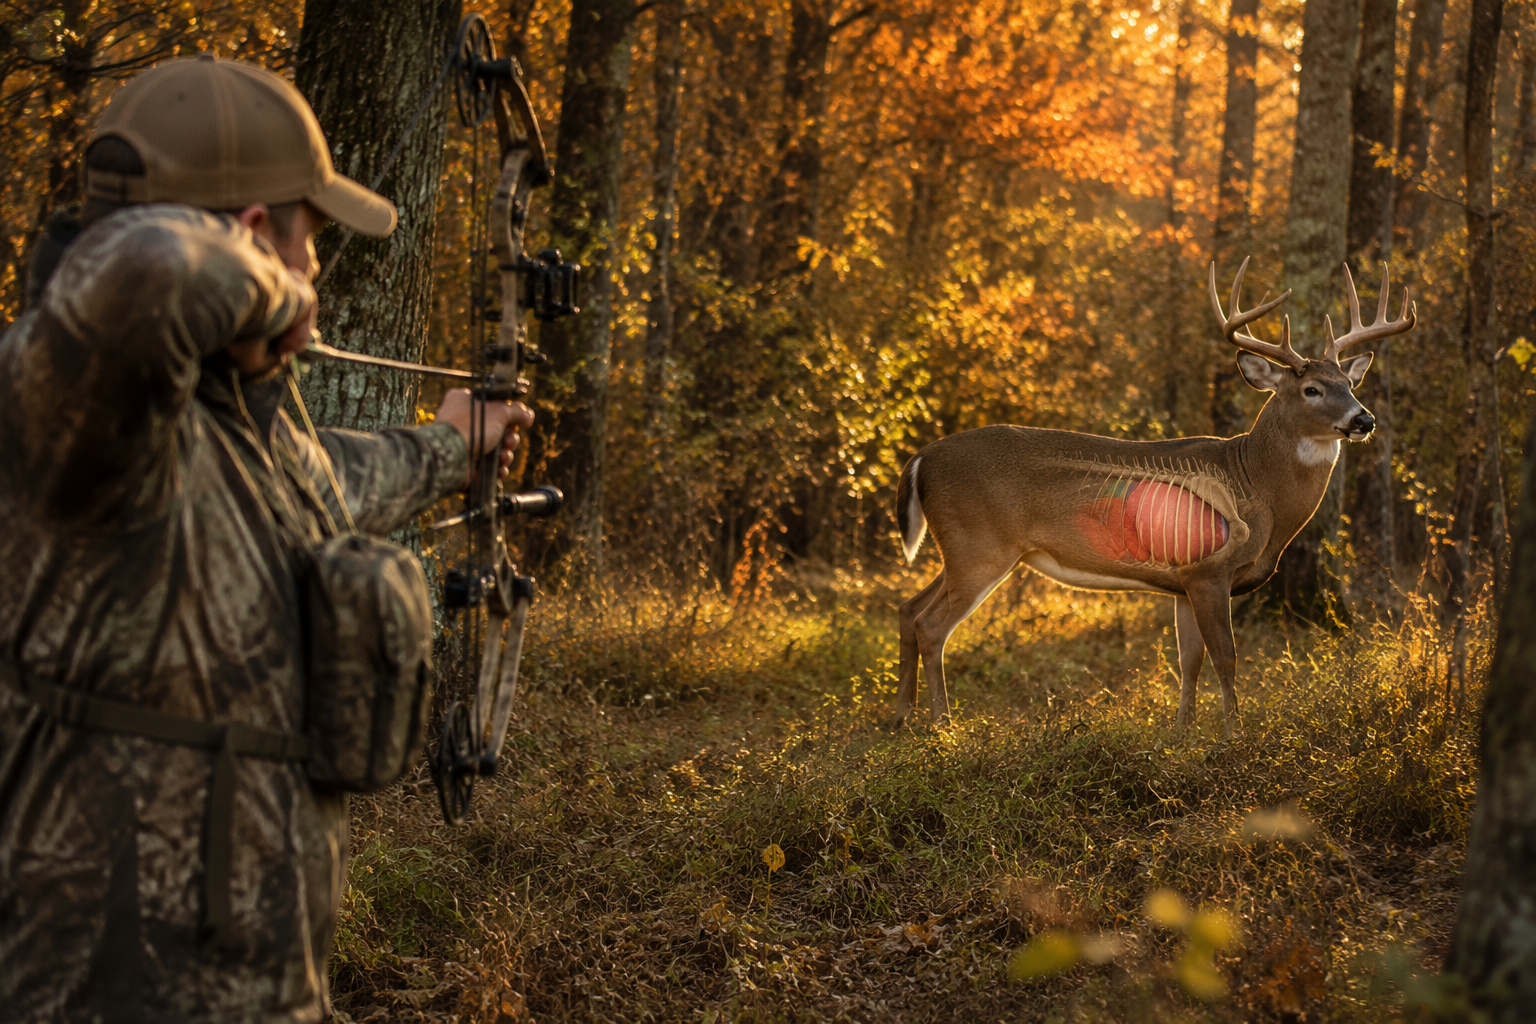
Aim for the vital zone in the lower third of the chest cavity, just behind the front shoulder - about 4-6 inches behind the front leg crease on a broadside deer.
Affiliate Disclaimer: We are a participant in the Amazon Services LLC Associates Program, an affiliate advertising program designed to provide a means for sites to earn advertising fees by advertising and linking to Amazon.com. As an Amazon Associate I earn from qualifying purchases. We also participate in other affiliate programs.
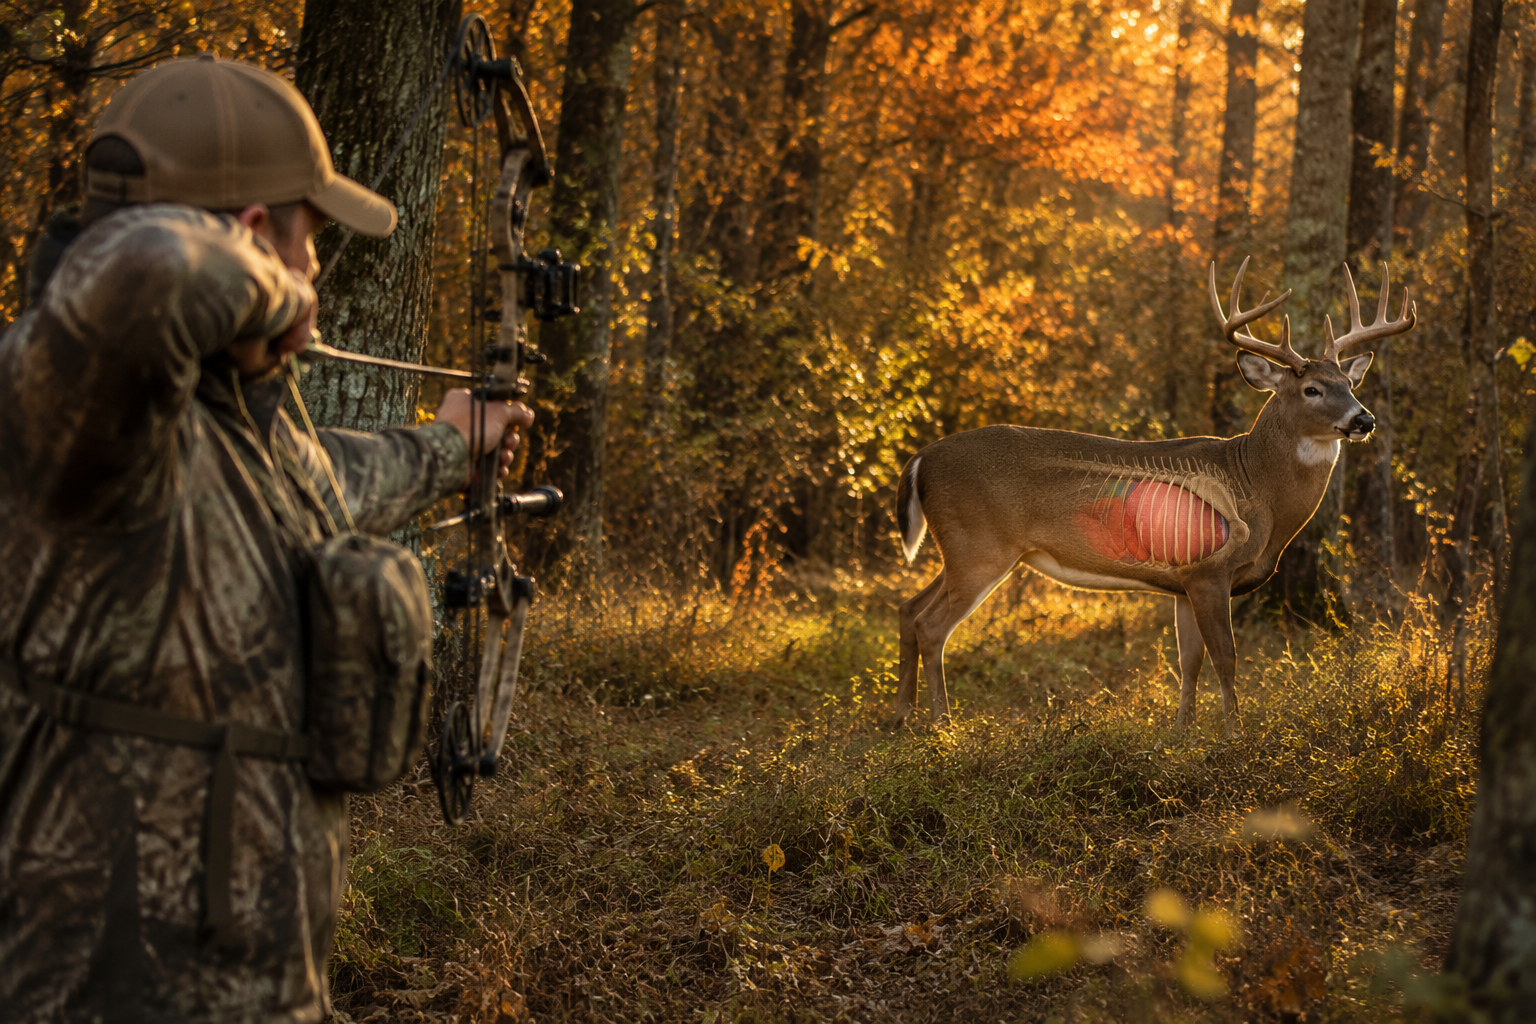
Quick Answer: When bowhunting deer, aim for the vital zone located in the lower third of the chest cavity, just behind the front shoulder. The ideal aiming point on a broadside deer is approximately 4-6 inches behind the crease of the front leg, centered vertically between the chest line and back line. This placement targets both lungs and potentially the heart, ensuring the quickest, most ethical kill.
The best shot placement for bowhunting deer targets the vital zone containing the heart and lungs, located in the lower third of the chest cavity directly behind the front shoulder. This area provides the largest margin for error while ensuring a quick, ethical kill. A well-placed arrow through both lungs typically results in death within 30-60 seconds as the deer experiences rapid blood pressure loss and oxygen deprivation.
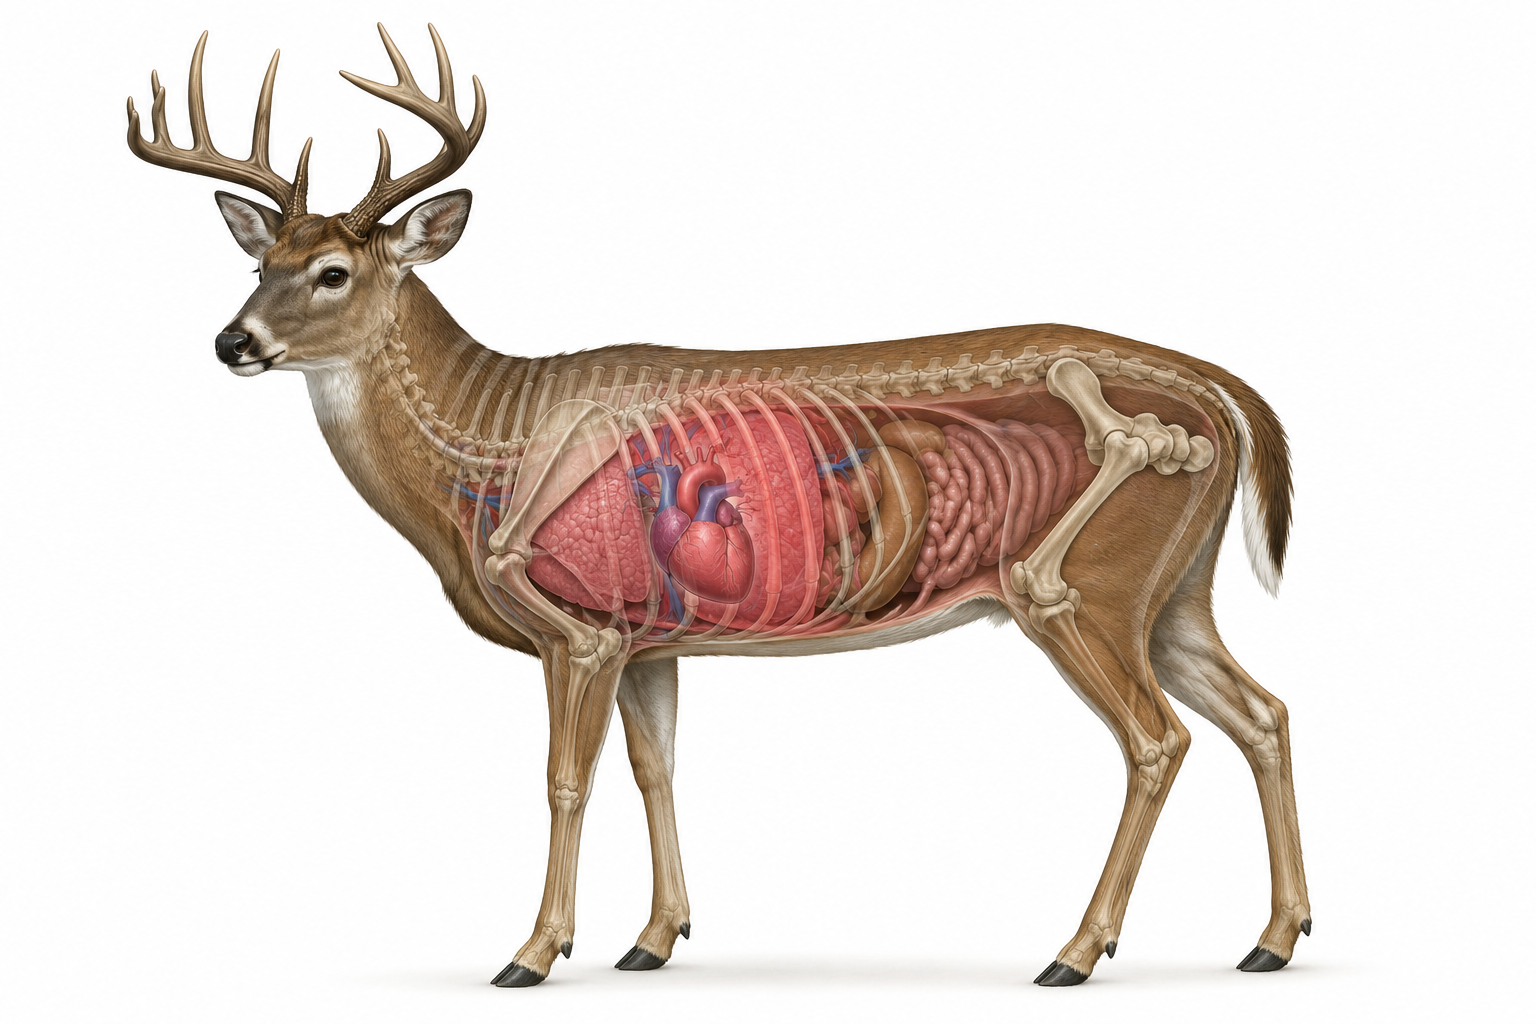
The vital zone on an adult whitetail deer measures approximately 8-10 inches in diameter when the animal stands broadside. This target area includes:
Aiming for the “boiler room” (a term hunters use for the lung area) provides the most forgiving target. Even if your arrow placement is slightly high, low, forward, or back within this zone, you will still achieve a lethal hit. The lungs fill most of the chest cavity, making them difficult to miss when the deer stands broadside.
A common mistake beginners make is aiming too high on the deer’s body, often because they focus on the deer’s back or spine as a reference point. Instead, mentally divide the deer’s chest into horizontal thirds and aim for the bottom third. This adjustment accounts for the actual position of the vital organs, which sit lower than many hunters expect.
The vitals on a whitetail deer are located in the chest cavity, protected by the ribcage and positioned behind the front shoulder. The lungs occupy the majority of this space, extending from just behind the shoulder blade back to approximately the last rib. The heart sits lower and more forward, nestled between the front legs at the bottom of the chest cavity.
Understanding the three-dimensional anatomy helps when the deer is not in a perfect broadside position:
The front shoulder blade (scapula) can deflect or stop arrows, especially from compound bows with lower draw weights or from traditional bows. This large, flat bone covers part of the lung area when the deer’s front leg is forward. Waiting for the deer to step forward with the near-side leg exposes more of the vital area and reduces the chance of hitting bone.
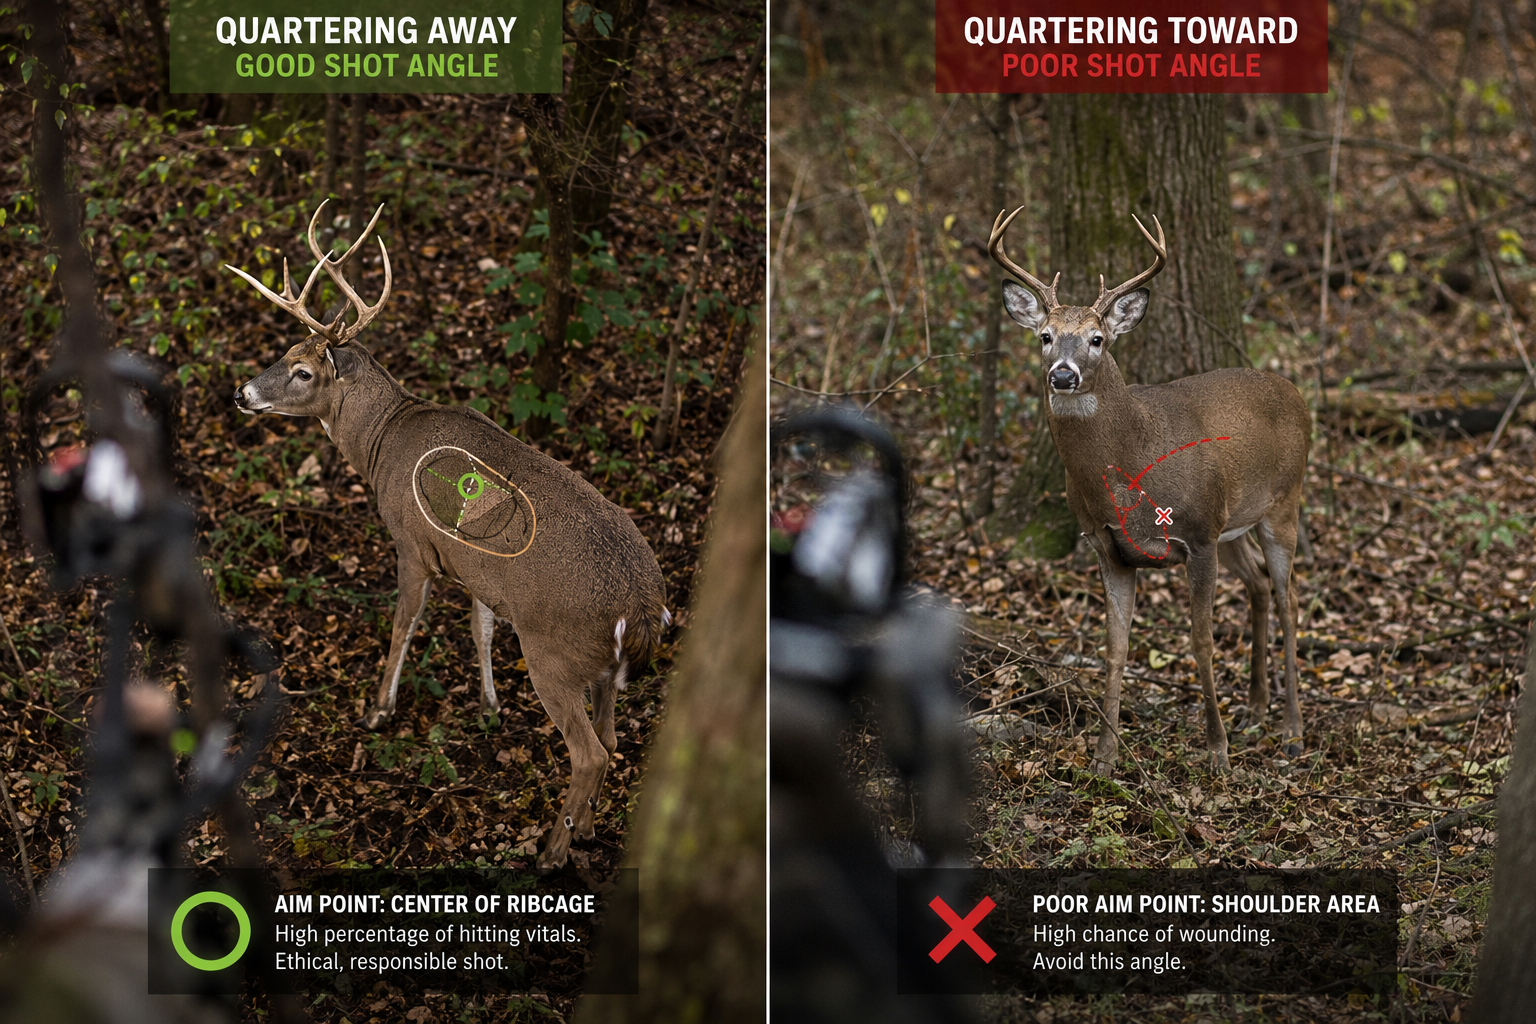
Choose a slightly quartering away angle over a perfect broadside shot if the deer’s near-side leg is back, as this position moves the shoulder blade forward and opens up a clear path to the vitals. The arrow will enter behind the shoulder and travel forward through both lungs.
Both broadside and quartering away shots are ethical and effective for bowhunting deer, but the broadside shot offers a larger margin for error and is generally preferred, especially for less experienced hunters. A broadside deer presents the full vital zone with minimal bone obstruction, while a quartering away shot requires more precise placement but can be equally lethal when executed correctly.
Broadside advantages:
Quartering away advantages:
The quartering away shot becomes problematic when the angle is too severe (more than 45 degrees). At extreme angles, the arrow must travel through more tissue, including potentially the paunch or intestines, before reaching the vitals. A good rule is to wait until you can visualize a clear path from your entry point to the off-side shoulder or lung area.
Avoid the shot if the deer is quartering away so sharply that your arrow would enter behind the ribcage. This placement risks a gut shot, which is difficult to recover and causes unnecessary suffering.
Aim at the lower third of the deer’s chest cavity, approximately one-third of the way up from the chest line (bottom of the body) to the back line (top of the body). This placement accounts for the actual position of the heart and lungs, which sit lower in the chest than many hunters instinctively expect. On an average adult whitetail, this translates to roughly 8-12 inches above the brisket, depending on the deer’s size.
Many hunters aim too high because they use the deer’s back as a reference point or because they focus on the shoulder area without considering vertical placement. The result is often an arrow that passes above the lungs, hitting only the top portion of one lung or missing the vitals entirely.
Vertical aiming guidelines:
The “tight to the shoulder” rule helps with horizontal placement: aim just behind where you see the crease of the front leg. Combined with the lower-third vertical placement, this creates the ideal aiming point for a double-lung or heart-lung shot.
Common mistake: Aiming at the “middle” of the deer’s body often results in high hits because hunters judge the middle based on the deer’s back and belly line, not the actual chest cavity dimensions.
Shooting a deer too far back with an arrow typically results in a liver hit or gut shot, both of which are eventually lethal but require different recovery strategies than a vital hit. A liver-shot deer will usually die within 2-4 hours, while a paunch (stomach/intestine) hit may take 8-12 hours or longer. These shots are less humane and more difficult to track than lung shots.
Signs of a back hit:
Recovery strategy for back hits:
A liver hit is more recoverable than a paunch hit because the liver is highly vascular and will eventually cause the deer to bleed out. The liver sits just behind the diaphragm, forward of the stomach. An arrow that enters 6-8 inches behind the ideal lung shot may catch the liver.
Prevention: Focus on the front half of the deer’s chest cavity. If you are uncertain about the deer’s exact position or if it is moving, do not take the shot. Waiting for a better opportunity is always preferable to a marginal hit.
Aim for the lungs rather than specifically targeting the heart when bowhunting deer. The lungs provide a much larger target area (roughly 8-10 inches in diameter) compared to the heart (approximately 4-5 inches), and a double-lung shot is just as lethal as a heart shot. Most heart-shot deer also have at least one lung compromised, making the distinction less important in practice.
The heart sits low in the chest cavity, positioned between the front legs. While a heart shot is immediately fatal, aiming specifically for this smaller target increases the risk of shooting too low and hitting only the brisket or front leg bones. Aiming for the center of the lung area naturally puts the heart within your margin of error.
Lung shot advantages:
Heart shot considerations:
The practical approach is to aim for the “center mass” of the vital zone, which naturally encompasses both organs. Place your pin or sight picture in the lower third of the chest, tight behind the shoulder. This aiming point will result in either a double-lung shot, a heart-lung shot, or a heart shot with lung involvement, all of which are quickly lethal.
Avoid quartering toward shots, straight-on frontal shots, and any angle where the arrow must penetrate heavy bone before reaching the vitals. These shot angles dramatically reduce the effective target area, increase the chance of wounding rather than killing the deer, and are considered unethical by most bowhunting standards. Additionally, avoid shots at deer that are walking or in motion unless you have extensive experience judging lead and timing.
Shot angles to refuse:
Why these angles fail:
The shoulder blade on a deer is a large, flat bone that can stop or deflect arrows, especially from traditional bows or compounds with lower kinetic energy. When a deer quarters toward you, this bone is positioned directly in front of the vital organs. Even if your arrow penetrates the shoulder, it may not have enough energy remaining to reach the lungs or heart.
The patience rule: If the deer is not in an acceptable shooting position, wait. Deer are constantly moving and shifting their stance. A deer that is quartering toward you will often turn broadside or quartering away within seconds if you remain still and quiet.
Exception for experienced hunters: Some highly experienced bowhunters with high-poundage setups and mechanical broadheads will take slight quartering toward shots (less than 20 degrees), but this requires precise knowledge of anatomy and confidence in equipment performance. Beginners should always wait for broadside or quartering away presentations.
Do not take a shot at a deer that is quartering toward you. This angle presents the shoulder blade and heavy leg bones as obstacles between your arrow and the vital organs, dramatically reducing the chance of a clean kill. Even experienced bowhunters with high-performance equipment typically pass on this shot angle because the risk of wounding the deer is too high.
If you find yourself in a situation where a deer is quartering toward you:
Why this shot fails: When a deer quarters toward you, the near-side shoulder blade covers the entry point to the chest cavity. Your arrow would need to penetrate this heavy bone, then continue through muscle and tissue to reach the lungs or heart. Most arrows lose significant energy after hitting bone, resulting in poor penetration. Additionally, the angle means your arrow is traveling away from the off-side lung, reducing the chance of a double-lung hit.
The only exception would be a deer that is barely quartering toward you (less than 10-15 degrees off broadside) where you can clearly visualize an arrow path that enters just behind the shoulder and angles back through the chest cavity. Even then, waiting for a better angle is the more ethical choice.
A neck shot is not ethical for bowhunting deer and should be avoided. The neck contains the spine, windpipe, and major blood vessels, but these structures are small targets surrounded by muscle and bone. The margin for error is minimal, and a miss by even a few inches results in a wounded deer with no vital organs compromised. Most state hunting regulations and bowhunting organizations discourage or prohibit intentional neck shots.
Why neck shots fail:
Spine shots from above: Some hunters in tree stands consider neck or high-shoulder shots to sever the spine. While a successful spine hit drops the deer immediately, the small target size makes this a low-percentage shot. A miss by inches results in a superficial wound that may not be recoverable.
The ethical standard: Bowhunters should always aim for the largest vital area that provides the quickest, most humane kill. The chest cavity offers an 8-10 inch target compared to the neck’s 2-3 inch vital zone. The increased difficulty of a neck shot does not justify the higher risk of wounding.
Choose the chest shot every time for ethical, effective bowhunting. Save neck shots for firearms hunting where the higher velocity and energy make them more viable, though even then, most experienced hunters prefer chest shots.
If you gut shot a deer with your bow, the most important action is to wait at least 8-12 hours before beginning to track, and do not push or bump the deer during this period. A gut-shot deer will typically bed down within a few hundred yards if left undisturbed and will expire from infection and blood loss over several hours. Pushing the deer too soon can cause it to travel miles, making recovery nearly impossible.
Immediate steps after a suspected gut shot:
Signs you made a gut shot:
Tracking strategy after waiting period:
Weather considerations: If temperatures are above 50°F or rain is forecast, you may need to begin tracking sooner (after 4-6 hours) to prevent meat spoilage or loss of blood trail. This is a difficult decision that balances recovery chances against meat quality.
Prevention for next time: Focus on the front third of the deer’s body, tight behind the shoulder. If the deer is angled or moving, wait for a better shot opportunity.
Aim at the same anatomical point on a deer whether shooting at 20 yards or 30 yards, but adjust your sight pin or gap accordingly to account for arrow drop. The aiming point on the deer’s body does not change with distance; what changes is which pin you use or how you compensate for trajectory. Always aim for the lower third of the chest cavity, tight behind the shoulder, regardless of distance.
Distance considerations:
The key principle: Your aiming point on the deer (the spot you want to hit) remains constant. Your sight picture (where you place your pin in relation to that spot) changes based on distance. If you are using a single-pin sight or shooting instinctively, you must compensate by aiming higher at longer distances.
Common mistake: Some hunters try to aim higher on the deer’s body at longer distances, which often results in high hits that miss the vitals. Instead, use the correct pin for the distance and maintain the same aiming point on the deer.
Practical ranging:
Wind and distance: At 30 yards, wind can affect arrow flight more than at 20 yards, especially with larger fixed-blade broadheads. A 10 mph crosswind can push an arrow 2-3 inches off course at 30 yards. Factor this into your decision to take the shot.
Beginners can absolutely make clean kills on deer with a bow if they practice extensively, understand deer anatomy, wait for high-percentage shots, and stay within their effective range. Success depends more on shot selection and patience than on years of experience. A beginner who waits for a 20-yard broadside shot has a higher success rate than an experienced hunter who takes a marginal 40-yard quartering shot.
Keys to success for beginner bowhunters:
Realistic expectations: Even experienced bowhunters have wounding rates higher than rifle hunters due to the nature of archery equipment and the need for close-range shots. Beginners should expect a learning curve but can minimize mistakes through preparation and conservative shot selection.
Your first deer: Take your time, control your breathing, focus on your form, and aim small. The excitement of the moment causes many beginners to rush the shot or forget their fundamentals. Practice shooting with elevated heart rate (do jumping jacks before practice shots) to simulate hunting conditions.
When to pass: If you have any doubt about the shot, distance, angle, obstructions, or deer position, do not shoot. There will be other opportunities, and passing a questionable shot is the mark of an ethical hunter.
Arrows fail to penetrate deer vitals due to several factors: hitting heavy bone (shoulder blade or leg bones), insufficient draw weight for the arrow and broadhead combination, dull or poorly designed broadheads, poor shot angle, or arrow deflection from brush or branches. Adequate penetration requires sufficient kinetic energy, a sharp cutting surface, and a clear path through soft tissue to the vital organs.
Common penetration problems:
Improving penetration:
Draw weight considerations: While some traditional archers successfully hunt with 40-45 pound bows, most compound shooters benefit from 50-60 pounds of draw weight. Higher draw weight provides more kinetic energy and better penetration, especially on larger deer or less-than-perfect shot angles.
Arrow selection: Match your arrow spine (stiffness) to your bow’s draw weight and length. Improperly spined arrows fly erratically and lose energy, reducing penetration even if they hit the target.
When a deer is standing uphill or downhill from your position, aim based on the horizontal distance to the deer, not the line-of-sight distance, and maintain your aiming point in the lower third of the chest cavity. Gravity affects your arrow’s trajectory differently on angled shots, causing arrows to impact high if you do not compensate. The steeper the angle (up or down), the more you should aim as if the deer is closer than the actual line-of-sight distance.
Angle compensation principles:
Why angles matter: When shooting at steep angles (either up or down), gravity has less effect on the arrow over the actual horizontal distance traveled. The arrow effectively “falls” less than it would on a flat trajectory at the same line-of-sight distance, causing it to hit higher than expected if you use the line-of-sight distance for your pin selection.
Tree stand hunters: This is particularly important for hunters in elevated stands. A deer directly below a 20-foot stand at 15 yards horizontal distance might be 25 yards line-of-sight distance. If you use your 25-yard pin, you will shoot over the deer’s back. Instead, use your 15-yard pin (the horizontal distance) or aim slightly lower.
Rangefinders with angle compensation: Modern rangefinders often include angle compensation features that calculate the “shoot-to” distance automatically. These devices measure the line-of-sight distance and angle, then display the horizontal equivalent distance. Use this corrected distance to select your pin.
Practical approach: If you do not have an angle-compensating rangefinder, use this rule: for every 10 degrees of angle (up or down), reduce your aiming distance by about 10% of the line-of-sight distance. A 30-yard shot at a 20-degree angle should be aimed as a 27-yard shot.
What is the kill zone on a deer for bow hunting?
The kill zone on a deer for bow hunting is the chest cavity containing the heart and lungs, measuring approximately 8-10 inches in diameter on an adult whitetail. This area is located in the lower third of the chest, directly behind the front shoulder when the deer is broadside.
How long should I wait after shooting a deer with a bow?
Wait at least 30-45 minutes after a good lung shot, 1-2 hours after a suspected heart shot, 4-6 hours after a liver hit, and 8-12 hours after a gut shot. The worse the hit, the longer you should wait to avoid pushing the deer and making recovery impossible.
Can you shoot a deer in the shoulder with a bow?
Avoid intentionally shooting a deer in the shoulder with a bow, as the shoulder blade can stop or deflect arrows. Aim just behind the shoulder crease where the arrow can pass between ribs into the chest cavity without hitting heavy bone.
What does it mean when a deer kicks after being shot with an arrow?
A deer that kicks or “mule kicks” after being shot typically indicates a good hit in the vital area. This reaction occurs when the arrow impacts the chest cavity, causing the deer to react to the sudden trauma. However, observe the deer’s behavior after the initial reaction for better confirmation.
How far will a lung-shot deer run?
A lung-shot deer typically runs 40-100 yards before expiring, though this varies based on whether one or both lungs were hit, the deer’s adrenaline level, and terrain. Double-lung shots usually result in shorter distances, often 30-60 yards, with the deer expiring within 30-60 seconds.
Should I use mechanical or fixed blade broadheads for deer?
Both mechanical and fixed blade broadheads are effective for deer hunting. Mechanical broadheads fly more like field points and create larger wound channels, while fixed blades offer better penetration and reliability. Choose based on your bow setup, shooting ability, and personal preference.
What is the best broadside shot placement on a deer?
The best broadside shot placement is in the lower third of the chest cavity, 4-6 inches directly behind the front shoulder crease. This placement targets both lungs and potentially the heart, providing the largest margin for error while ensuring a quick, ethical kill.
How do I know if I made a good shot on a deer?
Signs of a good shot include bright red blood with bubbles (indicating lung hit), the deer running hard for a short distance then crashing, a mule kick reaction immediately after the shot, and your arrow showing bright red blood. The deer’s body language and the blood trail provide the best confirmation.
What causes a deer to jump the string?
Deer jump the string when they react to the sound of the bow firing, dropping their body to load their legs for flight. This reaction can cause arrows to hit high. Faster bows, proper form, and shooting at calm, unalerted deer reduce this problem.
Can you recover a deer with no blood trail?
Yes, deer can be recovered with minimal or no blood trail by carefully searching the area, looking for tracks, disturbed leaves, hair, and beds. Grid-search the area in the direction the deer traveled, and look for the deer itself rather than relying solely on blood. Many deer are found within 100 yards despite poor blood trails.
What is the maximum ethical range for bowhunting deer?
The maximum ethical range for bowhunting deer depends on individual skill, equipment, and conditions, but most hunters should limit shots to 30-40 yards. Your personal maximum range is the distance at which you can consistently hit a 6-inch circle under field conditions, not just on a practice range.
Why do some arrows pass through deer while others do not?
Arrow pass-through depends on kinetic energy, broadhead sharpness, shot angle, and whether the arrow hits bone. Heavier arrows with sharp broadheads on broadside shots typically pass through, while lighter arrows, dull broadheads, or shots that hit bone may not exit the deer.
Understanding where to aim on a deer with a bow is fundamental to ethical, successful bowhunting. The vital zone in the lower third of the chest cavity, just behind the front shoulder, provides the largest target area and the quickest, most humane kill. Broadside and slight quartering away shots offer the best opportunities, while quartering toward, frontal, and extreme angle shots should be avoided regardless of distance or equipment.
Success in bowhunting depends less on advanced equipment and more on patience, shot selection, and understanding deer anatomy. Wait for high-percentage shots within your effective range, aim for the lungs rather than trying to thread arrows through small openings or around bone, and always prioritize ethics over opportunity. A passed shot is always better than a wounded, unrecovered deer.
Practice extensively before the season, study deer anatomy from multiple angles, and be honest about your limitations. Whether you are a beginner taking your first deer or an experienced hunter, the principles remain the same: aim for the vitals, wait for the right angle, and make every shot count. The reward for patience and precision is not just a successful harvest, but the satisfaction of knowing you hunted ethically and effectively.
Take action now: Set up a 3D deer target and practice from various angles and distances. Mark the vital zone on the target and track your accuracy over multiple practice sessions. Identify your maximum effective range and commit to staying within it during hunting season. Review deer anatomy diagrams and visualize shot placement from tree stand height and ground level. Preparation and knowledge transform good opportunities into clean, ethical kills.