
Newsletter Subscribe
Enter your email address below and subscribe to our newsletter

All voices matter
All voices matter

 ByTravis
Learn how to fletch your own arrows with this step-by-step guide covering supplies, techniques, costs, and troubleshooting for perfect arrow fletching.
Affiliate Disclaimer: We are a participant in the Amazon Services LLC Associates Program, an affiliate advertising program designed to provide a means for sites to earn advertising fees by advertising and linking to Amazon.com. As an Amazon Associate I earn from qualifying purchases. We also participate in other affiliate programs.

Learning how to fletch your own arrows involves attaching vanes or feathers to arrow shafts using a fletching jig and specialized adhesive. The process requires minimal equipment, a fletching jig, vanes or feathers, fletching glue, and arrow shafts, and takes about 15-20 minutes per arrow once you’ve mastered the technique. Fletching your own arrows saves money over time, allows complete customization of vane type and configuration, and gives you the ability to repair damaged arrows in the field.
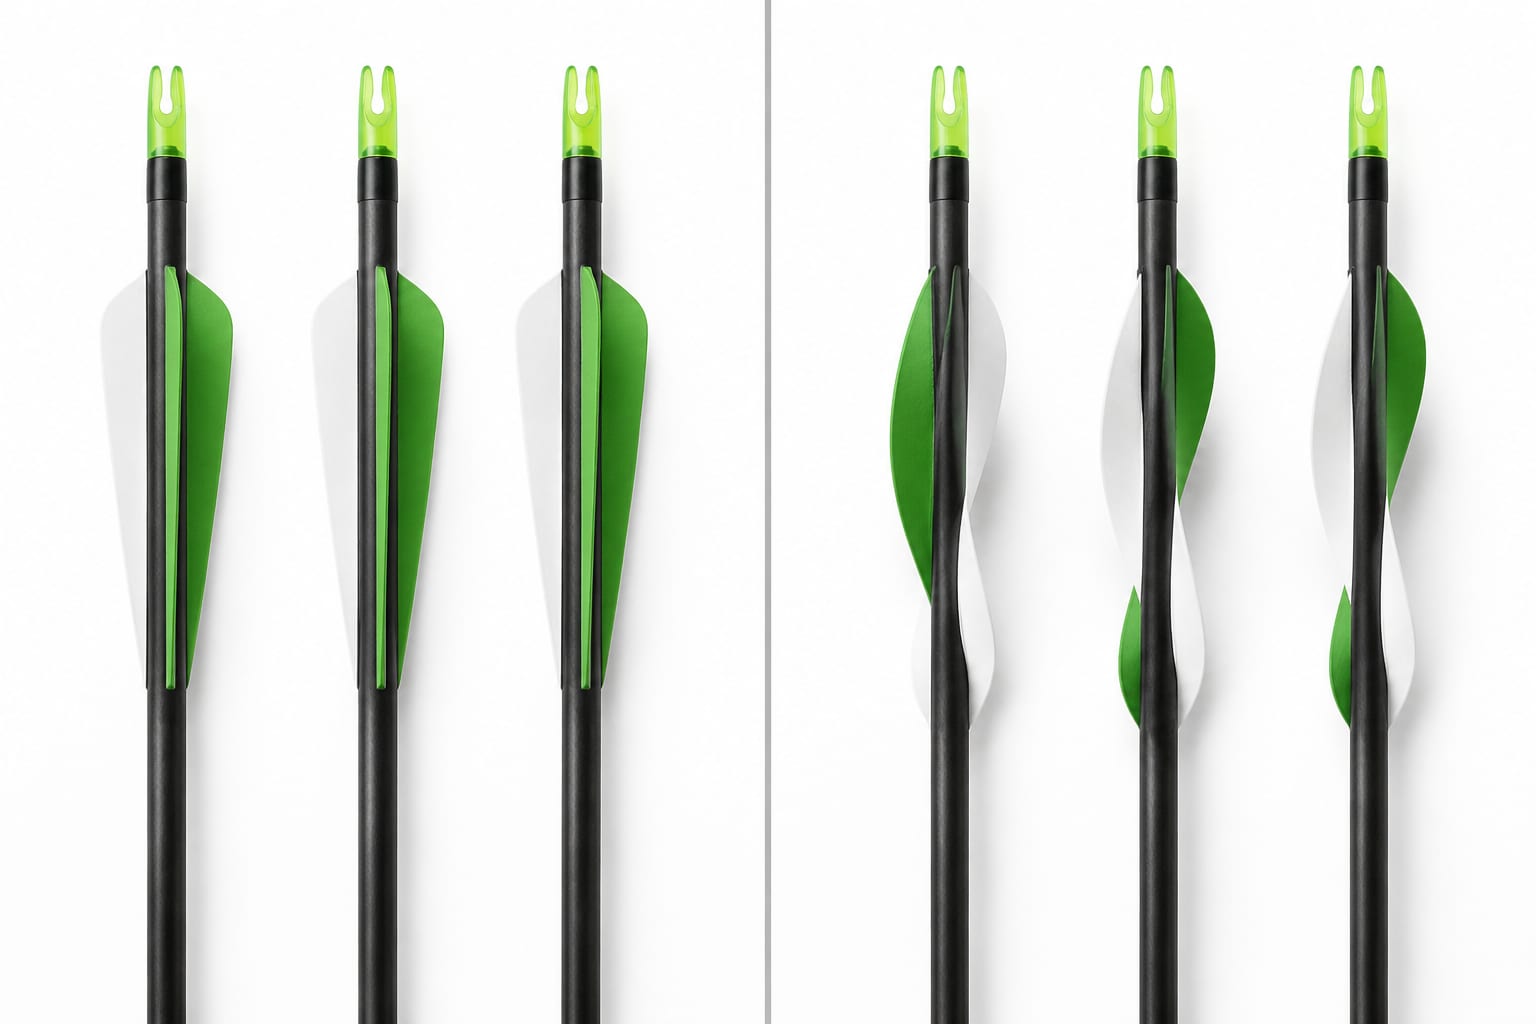
Fletching refers to the vanes or feathers attached to the rear of an arrow shaft that stabilize the arrow during flight. The term also describes the process of attaching these stabilizing components to create a complete, flight-ready arrow. Without proper fletching, arrows would tumble erratically and miss targets by wide margins.
The fletching creates drag at the rear of the arrow, which keeps the point oriented forward during flight, similar to how tail feathers stabilize a dart. Most modern arrows use three or four vanes spaced evenly around the shaft’s circumference, though traditional archers often prefer natural feathers.
Why fletching matters for arrow performance:
When you fletch your own arrows, you control every variable that affects arrow flight, from vane size and shape to offset angle and adhesive choice. This level of customization becomes especially important for hunting arrows that must fly accurately with heavy broadheads attached.
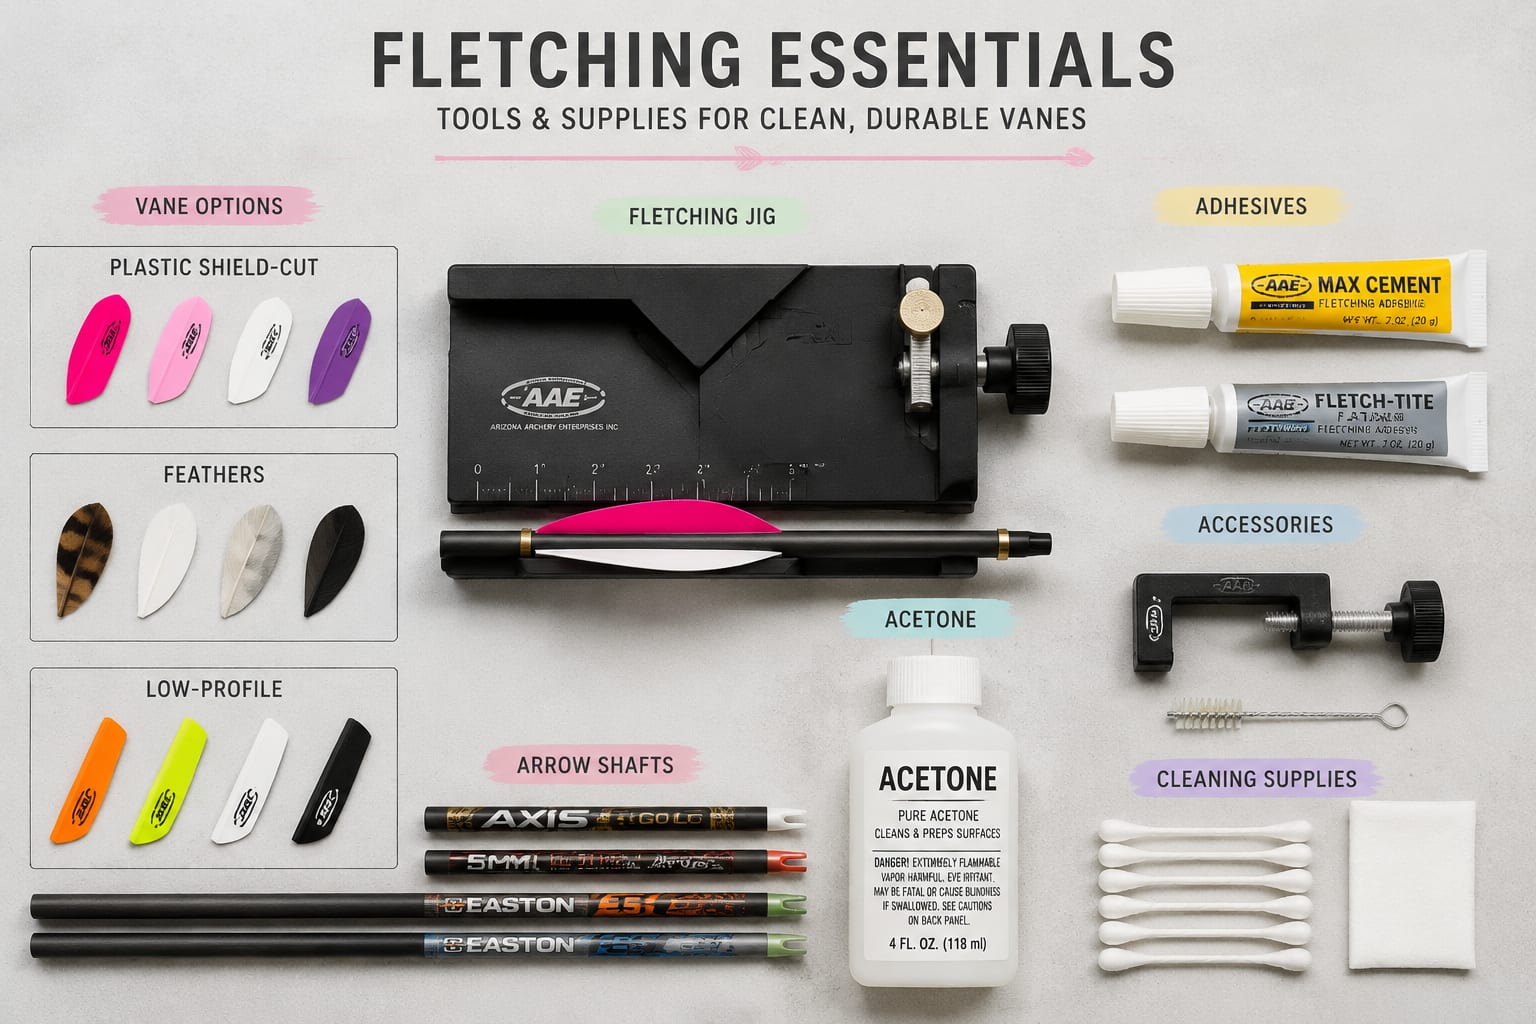
You need four essential items to start fletching arrows: a fletching jig, vanes or feathers, fletching adhesive, and arrow shafts. Optional but helpful supplies include acetone for surface preparation, a razor blade for removing old fletching, and a small clamp to hold vanes in place while the glue sets.
Essential fletching supplies:
Helpful additional supplies:
The total startup cost for fletching equipment typically ranges from $50-$120, depending on jig quality and whether you purchase premium vanes. After this initial investment, each arrow costs approximately $2-$4 to fletch, compared to $8-$15 for factory-fletched arrows.
Choose a jig that matches your preferred fletching style, straight, offset, or helical. Straight-clamp jigs are simplest and most affordable, while helical jigs require more setup but produce superior arrow stabilization for hunting applications.
A quality fletching jig costs between $30 and $80 for most archers, with basic straight-clamp models starting around $30 and premium helical jigs reaching $80-$120. The jig is a one-time investment that will fletch thousands of arrows over its lifetime, making it cost-effective after fletching just 20-30 arrows compared to buying pre-fletched shafts.
Fletching jig price ranges by type:
The price difference reflects build quality, adjustment options, and ease of use rather than fletching capability. A $35 jig will produce arrows that fly just as well as those from a $100 model, but the premium jig will be faster to adjust, more durable, and easier to use for different vane sizes.
What to consider when choosing a jig:
Most archers find that a mid-range jig ($50-$70) offers the best balance of features and value. If you plan to fletch only occasionally or are testing whether you enjoy the process, start with a budget model and upgrade later if needed. For more information on arrow maintenance and care, see our guide on when to retire an arrow.
The best glue for arrow fletching is cyanoacrylate (CA glue or super glue) specifically formulated for archery, with gel formulas providing the most control and strongest bonds. Specialized fletching adhesives like Bohning Fletch-Tite Platinum, AAE Max Bond, or Goat Tuff create flexible, waterproof bonds that withstand the shock of target impacts and temperature extremes.
Top fletching adhesive options:
Avoid regular household super glue, which becomes brittle and fails under repeated impact stress. Fletching-specific adhesives remain slightly flexible after curing, which prevents vanes from popping off when arrows hit hard targets or experience temperature changes.
Glue selection factors:
For natural feather fletching, use Duco Cement or Bohning Ferr-L-Tite, which remain flexible and accommodate the feather’s natural movement. These adhesives take longer to cure (12-24 hours) but create bonds that last the arrow’s lifetime.
Remove old fletching by carefully slicing under the vane base with a sharp razor blade, then cleaning residual adhesive with acetone or a commercial fletching remover. Work slowly to avoid gouging the arrow shaft, which can create weak points that lead to catastrophic failure during shooting.
Step-by-step fletching removal process:
Common mistakes to avoid:
For stubborn adhesive, commercial fletching removers like Bohning Fletch-Lac Thinner dissolve glue without damaging shaft finishes. Apply the remover, wait 2-3 minutes for it to soften the adhesive, then wipe clean with a cloth.
Inspect shafts carefully after removing fletching. Any visible damage, scratches deeper than 0.010 inches on carbon, dents on aluminum, or cracks anywhere, means the arrow should be retired rather than re-fletched. Arrow safety is paramount, and compromised shafts can shatter during shooting.
Fletching your own arrows involves cleaning the shaft, positioning it in a jig, applying adhesive to each vane, and allowing proper cure time between vanes. The entire process takes 15-20 minutes per arrow once you’ve established a rhythm, though beginners should expect 30-40 minutes for their first few arrows.
Complete fletching process:
Prepare the shaft: Wipe the fletching area with acetone on a lint-free cloth, removing all oils and residue. Let the shaft dry completely (2-3 minutes).
Set up the jig: Install the arrow shaft in the jig’s cradle and rotate it so the nock’s index groove aligns with the jig’s reference mark. This ensures one vane (the “cock vane”) clears the arrow rest.
Position the first vane: Place a vane in the jig’s clamp, ensuring the base sits flat and the vane’s leading edge aligns with your desired position (typically 1-1.5 inches from the nock).
Apply adhesive: Run a thin, continuous bead of fletching glue along the vane’s base. Use enough to create a bond but not so much that it squeezes out excessively.
Clamp and cure: Press the clamp firmly against the shaft and hold for 10-15 seconds. For gel adhesives, leave the vane clamped for 2-4 minutes before rotating to the next position.
Rotate and repeat: Release the clamp, rotate the shaft to the next fletching position (120 degrees for three-fletch, 90 degrees for four-fletch), and repeat steps 3-5.
Final cure: After attaching all vanes, let the arrow rest undisturbed for 2-4 hours (or overnight for maximum bond strength) before shooting.
Pro tips for better results:
The cock vane (the one that sits perpendicular to the nock’s groove) should be a different color than the other two vanes. This visual reference helps you nock arrows correctly and diagnose arrow flight issues during tuning.
Helical fletching is better for hunting because it spins the arrow faster, providing superior stabilization for broadhead-tipped arrows, while straight fletching is preferred for target archery because it produces slightly higher arrow speeds and works better with drop-away rests. The choice depends on your shooting discipline and whether you prioritize stability or speed.
Straight fletching characteristics:
Helical fletching characteristics:
Offset fletching (the middle ground):
Offset fletching positions vanes at a 1-3 degree angle to the shaft without the curved helical shape. It provides moderate arrow spin, more than straight, less than helical, and works well for bowhunters using mechanical broadheads or target archers who want extra forgiveness.
Choose helical if you hunt with any broadhead type or want maximum arrow stability. Choose straight if you shoot target archery exclusively with field points and want every bit of speed. Most compound bow hunters use helical fletching with a 3-4 degree offset for optimal broadhead flight.
Three-fletch configurations are the standard for most archery applications because they provide excellent stability with minimal weight and drag, while four-fletch setups offer more surface area for stabilizing heavy broadheads or correcting form inconsistencies. For most archers shooting modern compound bows, three vanes are sufficient and optimal.
Three-fletch advantages:
Four-fletch advantages:
When to choose four-fletch:
The weight difference between three and four vanes is minimal (6-8 grains), but the increased drag from four vanes can reduce arrow speed by 3-5 fps. For most compound bow hunters shooting modern mechanical or smaller fixed-blade broadheads, this trade-off isn’t worthwhile.
Most professional archers and bowhunters use three-fletch configurations with 2-inch or 2.1-inch vanes. This setup balances stability, speed, and clearance effectively. Experiment with four-fletch only if you’re experiencing specific flight problems that proper bow tuning hasn’t resolved.
You can fletch arrows without a jig by using a straight edge and careful hand placement, but the results will be inconsistent and time-consuming compared to using even a basic jig. Without a jig, achieving precise vane spacing, consistent offset angles, and straight alignment becomes extremely difficult, often resulting in arrows that fly erratically.
Methods for fletching without a jig:
Why jig-free fletching is problematic:
If you must fletch without a jig temporarily, use the straight-edge method with straight-clamp fletching only. Mark the shaft at 120-degree intervals using a protractor, tape a ruler along the shaft as a guide, and apply extra glue to compensate for imperfect contact. Accept that these arrows will be practice arrows rather than precision hunting or competition shafts.
For anyone planning to fletch more than a dozen arrows, a $30-$40 jig is an essential investment that pays for itself in time saved and arrow performance. The consistency and precision a jig provides simply cannot be replicated by hand.
Fletching glue requires 2-4 hours to cure fully for maximum bond strength, though fast-set formulas develop enough initial tack in 10-15 seconds to release the clamp and rotate to the next vane. For best results, let completed arrows rest overnight before shooting them, especially for hunting arrows that will experience hard target impacts.
Curing timeline for common adhesives:
Factors affecting cure time:
Accelerating the cure process:
Some fletchers use CA glue accelerator spray to achieve full cure in 30-60 seconds. While this works, it can make the bond slightly more brittle than allowing natural curing. Use accelerators only when you need arrows ready immediately, not as standard practice.
For hunting arrows where vane retention is critical, always allow overnight curing before the first shot. The difference between 90% bond strength at two hours and 100% bond strength at eight hours can determine whether vanes stay attached after a hard hit on bone or a tree.
Vanes falling off after fletching almost always results from inadequate surface preparation, specifically, failing to remove all oils, dirt, and residue from the arrow shaft before applying adhesive. Even invisible fingerprint oils prevent proper bonding, so thorough cleaning with acetone or 90%+ isopropyl alcohol is essential for every arrow.
Common causes of fletching failure:
How to prevent vane failure:
Testing bond strength:
After the glue cures, try to peel a vane off with your fingernail. A proper bond should resist strongly, if the vane lifts easily, the adhesive didn’t bond correctly. Re-clean the shaft and try again with fresh adhesive.
For carbon arrows, some fletchers lightly scuff the shaft’s fletching area with 220-grit sandpaper before cleaning. This creates a slightly rougher surface that improves mechanical bonding. Be extremely gentle, deep scratches can compromise shaft integrity.
Most bowhunters use a 2-4 degree helical offset for optimal arrow stabilization, with 3 degrees being the most common choice that balances spin rate, arrow speed, and broadhead stabilization. Target archers typically use 1-2 degree offsets or straight fletching, while hunters using large fixed-blade broadheads may increase to 4-5 degrees for maximum corrective force.
Helical offset recommendations by application:
How offset angle affects performance:
Higher offset angles create faster arrow rotation, which provides more gyroscopic stability but also increases drag and reduces arrow speed. Each additional degree of offset typically costs 1-2 fps in arrow velocity while improving broadhead flight and forgiveness.
Choosing your offset angle:
Start with 3 degrees for general hunting applications. If your broadhead-tipped arrows fly poorly despite proper bow tuning, increase to 4 degrees. If you shoot only target archery with field points and want maximum speed, reduce to 1 degree or use straight fletching.
Your fletching jig determines available offset options. Adjustable jigs offer precise degree settings, while fixed-angle jigs come in specific configurations (straight, 2-degree, 3-degree, etc.). Most hunters find that a 3-degree helical jig handles all their needs effectively.
You can use natural feathers instead of plastic vanes for fletching, and many traditional archers prefer feathers for their superior forgiveness, quieter flight, and natural aesthetic. Feathers compress when contacting the arrow rest or bow riser, making them more forgiving of tuning errors, but they require more maintenance and perform poorly in wet conditions.
Feather fletching advantages:
Feather fletching disadvantages:
When to choose feathers:
When to choose plastic vanes:
Modern plastic vanes have largely replaced feathers for compound bow hunting because they perform consistently in all weather conditions and require no special care. However, feathers remain popular among traditional archers and bowhunters who value their unique performance characteristics and are willing to manage their limitations.
If you choose feathers, treat them with a waterproofing spray and inspect them before each hunt. Replace any feathers showing damage, as torn or bent feathers significantly degrade arrow flight.
Fletching your own arrows becomes cost-effective after approximately 20-30 arrows and offers significant advantages in customization, repair capability, and arrow performance optimization. For archers who shoot frequently, hunt seriously, or want complete control over their equipment, learning to fletch is worthwhile; casual shooters who buy arrows infrequently may find pre-fletched arrows more convenient.
Cost comparison:
Advantages of fletching your own arrows:
Advantages of buying pre-fletched:
Who should fletch their own arrows:
Who should buy pre-fletched:
For most dedicated archers, fletching becomes a valuable skill that pays dividends in cost savings, performance optimization, and self-sufficiency. The initial time investment to learn proper technique is modest, most archers produce quality arrows after fletching their first dozen.
Beginners do not need to fletch their own arrows initially and should focus on developing proper shooting form and basic archery skills before investing in fletching equipment. However, learning to fletch becomes valuable once you’re shooting regularly (2-3 times per month or more) and want to save money or customize your arrow setup beyond factory options.
When beginners should buy pre-fletched arrows:
When beginners should learn to fletch:
Skills beginners should master first:
Once you’ve developed consistent shooting form and understand how different arrow components affect performance, fletching your own arrows becomes a natural next step. The knowledge gained from fletching helps you understand arrow flight dynamics and make better equipment decisions.
Learning path for beginners:
Start by buying pre-fletched arrows in your first year. As you advance and begin replacing damaged vanes at a pro shop, watch the process and ask questions. When you’re ready to invest in a jig, fletch a dozen practice arrows before fletching your primary hunting or competition set.
Many archery clubs and pro shops offer fletching workshops where beginners can learn the process using shop equipment before investing in their own jig. This hands-on instruction accelerates the learning curve and helps you avoid common mistakes.
How many arrows can I fletch with one tube of glue?
One tube of fletching glue typically fletches 50-100 arrows depending on application thickness and tube size. Gel formulas last longer because they’re easier to control and waste less adhesive than thin liquid formulas.
Should the cock vane point up or down?
The cock vane should point away from the bow riser, up for right-handed shooters using right-handed bows, down for left-handed setups. This orientation ensures the odd vane clears the arrow rest during the shot.
Can I reuse vanes after removing them from arrows?
Reusing vanes is not recommended because the adhesive residue on the base prevents proper bonding and the vanes may have stress damage from removal. New vanes cost only $0.50-$1.00 each, making reuse impractical.
What’s the difference between shield-cut and parabolic vanes?
Shield-cut vanes have a taller profile that provides more stabilization but creates more drag, while parabolic vanes have a lower, more aerodynamic profile that sacrifices some stability for higher arrow speed. Choose shield-cut for hunting, parabolic for target archery.
How far from the nock should I position my vanes?
Position vanes 0.5-1.5 inches from the nock’s throat, with 1 inch being the most common placement. Closer positioning works better for shorter arrows, while longer arrows benefit from vanes positioned slightly farther forward.
Do I need different jigs for different arrow diameters?
Most fletching jigs accommodate multiple arrow diameters through adjustable cradles or interchangeable inserts. Check your jig’s specifications, most handle standard diameters from 4mm to 27/64 inch without additional parts.
Can I fletch arrows with wraps already installed?
Yes, arrow wraps provide an excellent surface for fletching and actually improve vane adhesion compared to bare shafts. Clean wraps with alcohol rather than acetone, which can damage some wrap materials.
What causes one vane to consistently come off while others stay attached?
One vane failing repeatedly usually indicates inadequate clamp pressure at that jig position or contamination on that section of the shaft. Check that your jig’s clamp applies even pressure and re-clean the shaft thoroughly before re-fletching.
Should I use the same fletching setup for field points and broadheads?
Use the same fletching for both, but verify that broadhead-tipped arrows fly accurately through paper tuning or field testing. If broadheads fly poorly while field points fly well, increase your helical offset rather than changing fletching between point types.
How do I know if my arrows need re-fletching?
Re-fletch arrows when vanes show tears, significant wear, or begin lifting at the edges. Also re-fletch if you’re experiencing unexplained accuracy problems or if vanes are more than two seasons old and showing UV damage.
Can temperature affect fletching adhesive performance?
Yes, extreme cold makes adhesives brittle and can cause bond failure, while extreme heat can soften adhesives. Quality fletching glues remain stable from 0°F to 120°F, but arrows stored in hot vehicles or freezing conditions may experience vane failure.
What’s the best way to store fletched arrows?
Store arrows vertically in a rack or horizontally in a case where vanes don’t contact surfaces. Avoid leaning arrows against walls or storing them in tight spaces where vanes can become permanently bent or damaged.
Learning how to fletch your own arrows empowers you with complete control over one of archery’s most critical performance variables. The process requires minimal investment, a quality jig, proper adhesive, and attention to surface preparation, but delivers significant returns in cost savings, customization options, and self-sufficiency.
Start with a mid-range fletching jig and archery-specific adhesive, then practice on a dozen arrows before fletching your primary hunting or competition set. Focus on thorough shaft cleaning, consistent vane positioning, and adequate cure time. These fundamentals produce professional-quality results that match or exceed factory fletching.
As you gain experience, experiment with different vane types, configurations, and offset angles to optimize arrow performance for your specific shooting style and conditions. The knowledge gained from fletching your own arrows deepens your understanding of arrow flight dynamics and helps you make better equipment decisions across all aspects of archery.
Whether you’re a bowhunter needing field repair capability, a competitive archer seeking every performance advantage, or simply an enthusiast who enjoys the craft of building complete arrows, fletching is a valuable skill that enhances your archery experience. Take the time to learn proper technique, invest in quality materials, and enjoy the satisfaction of shooting arrows you’ve built yourself.
For more information on arrow maintenance and performance, explore our guides on arrow flight, hunting arrows, and when to retire an arrow.


