Newsletter Subscribe
Enter your email address below and subscribe to our newsletter

All voices matter
All voices matter
 ByTravis
Installing inserts and points means cleaning the shaft, applying hot-melt or epoxy adhesive, heating and seating the threaded component, then letting it cure before attaching points.
Affiliate Disclaimer: We are a participant in the Amazon Services LLC Associates Program, an affiliate advertising program designed to provide a means for sites to earn advertising fees by advertising and linking to Amazon.com. As an Amazon Associate I earn from qualifying purchases. We also participate in other affiliate programs.

Installing inserts and points requires cleaning the arrow shaft, applying the correct adhesive (hot-melt or epoxy), heating and inserting the threaded component into the shaft, and allowing proper cure time before attaching field points or broadheads. Carbon arrows typically use hot-melt glue with heat application, while aluminum arrows may use press-fit or adhesive methods depending on the shaft design. The entire process takes 15-30 minutes per arrow, with cure times ranging from instant cooling (hot-melt) to 24 hours (epoxy).
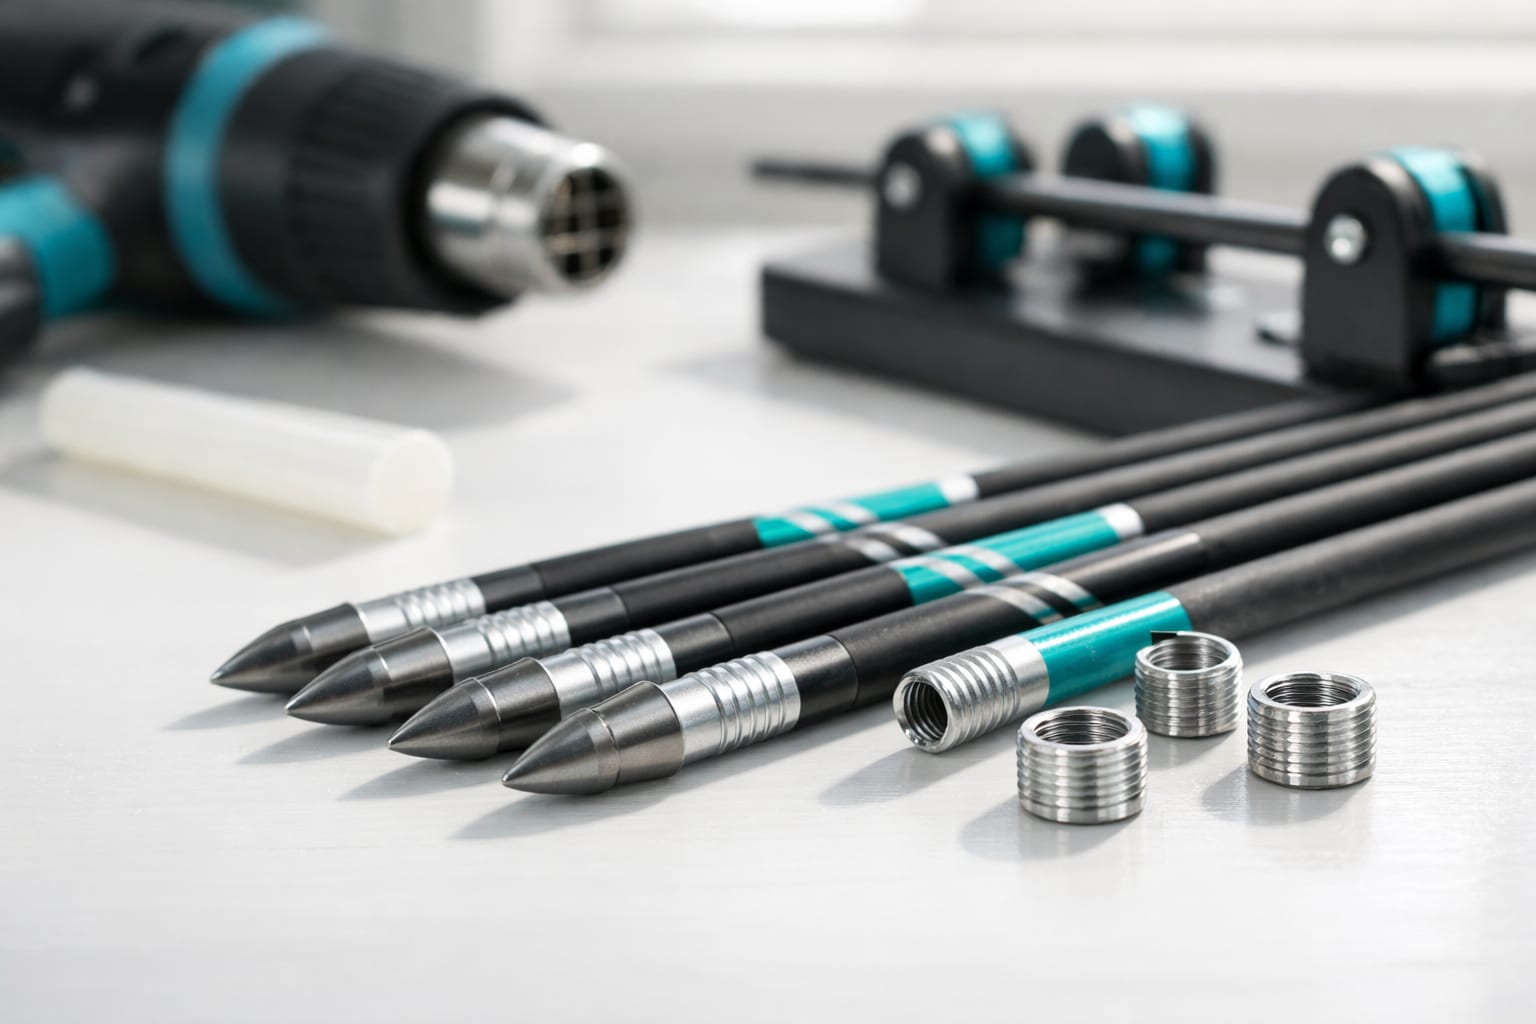
Archery inserts are small threaded metal cylinders that glue into the hollow front end of an arrow shaft, providing a standardized threaded receptacle for attaching various point types. Points refer to the tips that screw into these inserts, including field points for practice, broadheads for hunting, and specialized tips like judo points or blunts.
The insert system became standard with modern carbon and aluminum arrows because it allows archers to quickly swap between different point types without replacing the entire arrow. Before threaded inserts, archers used glue-on points that required heating and removal each time they wanted to change tip styles.
Key components of the insert system:
The weight of your insert affects total arrow weight and front-of-center (FOC) balance, which influences arrow flight characteristics. Standard inserts weigh 12-16 grains for carbon arrows, but specialized heavy inserts (50-100 grains) are available for hunters seeking better penetration and flight stability.
Inserts are the permanent threaded receivers installed inside your arrow shaft, while field points are removable practice tips that screw into those inserts. This distinction matters because you install inserts once (unless they come loose), but you’ll swap field points for broadheads when hunting or replace worn practice tips regularly.
Field points serve as practice substitutes for broadheads, matching the weight of your hunting tips so you can tune your bow and practice with the same arrow flight characteristics. Most archers keep field points installed year-round and only switch to broadheads immediately before hunting season or when verifying broadhead flight.
Practical differences:
When building new arrows, you’ll install inserts first, then thread in field points for practice. The threaded connection allows you to verify your broadheads fly like field points by swapping tips without rebuilding arrows.
You need a heat source (heat gun or small torch), cleaning supplies (isopropyl alcohol and cotton swabs), appropriate adhesive (hot-melt glue or epoxy), and an arrow spinner or flat surface for alignment verification. Optional but helpful tools include a digital scale for weighing components and a dedicated insert installation jig.
Essential tool list:
Optional upgrades:
Most archers start with basic tools and upgrade as they build more arrows. A quality heat gun costs $20-30 and works better than torches because it provides even, controlled heat without risk of scorching carbon shafts. An arrow spinner is the single most valuable tool for verifying proper installation before you shoot.
Apply controlled heat to the arrow point using a heat gun or torch until the adhesive softens (typically 30-60 seconds), then pull the insert out with pliers while the glue is still hot. For carbon arrows, keep heat moving and avoid concentrating it on one spot to prevent shaft damage or delamination.
Step-by-step removal process:
Common mistake: Applying too much heat too quickly can damage carbon fiber layers or cause the shaft to bubble. Use medium heat and patience rather than high heat and speed.
If the insert won’t budge after 60 seconds of heating, the previous installer likely used epoxy instead of hot-melt glue. Epoxy requires more aggressive heating (sometimes until it smokes slightly) or mechanical extraction with a specialized insert puller tool that grips the insert threads.
For stubborn inserts, some archers carefully drill out the old insert with a bit slightly smaller than the insert’s inner diameter, then clean the shaft thoroughly. This method risks shaft damage if you’re not experienced with precision drilling.
Hot-melt glue is the best adhesive for most carbon arrow insert installations because it bonds strongly, allows heat removal if needed, and cures instantly when cooled. Two-part epoxy provides a stronger permanent bond but makes future insert removal difficult and requires 24-hour cure time before shooting.
Hot-melt glue advantages:
Epoxy advantages:
Popular hot-melt options include Bohning Ferr-L-Tite Hot Melt and AAE Arizona Archery Fast Fletch Hot Melt. For epoxy, Loctite E-120HP and Bohning Fletch-Tite Platinum are archery-specific formulas that cure clear and resist impact.
Application tip: Use less adhesive than you think you need. A thin coating on the insert’s outer surface is sufficient; excess glue can pool inside the shaft and add unwanted weight or block the insert threads.
Most experienced archers prefer hot-melt for practice arrows and save epoxy for their hunting arrow builds where they want absolute permanence and maximum durability in the field.
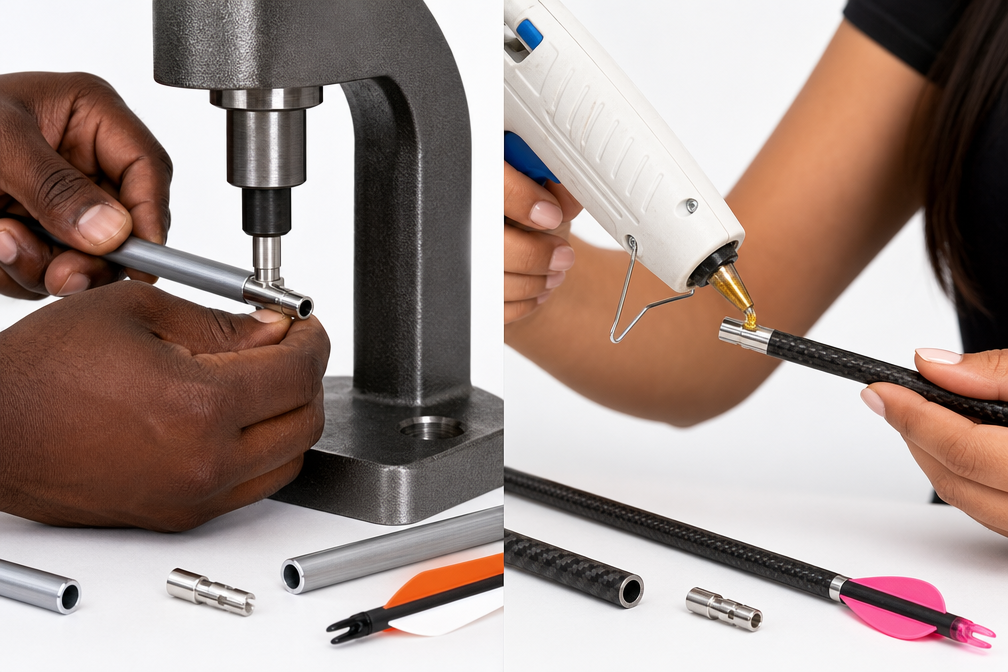
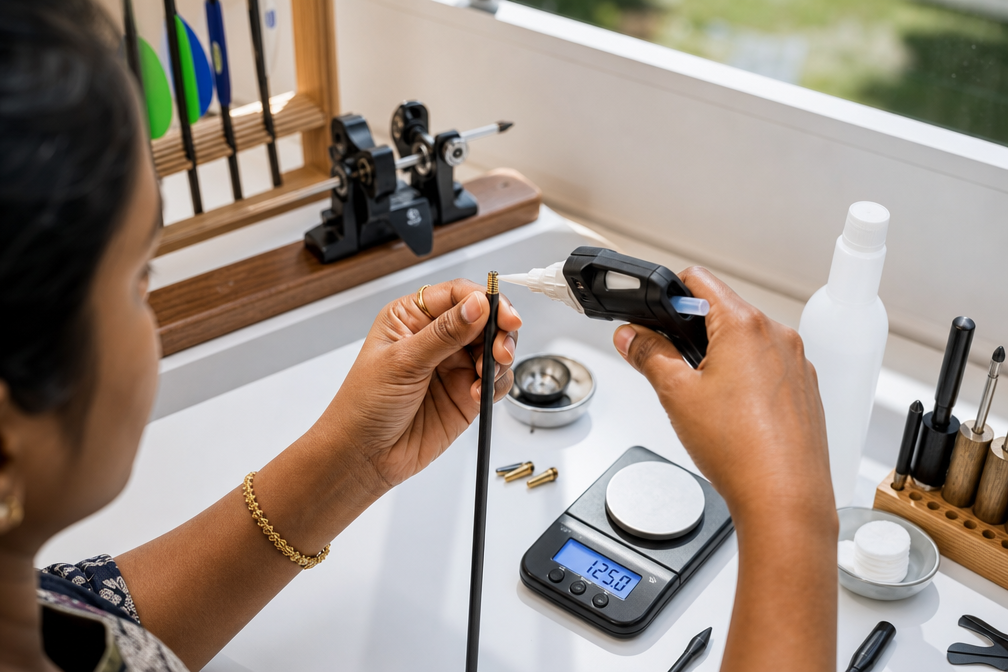
Clean the arrow shaft interior thoroughly with alcohol, apply heated adhesive to the insert, push the insert into the shaft while rotating to distribute glue evenly, verify alignment with a spinner, and allow proper cure time before attaching points. The entire process takes 5-10 minutes per arrow with hot-melt glue.
Detailed installation steps:
Prepare the shaft:
Heat the adhesive:
Install the insert:
Verify alignment:
Cure and finish:
Critical alignment check: An arrow spinner reveals even tiny misalignments that cause accuracy problems. If the point wobbles when spinning, the insert is crooked and must be corrected before adhesive fully cures.
For beginners, practice on one or two arrows first before installing inserts in a full dozen. The technique becomes intuitive after a few repetitions, and you’ll develop a feel for the right amount of glue and proper insertion depth.
Professional arrow shops typically charge $3-5 per arrow for insert installation, with some shops offering free installation if you purchase arrows and components from them. Full arrow building services (cutting, installing inserts, fletching, and final assembly) usually run $10-15 per arrow.
Cost breakdown for DIY vs. professional:
Most archers choose professional installation for their first set of arrows to see proper technique, then invest in basic tools to handle their own maintenance and future builds. The break-even point is typically around 12-15 arrows if you’re paying for installation versus buying your own tools.
When to use professional services:
When to DIY:
Many archery shops offer free installation clinics or will demonstrate the process if you buy components from them. This hands-on learning is valuable and builds confidence for future DIY work.
Remove the loose insert completely by heating the point area with a heat gun until you can pull it out with pliers, clean all old adhesive from both the insert and shaft interior, then reinstall using fresh hot-melt glue or epoxy following proper installation procedures. A loose insert indicates either insufficient adhesive, poor surface preparation, or using the wrong glue type for your arrow material.
Diagnosis and repair steps:
Identify the cause:
Complete removal:
Proper reinstallation:
Prevention tips:
If an insert loosens repeatedly in the same arrow, inspect the shaft carefully for internal damage or manufacturing defects. Sometimes the shaft’s inner diameter is slightly oversized, preventing proper adhesive contact. In these cases, a thin layer of thread or specialized shaft-building tape wrapped around the insert before gluing can improve the fit.
Aluminum arrows can use either threaded inserts with adhesive (like carbon arrows) or press-fit inserts that mechanically expand inside the shaft without glue, depending on the shaft model and wall thickness. Some aluminum arrows also accept glue-in points directly without separate inserts, particularly older or budget models.
Aluminum arrow insert methods:
Press-fit inserts are popular for aluminum target arrows because they allow easy point weight changes without heat or adhesive mess. The press tool (around $30-50) mechanically expands the insert’s outer surface against the aluminum shaft’s inner wall, creating a friction fit strong enough for target shooting but removable with the same tool.
Key differences from carbon:
For hunting with aluminum arrows, most archers still prefer adhesive installation (hot-melt or epoxy) because it provides more security than press-fit methods under the impact stress of broadhead strikes. Target archers appreciate press-fit for the convenience of swapping point weights during tuning sessions.
If you’re working with aluminum arrows, check the manufacturer’s specifications to determine which insert type your specific shaft model accepts. Some aluminum arrows are designed exclusively for one method or the other.
Yes, you can install inserts using two-part epoxy that requires no heat, or you can heat hot-melt glue with a small butane torch, lighter, or even a kitchen stove burner if you work carefully. A heat gun is the safest and most controlled option, but it’s not absolutely required for successful insert installation.
Alternative heating methods:
Epoxy installation (no heat method):
The main disadvantage of epoxy is the long cure time and difficulty of future removal. If you’re building arrows in the field or need quick repairs, hot-melt glue with any heat source is faster and more forgiving.
Safety warning: If using open flame (torch or lighter), keep heat moving and avoid prolonged exposure to carbon shafts. Carbon fiber can delaminate or weaken if overheated, and the resin matrix can release fumes when burned.
For archers who build arrows occasionally, a basic heat gun costs $20-30 and is worth the investment for safety and control. For one-time emergency repairs, careful use of a lighter or torch can work in a pinch.
Place the arrow on a spinner immediately after inserting the component while adhesive is still workable, spin the arrow and observe the point for wobble or runout, and make small adjustments by gently tapping the insert with a soft mallet or pushing with your thumb until the point spins true. Proper alignment is critical for archery accuracy and consistent arrow flight.
Alignment verification process:
Tools for alignment:
Common alignment problems:
If you don’t have an arrow spinner, you can roll the arrow slowly on a perfectly flat surface and watch the point. A misaligned insert will cause the point to trace a small circle rather than staying in one spot. This method is less precise than a spinner but can identify major alignment issues.
For hunting arrows where broadhead flight is critical, perfect insert alignment is non-negotiable. Even small misalignments that don’t affect field point accuracy can cause broadheads to plane or spiral because of their larger surface area.
The most frequent errors include using too much adhesive (which pools inside the shaft and blocks threads or adds unwanted weight), insufficient shaft cleaning (oils and residue prevent proper bonding), and shooting arrows before adhesive fully cures. Other common mistakes include misalignment, using the wrong glue type, and applying uneven heat during installation.
Top mistakes and solutions:
Excess adhesive:
Dirty shaft interior:
Premature shooting:
Poor alignment:
Wrong adhesive choice:
Uneven heating:
Insert not fully seated:
Quality check before shooting:
Many beginners use 3-4 times more glue than necessary because they fear the insert will come loose. In reality, a thin coating provides maximum bond strength, while excess glue creates problems without improving security.
Outserts are external collar systems that slide over the arrow shaft rather than inserting inside it, offering advantages for heavy front-of-center builds and easier installation, but they add bulk that can affect arrow flight and penetration through targets. Neither system is universally better; the choice depends on your specific archery application and arrow setup goals.
Outsert advantages:
Outsert disadvantages:
Regular insert advantages:
When to choose outserts:
When to choose regular inserts:
For most recreational archers and target shooters, standard inserts provide everything needed at lower cost and with cleaner arrow profile. Serious bowhunters building specialized heavy arrow setups often prefer outserts for the flexibility to add substantial front weight and achieve 15-20% FOC for better penetration on game.
Hot-melt glue cures instantly when cooled and arrows are safe to shoot after 2-3 minutes of cooling time, while two-part epoxy requires a full 24-hour cure before shooting to achieve maximum bond strength. Shooting before proper cure time risks insert failure, accuracy problems, and potential safety issues if the point separates during the shot.
Cure time by adhesive type:
Testing cure completion:
Consequences of premature shooting:
Even though hot-melt glue sets quickly, some archers wait 10-15 minutes before shooting to ensure the adhesive has fully hardened throughout the bond area. The glue at the surface cools first, but adhesive deeper in the joint may take a few extra minutes to solidify completely.
For epoxy installations, resist the temptation to test arrows early. The adhesive may feel hard after a few hours, but full chemical cure takes 24 hours. Shooting at 12 hours might seem fine initially, but the bond won’t have achieved maximum strength and can fail under impact stress.
Pro tip: Install inserts the evening before you plan to shoot. This gives hot-melt glue plenty of cooling time and ensures epoxy has fully cured, eliminating any uncertainty about readiness.
Beginners should use standard-weight inserts (12-16 grains for carbon arrows) with 100-grain field points, which provide reliable performance for learning proper form and developing archery accuracy without the complexity of specialized weight systems. Specialized inserts (heavy, lightweight, or adjustable-weight) are for advanced archers fine-tuning arrow flight or building specific hunting setups.
Standard beginner setup:
When beginners might need different inserts:
Advanced insert options (not for beginners):
The beginner’s priority should be building consistent, straight-flying arrows with reliable components. Standard inserts and 100-grain points are the industry baseline, meaning they’re compatible with the widest range of arrows, bows, and shooting styles. This universality makes it easier to get advice, find replacement components, and follow standard tuning procedures.
As skills develop and you understand how arrow weight, FOC, and point weight affect your specific shooting style and bow setup, you can experiment with specialized inserts. But for the first 6-12 months of archery, standard components remove variables and let you focus on fundamentals like proper stance and consistent release technique.
Cost consideration: Standard inserts cost $0.50-2 each, while specialized heavy or adjustable inserts can run $5-15 each. For a beginner building their first dozen arrows, standard inserts save $50-150 without sacrificing performance during the learning phase.
Can I reuse arrow inserts after removing them?
Yes, you can reuse inserts if they’re undamaged and you thoroughly clean all old adhesive from the exterior surface before reinstalling. Inspect threads for damage and verify the insert isn’t bent or cracked from the removal process.
What happens if I use too much glue when installing inserts?
Excess glue pools inside the arrow shaft, potentially blocking the insert’s threads so field points won’t screw in properly, adding unwanted weight, and creating an uneven internal surface that affects arrow balance. Use only a thin coating on the insert’s exterior.
Do I need different inserts for broadheads versus field points?
No, the same insert accepts both field points and broadheads as long as they share the same thread standard (typically 8-32) and grain weight. This interchangeability is the primary advantage of the threaded insert system.
How do I know if my insert is installed deep enough?
The insert should sit flush with the arrow shaft’s end or slightly recessed (typically 1-2mm) according to the shaft manufacturer’s specifications. If the insert protrudes, it will interfere with proper point seating and may affect accuracy.
Can I install inserts in arrows that are already fletched?
Yes, insert installation doesn’t interfere with fletching at the opposite end of the arrow. However, most arrow builders install inserts before fletching to verify total arrow weight and balance before completing the build.
What’s the difference between standard and deep inserts?
Deep inserts (also called long inserts) extend further into the arrow shaft, typically 1-1.5 inches versus 0.5-0.75 inches for standard inserts. They provide more bonding surface area and structural support, preferred for heavy hunting setups but unnecessary for target archery.
Will hot-melt glue fail in hot weather or in a car?
Quality archery hot-melt adhesives are formulated to withstand temperatures up to 150-160°F, which is higher than typical car interior temperatures. However, leaving arrows in direct sunlight in a hot vehicle for extended periods can soften the adhesive and cause inserts to loosen.
How do I remove an insert if I used epoxy instead of hot-melt?
Apply more aggressive heat (sometimes until the epoxy smokes slightly) and use pliers to extract the insert, or use a specialized insert puller tool that grips the threads. Some archers carefully drill out epoxied inserts if heat removal risks shaft damage.
Can I use super glue or household adhesives for arrow inserts?
No, cyanoacrylate (super glue) and household adhesives are too brittle for arrow insert installation and will fail under impact stress. Use archery-specific hot-melt glue or two-part epoxy formulated for arrow building.
Do I need to use thread-locker on field points after installing inserts?
Thread-locker isn’t required but helps prevent field points from unscrewing during shooting, especially with mechanical broadheads or if you notice points loosening frequently. Apply a small drop to threads before screwing in points.
What grain weight insert should I use for hunting?
Most hunters use standard 12-16 grain inserts with 100-125 grain points for adequate penetration and arrow durability. Heavy insert systems (50-100 grains) are popular for specialized high-FOC setups seeking maximum penetration on large game.
How straight do inserts need to be for good accuracy?
Inserts should have less than 0.010-inch runout (wobble) for optimal accuracy, especially when shooting broadheads that need to fly like field points. Use an arrow spinner to verify alignment during installation while adhesive is still workable.
Installing arrow inserts and points is a fundamental arrow-building skill that every archer can master with proper tools, technique, and attention to detail. The process requires cleaning the shaft thoroughly, applying the appropriate adhesive (hot-melt for flexibility, epoxy for permanence), carefully inserting and aligning the component, and allowing adequate cure time before shooting.
Success comes from avoiding common mistakes: using too much glue, skipping the cleaning step, shooting before adhesive cures, and neglecting alignment verification. An arrow spinner is the single most valuable tool for ensuring proper installation, revealing misalignments that would otherwise cause accuracy problems and inconsistent arrow flight.
For beginners, start with standard-weight inserts and 100-grain field points using hot-melt glue, which allows easy correction of mistakes and future adjustments. As your skills and understanding develop, you can experiment with specialized inserts, different adhesives, and weight configurations to optimize your setup for specific archery applications.
Next steps to get started:
Whether you’re building practice arrows for target shooting or preparing hunting arrows for the field, proper insert installation ensures reliable performance, consistent accuracy, and the flexibility to swap between field points and broadheads as your archery pursuits evolve.