
Newsletter Subscribe
Enter your email address below and subscribe to our newsletter
All voices matter
All voices matter

 ByTravis
Learn how to sight in a bow at 20 yards with step-by-step instructions, adjustment techniques, and expert tips for compound and recurve bows.
Affiliate Disclaimer: We are a participant in the Amazon Services LLC Associates Program, an affiliate advertising program designed to provide a means for sites to earn advertising fees by advertising and linking to Amazon.com. As an Amazon Associate I earn from qualifying purchases. We also participate in other affiliate programs.
Sighting in a bow at 20 yards requires securing your bow in a stable shooting position, shooting a group of 3-5 arrows at a target, then adjusting your sight pins in the direction you want your arrows to move, if arrows hit low, move the sight down; if they hit right, move the sight right. This process typically takes 15-30 minutes and 15-20 arrows for most archers to achieve consistent accuracy at this foundational distance.

Sighting in a bow means adjusting your bow sight so that your arrows consistently hit where you aim at a specific distance. The process aligns your sight pins with your arrow’s actual point of impact, accounting for your individual shooting form, bow setup, and arrow characteristics.
Every archer shoots slightly differently, and every bow-and-arrow combination produces unique flight characteristics. Your friend’s perfectly sighted bow will not shoot accurately for you because variables like draw length, anchor point, release technique, and even grip pressure affect where arrows land. Sighting in personalizes your equipment to your shooting style.
The fundamental principle: Your sight tells you where to aim, but only after you’ve calibrated it to match where your arrows actually fly. Without proper sighting, you’re essentially guessing where your arrow will land relative to your aiming point.
For compound bow shooters using multi-pin sights, each pin corresponds to a different distance, typically 20, 30, 40, and 50 yards. The 20-yard pin serves as your foundation because it’s the first pin you’ll set, and all other pins are adjusted relative to it.
Twenty yards represents the optimal balance between accuracy feedback and forgiveness for initial bow sighting. At this distance, sight misalignment creates noticeable arrow deviation (typically 4-6 inches for every 1/8-inch sight adjustment), but minor form inconsistencies won’t completely obscure your grouping pattern.
Closer distances like 10 yards mask sight problems because arrows hit relatively close to your aiming point even with significant misalignment. You might think your sight is perfect at 10 yards, only to discover you’re missing by 12 inches at 30 yards. Conversely, starting at longer distances like 40 yards amplifies every form flaw, making it nearly impossible to distinguish between sight problems and technique problems.
Choose 20 yards as your starting point if:
Most hunting scenarios occur within 20-40 yards, making 20 yards directly relevant to field conditions. Once your 20-yard pin is dialed in, you can confidently extend to longer distances knowing your foundation is solid. For more foundational practice techniques, explore our archery practice drills at 10 yards.
You need five essential items to properly sight in your bow at 20 yards: a bow with an attached sight, arrows matched to your bow’s specifications, a stable target, a method to measure exactly 20 yards, and a tool to adjust your sight pins (usually an Allen wrench set).
Essential equipment checklist:
Optional but helpful items:
Your arrows must be properly matched to your bow’s draw weight and draw length. Shooting arrows with incorrect spine (stiffness) will produce erratic flight patterns that no amount of sight adjustment can fix. If you’re unsure about arrow compatibility, consult your bow’s manufacturer specifications or visit a pro shop for a professional arrow selection.
The target should be large enough to safely catch errant arrows during the sighting process, a 24-inch target face minimum. Position your target at exactly 20 yards, measured from where you’ll stand to the target’s center. Even a 2-yard measurement error will throw off your entire sighting process.
Begin by setting your top sight pin to a middle position in your sight housing, giving yourself room to adjust up or down. Stand at exactly 20 yards from your target, assume your normal shooting stance, and shoot a group of 3-5 arrows aiming at the bullseye with your top pin.
Detailed sighting process:
Establish your baseline: Shoot 3-5 arrows without adjusting anything, focusing on consistent form and anchor point. Don’t chase individual arrows, shoot the entire group first.
Identify your group center: Ignore outliers and find where the majority of your arrows clustered. This cluster represents your true point of impact, not any single arrow.
Determine adjustment direction: If your group is low, move your sight down. If your group is left, move your sight left. This seems backward, but it’s correct, you’re moving the sight toward where your arrows are hitting.
Make small adjustments: Start with 1/8-inch movements (about 3-4 clicks on most micro-adjust sights). Large adjustments often overshoot and waste arrows.
Shoot another group: Fire 3-5 more arrows and observe how your group moved. Your arrows should shift toward the bullseye.
Repeat until centered: Continue the adjust-shoot-observe cycle until your arrow group centers on the bullseye. Most archers need 3-5 adjustment cycles.
Confirm with a final group: Once centered, shoot one more 5-arrow group to verify consistency. All five arrows should land within a 4-6 inch circle at 20 yards.
Common mistake: Making adjustments after every single arrow. This approach confuses form errors with sight errors. Always shoot a complete group before touching your sight. For proper shooting form fundamentals, review techniques in our guide to drawing a bow smoothly.
Pro tip: If your groups are scattered across a 12-inch area or larger, your sight isn’t the problem, your form is. Stop adjusting your sight and focus on consistent anchor point, grip pressure, and release technique. Consider practicing blank bale shooting to refine your form before continuing the sighting process.
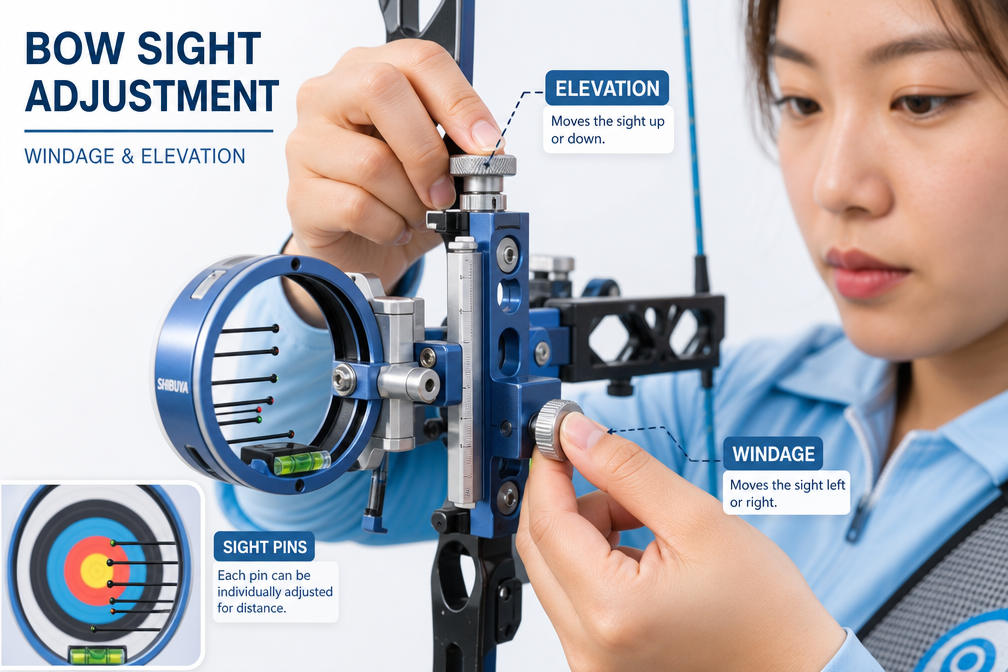
Bow sight pins move via windage (left-right) and elevation (up-down) adjustment screws located on your sight housing. To adjust elevation, loosen the elevation lock screw, move the entire sight housing or individual pin in the direction your arrows are hitting, then retighten the lock screw.
Elevation adjustment (vertical):
Windage adjustment (horizontal):
Most modern bow sights feature micro-adjustment knobs that click as you turn them. Each click typically represents 0.019 inches of sight movement, which translates to roughly 1-2 inches of arrow impact change at 20 yards. Count your clicks so you can reverse adjustments if you overshoot.
Two types of sight adjustment systems:
Fixed-pin sights: Each pin adjusts independently. You’ll move only your top pin during 20-yard sighting. The adjustment screws are usually located directly on each pin housing.
Movable sight housing: The entire sight block moves up/down and left/right. All pins move together, maintaining their relative spacing. This system is common on single-pin slider sights.
After loosening adjustment screws, move your pin the desired amount, then firmly retighten before shooting. A loose pin will shift during the shot, producing inconsistent results. Don’t overtighten, you’ll strip the threads. Snug is sufficient.
Edge case: If you’ve maxed out your adjustment range and still can’t center your groups, your sight is mounted incorrectly or your arrow rest needs adjustment. This situation is rare but requires professional help to diagnose. For more on sight systems, visit our sights, rests, and releases category.
Shoot groups of 3-5 arrows between each sight adjustment, totaling 15-20 arrows for a complete 20-yard sighting session. Shooting fewer than three arrows per group doesn’t provide enough data to distinguish between form errors and sight misalignment, while shooting more than five arrows per group causes fatigue that degrades accuracy.
Optimal shooting sequence:
Three-arrow groups work well for experienced archers with consistent form. If you’re newer to archery or notice your groups spreading beyond 8 inches, shoot 4-5 arrow groups to get clearer feedback about your true point of impact.
Why not shoot more arrows per group? Fatigue accumulates quickly, especially for archers shooting higher draw weights (50+ pounds). By your 8th or 9th consecutive shot, your back and shoulder muscles tire, your form degrades, and your groups open up. These fatigue-induced errors look identical to sight problems, leading you to make unnecessary adjustments.
Practical approach: Shoot your group, walk to the target to examine arrow placement and make adjustments, then walk back to the shooting line. This built-in rest period prevents fatigue while giving you close-up feedback on your grouping. The 40-yard round trip takes 60-90 seconds, enough recovery time to maintain consistent form.
If you’re sighting in multiple pins (20, 30, 40 yards), complete the 20-yard pin first, then take a 10-15 minute break before moving to the next distance. Trying to sight all pins in one continuous session leads to fatigue-induced errors that compromise accuracy.
Both compound and recurve bows follow the same fundamental sighting principle, move the sight toward your arrow impacts, but compound bows typically use multi-pin sights with micro-adjustments while recurve bows often use simpler single-pin or aperture sights with coarser adjustments.
Compound bow sighting characteristics:
Recurve bow sighting characteristics:
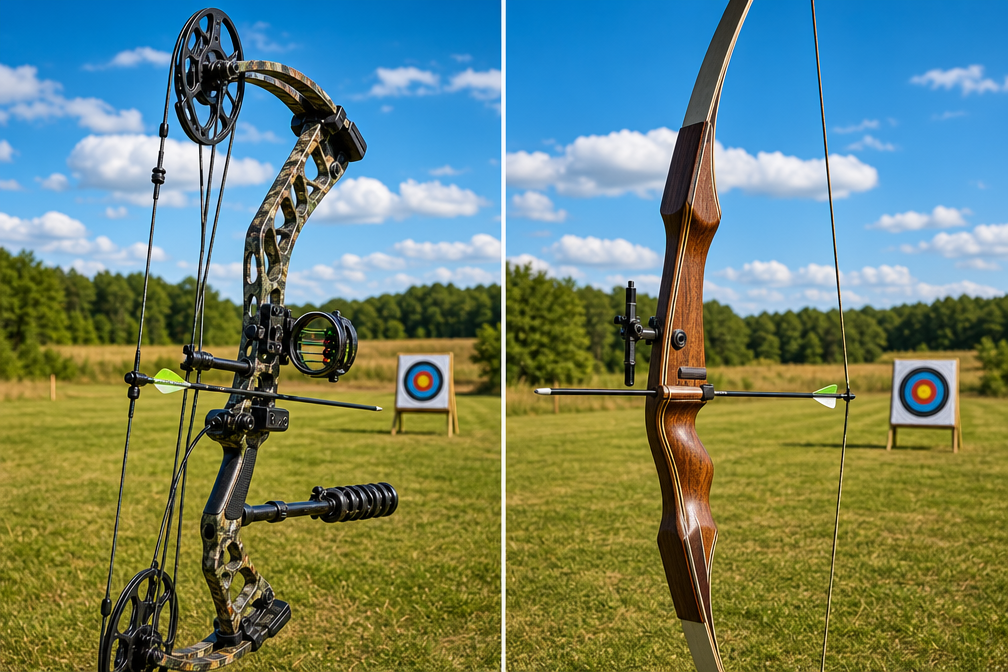
The compound bow’s mechanical advantages (let-off, peep sight, release aid) produce more consistent arrow flight, making sight adjustments more predictable. When you move a compound bow sight 1/8 inch, your arrows will reliably shift 4-6 inches at 20 yards.
Recurve bows introduce more human variability. Finger release technique, string hand position, and bow cant (tilting) all affect arrow flight more dramatically than with compound bows. Your first few arrow groups might spread across 10-12 inches even with a properly adjusted sight, simply because you’re still developing consistent form.
Adjustment strategy for recurve bows: Make slightly larger initial adjustments (3/16 inch instead of 1/8 inch) because the increased variability makes small changes harder to detect. Once you’re within 4-6 inches of center, switch to smaller 1/8-inch adjustments for final tuning.
Both bow types benefit from the same 20-yard starting distance and the same adjust-shoot-observe cycle. The core process doesn’t change, only the equipment details and the number of arrows needed to achieve consistent results.
Start sighting in at 20 yards rather than 10 yards because 20 yards provides meaningful feedback about sight alignment while 10 yards is too close to reveal sight problems that will appear at hunting or competition distances.
At 10 yards, your arrow’s trajectory is nearly flat, and even significant sight misalignment produces only 2-3 inches of deviation. You might achieve a perfect bullseye at 10 yards with a sight that’s actually 1/4 inch off, then discover you’re missing by 15 inches at 30 yards. The close distance masks the problem.
When 10 yards makes sense:
When 20 yards is the right choice:
Some instructors recommend a 10-15-20 yard progression for absolute beginners, starting at 10 yards to verify the arrow hits somewhere on the target, then moving to 15 yards for rough sight adjustment, and finally settling at 20 yards for precise tuning. This approach works but adds 20-30 minutes to the process.
Most efficient approach for archers with basic competency: Skip 10 yards entirely and start at 20 yards. If your arrows are hitting wildly off-target (more than 24 inches from center), your problem isn’t the sight, it’s arrow rest alignment, nocking point position, or severe form issues that require professional diagnosis.
Sight in your bow at 20, 30, and 40 yards for general hunting applications, with 20 yards serving as your primary pin because most big game animals are taken at 25 yards or closer. Add a 50-yard pin only if you hunt open terrain where longer shots are common and ethical.
Standard hunting sight setup:
Most whitetail deer hunters take shots between 15-25 yards, making the 20-yard pin their workhorse. Elk hunters in open country might regularly use 30-40 yard pins. Match your sight setup to your hunting environment and personal effective range.
Ethical consideration: Your maximum sighting distance should be shorter than your maximum effective range. If you can consistently hit a 6-inch circle at 40 yards in practice, sight in to 40 yards. If your groups open to 10-12 inches at 40 yards, stop at 30 yards. Sighting in at a distance doesn’t make you competent at that distance, practice does.
After establishing your 20-yard pin, sight in additional pins by shooting at their respective distances and repeating the same adjustment process. Your 30-yard pin will sit below your 20-yard pin, your 40-yard pin below that, and so on. The vertical spacing between pins increases as distance increases due to arrow trajectory.
For realistic hunting practice scenarios, see our guide on how to practice for bowhunting realistic scenarios.
Twenty yards is ideal for beginners to sight in their bow because it’s close enough to build confidence and see clear results, yet far enough to teach proper sight adjustment principles that apply at all distances. Beginners typically achieve acceptable accuracy (8-inch groups) at 20 yards within their first sighting session.
Why 20 yards works for beginners:
Beginner-specific challenges at 20 yards:
Beginner sighting strategy: Shoot 5-arrow groups and ignore your worst arrow when determining group center. This approach accounts for the occasional form breakdown that’s normal when you’re still developing muscle memory. As your form improves over subsequent practice sessions, your groups will naturally tighten.
If you’re struggling to keep arrows on a 24-inch target at 20 yards, move closer to 15 yards temporarily, not to sight in, but to practice form fundamentals until your consistency improves. Once you can keep all arrows on target at 15 yards, move back to 20 yards for actual sighting.
New archers should expect to spend 30-45 minutes on their first 20-yard sighting session, shooting 20-30 arrows total. This is normal. Experienced archers can sight in at 20 yards in 15 minutes with 12-15 arrows because their form is consistent.
The most common mistake when sighting in a bow for the first time is adjusting the sight after every single arrow instead of shooting a complete 3-5 arrow group, which leads to chasing individual arrows rather than correcting the true group center.
Critical mistakes and corrections:
Mistake 1: Adjusting after each arrow
Mistake 2: Moving the sight the wrong direction
Mistake 3: Making large adjustments
Mistake 4: Inconsistent shooting form
Mistake 5: Sighting when fatigued
Mistake 6: Ignoring environmental factors
Mistake 7: Using damaged or mismatched arrows
First-time sighters often expect immediate perfection and become frustrated when their first group isn’t centered. Sighting is an iterative process, three to five adjustment cycles is completely normal. Trust the process, shoot complete groups, and make small adjustments.
If your bow shoots left after sighting in, the most likely causes are torquing the bow grip (twisting the bow handle during the shot), inconsistent anchor point, or wind drift affecting your arrows during the sighting session but not during subsequent shooting.
Diagnosis checklist for left impacts:
Grip torque (most common cause):
Anchor point inconsistency:
Wind drift during sighting:
Rest alignment issues:
For right-handed shooters, leftward impacts typically indicate grip torque or rest misalignment. For left-handed shooters, the same symptoms suggest the opposite mechanical issues. The solution remains the same: isolate variables by shooting with exaggerated attention to one element at a time.
Quick field test: Shoot three arrows with normal form, then shoot three arrows with deliberately relaxed grip pressure (so relaxed the bow almost feels like it will fall out of your hand). If the second group moves right, grip torque was your problem. For more on proper form, explore our resources on archery form.
You can sight in a bow without a formal target or range by using a cardboard box stuffed with old clothing or plastic bags as a backstop, measuring 20 yards with a tape measure or by pacing (roughly 18-20 normal steps), and following the same adjustment process you’d use at a range.
Improvised sighting setup:
Backstop options:
Distance measurement:
Safety requirements for improvised ranges:
Limitations of improvised setups:
Workaround for visibility: Tape a paper plate or piece of white paper to your backstop as an aiming point. Mark the center with a dark circle. After each arrow group, walk to the target and mark where arrows hit with a marker, giving you reference points for sight adjustment.
Many bowhunters sight in at home using this exact setup, particularly when fine-tuning after equipment changes. While not ideal for beginners who benefit from range amenities and instruction, improvised setups work perfectly well for experienced archers who understand the sighting process.
Yes, you need to re-sight your bow after changing arrows because different arrow weights, spine stiffness, and lengths alter arrow trajectory, causing your existing sight settings to become inaccurate by 4-8 inches or more at 20 yards.
Arrow changes requiring re-sighting:
Arrow weight change:
Arrow spine change:
Arrow length change:
Broadhead vs field point:
Minor changes not requiring re-sighting:
Re-sighting process after arrow changes: Follow the same 20-yard sighting procedure described earlier, but you’ll likely need fewer arrows (8-12 total) because you’re making minor corrections to existing settings rather than establishing new ones from scratch.
Pro tip: When switching to hunting arrows with broadheads, sight in with field points first, then shoot a few arrows with broadheads to verify point of impact. If broadheads hit within 2 inches of field points, your setup is well-tuned. If broadheads hit more than 3 inches away from field points, you need arrow rest adjustment or paper tuning, not just sight adjustment. Learn more about broadhead selection and tuning.
Properly sighting in a bow at 20 yards takes 15-30 minutes for experienced archers and 30-45 minutes for beginners, shooting 15-25 arrows total to achieve consistent accuracy within a 6-inch group.
Time breakdown by experience level:
Experienced archers (3+ years regular shooting):
Intermediate archers (1-3 years regular shooting):
Beginner archers (less than 1 year experience):
Factors that extend sighting time:
Factors that reduce sighting time:
Realistic expectation: If you’re sighting in a new bow or making significant equipment changes, budget 45 minutes including setup time, shooting time, and breaks. Rushing the process leads to fatigue-induced errors that compromise accuracy. Better to take an extra 10 minutes and get it right than to finish quickly with inaccurate sight settings.
Most archers sight in multiple pins (20, 30, 40 yards) in a single range session, which extends total time to 60-90 minutes. However, the 20-yard pin always comes first and takes the most time because it’s your foundation.
Sighting in a bow at 20 yards is a systematic process that transforms your equipment from a generic tool into a personalized precision instrument. By shooting consistent arrow groups, adjusting your sight in the direction of your impacts, and repeating the process until your arrows center on target, you establish the foundation for accurate shooting at all distances.
The 20-yard distance serves as the ideal starting point because it balances feedback clarity with forgiveness, revealing sight problems without amplifying every minor form inconsistency. Whether you shoot a compound bow with a multi-pin sight or a recurve bow with a simple aperture sight, the fundamental principles remain the same: shoot groups before adjusting, move your sight toward your arrow impacts, and make small incremental changes.
Your next steps:
Once your 20-yard pin is dialed in, you can confidently extend to longer distances, knowing your foundation is solid. Practice regularly at 20 yards to maintain your sight settings and develop the consistent form that makes accurate shooting possible. For continued skill development, explore our complete guide to multi-pin sight aiming and realistic bowhunting practice scenarios.
Remember that sighting in is not a one-time event but an ongoing process. Environmental changes, equipment wear, and even changes in your shooting form may require periodic re-sighting. Check your 20-yard accuracy before every hunting season and after any significant equipment modifications to ensure your bow shoots where you aim when it matters most.
How accurate should I be at 20 yards after sighting in?
After proper sighting in, you should consistently group arrows within a 6-inch circle at 20 yards. Experienced archers often achieve 3-4 inch groups, while beginners should expect 6-8 inch groups initially, tightening with practice.
Can I sight in my bow indoors at 20 yards?
Yes, you can sight in indoors if you have 20 yards of clear space and adequate lighting. Indoor ranges eliminate wind variables and provide consistent conditions, often producing more accurate initial sight settings than outdoor ranges.
How do I know if my bow sight is broken or just needs adjustment?
A broken sight will have loose pins that move during shooting, stripped adjustment screws that won’t tighten, or visible cracks in the sight housing. If adjustments move your arrow impacts predictably, your sight is working correctly and just needs calibration.
Should I sight in with one eye closed or both eyes open?
Use whichever method you’ll use while hunting or competing. Most compound bow shooters close their non-dominant eye for precise aiming, while many traditional archers shoot with both eyes open. Consistency matters more than the specific method.
What if my arrows group well but consistently hit 6 inches left at 20 yards?
Consistent grouping with offset impact indicates your sight needs adjustment, not a form problem. Simply move your sight 6 inches left (following the “move toward impacts” rule) and shoot another group to verify correction.
How often should I re-sight my bow?
Re-sight your bow annually before hunting season, after any equipment changes (new arrows, string replacement, rest adjustment), after traveling with your bow, or whenever you notice accuracy degradation beyond 6 inches at 20 yards.
Can I sight in at 20 yards and then hunt at 30 yards without adjusting?
No, you need separate sight pins for different distances. An arrow sighted for 20 yards will hit 8-12 inches low at 30 yards due to trajectory drop. Set your 20-yard pin first, then sight additional pins at 30, 40, and 50 yards as needed.
Why do my arrow groups spread more at the end of my sighting session?
Group spread at the end of a session indicates muscle fatigue degrading your form. Take longer breaks between shooting groups, reduce your bow’s draw weight if possible, or split sighting across multiple shorter sessions.
Is it normal for my sight settings to be different from my friend’s settings?
Yes, sight settings are completely individual. Your draw length, anchor point, release technique, arrow specifications, and even bow model all affect where arrows impact. Never copy someone else’s sight settings.
What do I do if I run out of adjustment range on my sight?
Running out of adjustment range indicates your sight is mounted incorrectly, your arrow rest needs repositioning, or your arrows are mismatched to your bow. This requires professional diagnosis at a pro shop, don’t attempt to force adjustments beyond the sight’s range.
Should I sight in with my hunting clothes on?
Yes, sight in wearing the same clothing you’ll wear while hunting, including bulky jackets or chest protectors. Thick clothing can affect your anchor point and string clearance, changing your point of impact by 2-3 inches.
How do I sight in if I can’t see the target clearly at 20 yards?
If you need corrective lenses for distance vision, wear them while sighting in and hunting. Alternatively, use a magnified bow sight with a lens that compensates for your vision. Never sight in with different vision correction than you’ll use in the field.


