
Newsletter Subscribe
Enter your email address below and subscribe to our newsletter

All voices matter
All voices matter

 ByTravis
Realistic bowhunting practice means moving beyond static range shooting to simulate actual field conditions - varied distances, awkward angles, elevated positions, and weather extremes.
Affiliate Disclaimer: We are a participant in the Amazon Services LLC Associates Program, an affiliate advertising program designed to provide a means for sites to earn advertising fees by advertising and linking to Amazon.com. As an Amazon Associate I earn from qualifying purchases. We also participate in other affiliate programs.

Learning how to practice for bowhunting in realistic scenarios means moving beyond static range shooting to simulate actual hunting conditions including varied distances, awkward angles, elevated positions, weather extremes, and the physical and mental stress of field situations. Effective bowhunting practice incorporates 3D targets, treestand shooting, terrain variations, full hunting gear, and time constraints that mirror the split-second decisions required during actual hunts. This approach builds muscle memory and confidence for ethical, accurate shots when opportunities arise in the field.
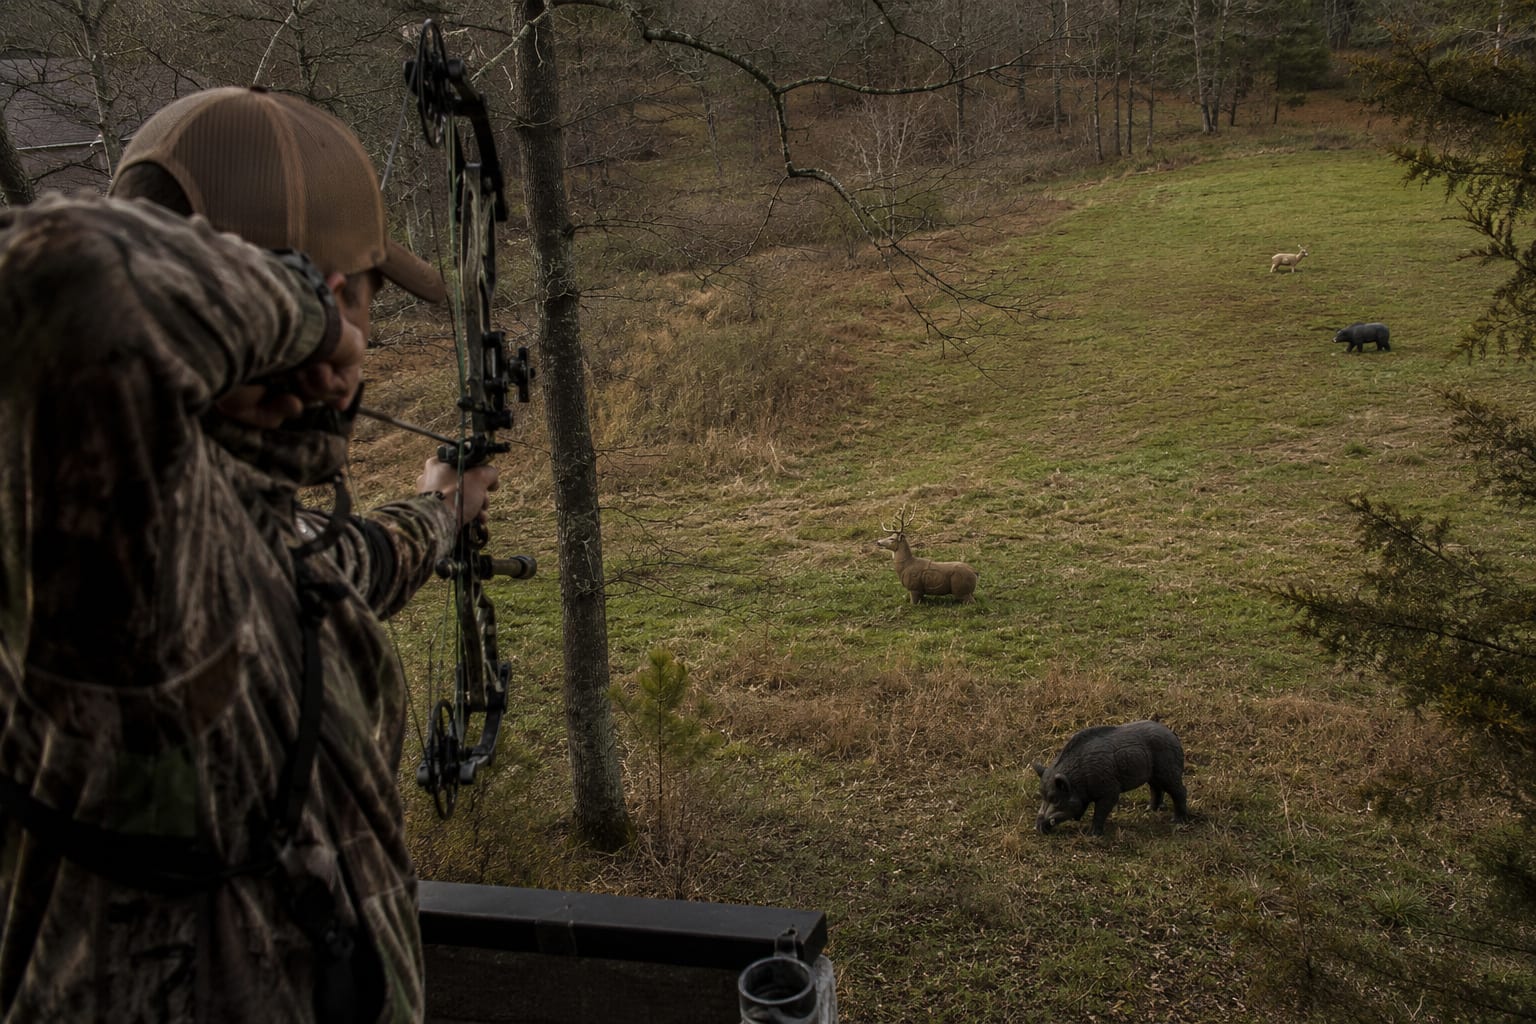
Realistic bowhunting practice recreates the physical conditions, mental pressure, and environmental variables encountered during actual hunts rather than controlled range shooting. This training method incorporates uneven terrain, awkward shooting positions, varying light conditions, full hunting gear, and time-limited shot opportunities that force quick decision-making. The goal is to eliminate the gap between range performance and field performance by making practice harder than the actual hunt.
Traditional archery practice focuses on perfect form and tight groups at known distances from a comfortable stance. While these fundamentals matter, they represent only a fraction of what bowhunters face when a deer steps into a shooting lane at an unknown distance while the hunter is perched 20 feet up a tree wearing bulky clothing.
Key elements that make practice realistic:
Realistic practice builds confidence because bowhunters know they have successfully made difficult shots under challenging conditions. This mental preparation often matters more than physical skill when a trophy animal appears and adrenaline spikes.
Simulating hunting conditions when practicing archery requires deliberately introducing variables that disrupt comfort and consistency. Start by abandoning the flat, open shooting lane and instead practice in wooded areas or yards with natural obstacles. Place targets at varying distances without marking the yardage, forcing range estimation with a rangefinder only after committing to a shot.
Effective simulation techniques:
One particularly effective drill involves having a practice partner call out random yardages and body positions. The shooter must quickly assume that position, range the target, and take the shot within 20 seconds. This builds the rapid decision-making skills needed when game appears unexpectedly.
Choose simulation methods based on your primary hunting style. Treestand hunters should emphasize elevated shooting, while spot-and-stalk hunters need more practice with varied terrain and shooting positions. Western hunters pursuing elk in mountains require different preparation than whitetail hunters in eastern forests.
The best drills for bowhunting practice at home focus on shot execution under realistic constraints rather than volume shooting. The “one arrow drill” forces complete focus on a single shot by allowing only one arrow per target, simulating the single opportunity most hunting situations provide. The “blind bale drill” involves shooting into a target from 3-5 yards with eyes closed to perfect release mechanics and follow-through without worrying about arrow placement.
High-value home practice drills:
Timed shooting drill: Set a timer for random intervals between 10-30 seconds. When it sounds, you have that amount of time to draw, aim, and release at an unmarked distance target. This builds speed and decision-making under pressure.
Obstacle course drill: Create a backyard course with 5-7 stations featuring different challenges – shooting through a narrow gap, from a kneeling position, at a steep upward angle, from behind a barrier, etc. Complete the course with one arrow per station.
Cold bow drill: Without any warm-up shots, take your first arrow of the day at a vital-zone target at 30 yards. This simulates the reality that your first shot in the field is often the only shot that matters.
Fatigue drill: After physical exertion (carrying a heavy pack, climbing stairs, doing burpees), immediately shoot at a target while breathing hard and heart rate elevated. This replicates the physical state after hiking to a stand or tracking game.
Form check drill: Shoot one arrow at close range (5 yards) focusing entirely on perfect form, then immediately shoot at your maximum effective range. This reinforces that form remains constant regardless of distance.
The key to effective home drills is quality over quantity. Twenty focused shots with realistic constraints build better hunting skills than 100 arrows shot in perfect conditions. Track your success rate on first-arrow shots and shots taken under time pressure, as these metrics better predict field performance than group size.
3D targets are better for bowhunting practice because they provide realistic vital zone visualization, unknown distance estimation, and the psychological experience of aiming at an animal form. Paper targets excel at diagnosing form issues and building fundamental accuracy but lack the depth perception and range estimation challenges that 3D targets provide. Most serious bowhunters use both, dedicating 70-80% of practice time to 3D targets in the months before season.
3D target advantages:
Paper target advantages:
The ideal practice regimen combines both target types strategically. Use paper targets for form work, tuning verification, and building fundamental accuracy at known distances. Switch to 3D targets for scenario-based practice, unknown distance shooting, and final pre-season preparation.
For bowhunters on a budget, prioritize one quality 3D deer target over multiple paper targets. Position it at varying distances and angles throughout your practice area to maximize training value. Replace worn vital zones with repair inserts rather than buying new targets.
Practicing shooting from a treestand safely requires a full-body safety harness attached to the tree at all times, a pull-up rope for raising and lowering the bow, and a stable platform that does not wobble or shift during the draw cycle. Start at lower heights (8-10 feet) before progressing to hunting height (15-20 feet), and always practice with another person present who can respond to emergencies. Never practice treestand shooting alone, especially when first learning elevated shooting techniques.
Safe treestand practice protocol:
The downward angle from a treestand changes arrow trajectory because gravity affects the arrow differently than on level ground. At typical treestand heights (15-20 feet) and distances (15-25 yards), aim slightly lower than the rangefinder distance suggests, or use the true horizontal distance rather than line-of-sight distance.
Common treestand shooting mistakes:
For bowhunters without access to trees, a sturdy elevated deck, second-story balcony, or purpose-built shooting tower provides similar practice value. The key is replicating the downward angle and restricted movement of actual hunting positions.

Bowhunters should practice primarily at distances between 10-40 yards, with the majority of practice time spent at 20-30 yards where most ethical shot opportunities occur. Dedicate at least 40% of practice shots to the 15-25 yard range, as statistics show most successful bowhunts happen within this window. Practice out to your maximum effective range, but recognize that effective hunting range is typically 10 yards shorter than your best practice range due to field conditions and adrenaline.
Recommended practice yardage distribution:
Your maximum ethical hunting range is the distance at which you can consistently place arrows in a 6-inch circle under field conditions, not range conditions. If you shoot 3-inch groups at 40 yards on the range, your field effective range is probably 30-35 yards when accounting for adrenaline, awkward positions, and environmental factors.
Determining personal effective range:
Practice at unknown distances by having a partner place targets randomly within your practice area. Range them only after committing to a shot, then verify accuracy. This builds the range estimation skills critical for bowhunting success, as misjudging distance by even 5 yards can result in a miss or poor hit on the vitals.
Shooting uphill and downhill requires aiming based on horizontal distance rather than line-of-sight distance because gravity only affects the arrow over the horizontal plane. For both uphill and downhill shots at angles steeper than 20 degrees, use the horizontal distance (true distance) for aiming, which is always shorter than the line-of-sight distance your rangefinder shows. Most modern rangefinders include an angle compensation mode that calculates this automatically.
Angle shooting fundamentals:
Practice setup for angle shooting:
Find terrain with natural slopes or create an elevated shooting position. Place targets uphill and downhill at various angles between 15-30 degrees. Shoot at the same target from level ground, then from elevated and depressed angles to observe the difference in impact points.
For example, a target at 30 yards line-of-sight distance at a 30-degree downward angle has a horizontal distance of approximately 26 yards. If you aim using 30 yards, your arrow will impact 3-4 inches high on a deer-sized target. This difference increases with steeper angles and longer distances.
Angle compensation methods:
Western hunters pursuing elk and mule deer in mountainous terrain must master angle shooting, as steep shots are common. Eastern whitetail hunters encounter angles primarily when shooting from elevated treestands, where the angle is typically less severe but still significant at close distances directly below the stand.
Bowhunters should practice 3-4 times per week starting 8-12 weeks before season, increasing to 5-6 times per week during the final two weeks before opening day. Each practice session should include 20-40 quality shots focusing on realistic scenarios rather than high-volume shooting that can lead to fatigue and bad habits. Consistency matters more than duration, with focused 30-minute sessions producing better results than occasional marathon practice days.
Pre-season practice timeline:
12-8 weeks out: Build or rebuild fundamental form and strength
8-4 weeks out: Transition to realistic scenario practice
4-2 weeks out: Intensify field-realistic training
Final week: Maintain edge without overtraining
Reduce practice volume during the final week to avoid fatigue and maintain mental freshness. Overtraining in the days before season can lead to target panic, form breakdown, and loss of confidence. The goal is to arrive at opening day physically prepared but mentally sharp and eager.
During the season, maintain skills with 1-2 short practice sessions per week, focusing on shot confirmation and confidence maintenance. If you miss a shot opportunity or make a poor hit, return to fundamentals with close-range form work before attempting longer distances again.
The most common mistake when practicing for bowhunting is shooting only at known distances from comfortable positions, which creates a false sense of accuracy that disappears under field conditions. Other critical errors include practicing exclusively in perfect weather, never shooting in hunting clothes, focusing on group size rather than first-arrow accuracy, and failing to practice the complete shot sequence from target acquisition through follow-through. These mistakes create a skill gap between range performance and hunting performance that costs shot opportunities.
Major practice mistakes to avoid:
Only shooting at marked distances: This eliminates the range estimation skill required for hunting. Always practice at unmarked distances and verify yardage only after committing to an aiming point.
Never practicing from elevated positions: Treestand hunters who only practice from ground level struggle with the downward angle and restricted movement when hunting. Dedicate at least 30% of practice time to elevated shooting.
Shooting too many arrows per session: High-volume practice (100+ arrows) leads to fatigue, sloppy form, and bad habits. Quality matters more than quantity, with 20-30 focused shots producing better results.
Ignoring the first arrow: Many bowhunters warm up with several shots before “counting” their practice. In hunting, the first arrow is often the only arrow. Make every first shot of each session count.
Practicing only in ideal conditions: Shooting only on calm, warm, bright days leaves bowhunters unprepared for wind, cold, and low light. Deliberately practice in challenging conditions.
Never shooting in hunting clothes: Heavy jackets, gloves, and face masks restrict movement and interfere with the bow. Discover these issues during practice, not when a deer appears.
Focusing on equipment over skill: Constantly changing bows, sights, arrows, and accessories prevents building consistent muscle memory. Commit to a setup and master it.
Neglecting mental preparation: Physical practice without mental rehearsal leaves bowhunters unprepared for the adrenaline and decision-making pressure of actual hunting situations.
Not practicing shot scenarios: Shooting only at broadside targets ignores quartering-away, quartering-toward, and other common shot angles encountered while hunting.
The fix for most practice mistakes is simple: make practice harder than hunting. If practice feels easy and comfortable, it is not preparing you for field conditions. Embrace difficulty, introduce variables, and challenge yourself with realistic scenarios that build genuine hunting readiness.
Bowhunters pursuing game during late season or in northern climates must practice in cold weather because temperatures below 40 degrees Fahrenheit significantly affect draw weight, release mechanics, and arrow flight. Cold muscles require more effort to reach full draw, fingers lose dexterity affecting release consistency, and bow limbs become stiffer increasing actual draw weight by 2-5 pounds. Practicing exclusively in warm weather leaves bowhunters unprepared for these changes when hunting in freezing conditions.
Cold weather effects on bowhunting:
Cold weather practice strategies:
Start practicing in cold conditions at least 3-4 weeks before hunting in those temperatures. Begin with short sessions to identify equipment and clothing issues without developing bad habits from cold-induced discomfort.
Essential cold weather practice elements:
For bowhunters using mechanical releases, cold weather practice reveals whether the release can be operated smoothly with gloves or if thin liner gloves are necessary. Finger shooters must practice with the exact glove or tab they will hunt with, as thickness dramatically affects release consistency.
If you hunt primarily during early season in warm weather, extensive cold weather practice is unnecessary. Match practice conditions to expected hunting conditions, but always verify equipment function across the temperature range you might encounter.
Practicing shooting with heavy clothes on requires verifying full draw clearance, confirming anchor point consistency, and adjusting draw length if necessary to accommodate bulky layers. Start by wearing your complete hunting outfit including jacket, base layers, gloves, and face mask while shooting at close range (10 yards) to identify interference points before attempting longer distances. Most bowhunters discover that heavy clothing requires shortening draw length by 1/4 to 1/2 inch or adjusting anchor points to maintain consistent form.
Clothing interference points to check:
Solutions for clothing interference:
Sleeve management: Use jacket sleeves with elastic cuffs that stay tight to the wrist, or tuck sleeves into arm guards. Some bowhunters cut the sleeve on their bow arm short or use sleeveless outer layers.
Chest clearance: Wear a chest protector over all layers to compress clothing and provide a smooth surface for string clearance. Adjust the bow’s draw length slightly shorter if needed.
Anchor point adjustment: Heavy clothing may prevent reaching your normal anchor point. Establish a modified anchor that is consistent with your hunting clothes, then practice exclusively with that anchor.
Glove selection: Choose thin, flexible gloves that allow trigger operation, or use glove liners with hand-warming pockets. Practice with the exact gloves you will hunt with.
Face mask positioning: Ensure the face mask does not interfere with your anchor point or sight picture. Some bowhunters use neck gaiters pulled up rather than full face masks for better bow clearance.
Conduct a full dress rehearsal at least two weeks before season. Wear every piece of hunting clothing and equipment, then practice your complete shot routine from target acquisition through follow-through. This reveals issues while there is still time to make adjustments or acquire different gear.
Temperature layering systems work best for bowhunting because they allow adjustment based on activity level and weather. Practice with various layer combinations to understand how each affects your shooting mechanics and what adjustments are needed.
Shooting at the range alone is not enough to prepare for hunting because ranges provide controlled conditions that eliminate the variables, decision-making pressure, and physical challenges encountered in actual hunting situations. Range practice builds fundamental accuracy and consistency but does not develop range estimation skills, awkward position shooting, time-pressure decision-making, or the ability to execute shots while wearing full hunting gear in adverse weather. Effective hunting preparation requires both range practice for fundamentals and field practice for realistic scenarios.
What range practice provides:
What range practice lacks:
The ideal preparation strategy uses range practice for 30-40% of training time and field practice for 60-70% of training time during the 8 weeks before season. Range sessions focus on form consistency, equipment tuning, and building fundamental accuracy at known distances. Field sessions introduce realistic variables and scenario-based challenges.
Transitioning from range to field:
Bowhunters who practice exclusively at ranges often experience a confidence crisis when they miss their first field shot or struggle to estimate range accurately. This gap between range performance and field performance is predictable and preventable through realistic scenario practice.
Essential gear for realistic bowhunting practice includes at least one quality 3D target with replaceable vital zones, a reliable rangefinder, a portable treestand or elevated platform for practicing elevated shots, and your complete hunting clothing system including layers, gloves, and face covering. Additional valuable equipment includes a target backstop or netting for safety, a bow-mounted quiver to practice with hunting weight, broadhead-compatible targets for testing hunting arrows, and a shooting timer or smartphone app to introduce time pressure into practice scenarios.
Core practice equipment:
3D targets: Invest in one high-quality deer target rather than multiple cheap targets. Look for replaceable core systems that allow vital zone replacement without buying a new target. Position the target at various angles and distances throughout your practice area.
Rangefinder: Use the same rangefinder for practice that you will carry hunting. Practice ranging targets quickly and from awkward positions. Models with angle compensation are essential for treestand hunters and western hunters.
Elevated platform: A portable treestand, ladder stand, or purpose-built shooting platform allows safe practice of elevated shots. Ensure it is stable and always use a safety harness when elevated.
Hunting clothing: Practice in the exact clothing system you will hunt in, including base layers, insulation, outer shell, gloves, and face covering. Discover fit and interference issues during practice.
Broadhead targets: Dedicated broadhead targets allow practice with actual hunting arrows. Never shoot broadheads into standard foam targets, as they cause excessive damage.
Optional but valuable equipment:
Equipment you do not need:
Expensive target systems with multiple animals are unnecessary for most bowhunters. A single quality deer target repositioned regularly provides more training value than a static multi-target setup. Similarly, elaborate 3D courses are nice but not essential; a backyard practice area with varied terrain and shooting positions is sufficient.
Focus equipment investment on items that directly simulate hunting conditions. A $200 quality 3D target and $150 rangefinder provide more training value than a $500 bow upgrade if your current bow shoots accurately.
Practicing shooting at different angles for hunting requires setting up targets at various positions relative to your shooting location, including quartering-away, quartering-toward, steep downward angles from treestands, and uphill/downhill shots on sloped terrain. Use 3D targets positioned at multiple angles rather than always shooting at broadside presentations, and practice identifying the proper aiming point for each angle by visualizing arrow path through the vitals. Dedicate at least 30% of practice time to non-broadside angles, as these represent the majority of actual shot opportunities.
Critical shooting angles to practice:
Quartering-away (20-45 degrees): The most common and ethical bowhunting shot angle. Aim for the far-side shoulder, visualizing the arrow path through both lungs. The steeper the quartering angle, the farther forward the entry point.
Quartering-toward (20-30 degrees): A more challenging shot requiring the arrow to reach vitals before hitting the shoulder blade. Aim for the near-side shoulder pocket. Avoid steep quartering-toward shots (45+ degrees) as they risk poor penetration.
Broadside (90 degrees): The textbook shot, but less common than many hunters expect. Aim tight behind the shoulder at the vertical center of the chest.
Straight-down (treestand): Common for treestand hunters when deer pass directly beneath the stand. Aim for the spine or slightly behind the shoulder, understanding penetration will be limited.
Uphill/downhill (15-30 degrees): Use horizontal distance for aiming and practice both uphill and downhill shots to understand trajectory changes.
Steep upward (30+ degrees): Rare but occurs when ground hunting in mountains. Requires significant holdover adjustment and is often beyond ethical range.
Angle practice drill:
Set up a 3D deer target in your practice area. Shoot from five different positions around the target: broadside, quartering-away from both sides, and quartering-toward from both sides. Before each shot, identify the aiming point and visualize the arrow path through the vitals. This drill builds the shot assessment skills needed to make ethical decisions in the field.
Angle assessment checklist:
Many bowhunters practice only broadside shots, then struggle to assess shot quality when game presents a quartering angle. This lack of preparation leads to poor hits or missed opportunities. Regular practice at varied angles builds confidence and ethical decision-making skills.
How long before hunting season should I start practicing?
Start practicing 8-12 weeks before bow season to rebuild or maintain shooting skills, verify equipment function, and transition from fundamental accuracy work to realistic scenario practice. Bowhunters who shot regularly during the off-season can begin focused hunting preparation 6-8 weeks out, while those taking a break from shooting need the full 12 weeks to rebuild form and consistency.
Can I practice too much before bow season?
Yes, excessive practice in the final weeks before season can lead to mental fatigue, target panic, form breakdown, and loss of confidence. Limit practice to 20-30 quality arrows per session during the final two weeks, focusing on confidence-building shots rather than high-volume shooting. Overtraining causes more problems than undertraining for experienced bowhunters.
Should I practice with broadheads or field points?
Practice primarily with field points for volume work, but shoot at least 20-30 arrows with your actual hunting broadheads 2-4 weeks before season to verify point of impact and arrow flight. Broadheads often impact slightly differently than field points due to planing effects, and this difference must be confirmed and compensated for before hunting.
What is the most important thing to practice for bowhunting?
First-arrow accuracy under realistic field conditions is the most important skill to practice because hunting rarely provides second chances. Focus practice on making that first shot count by introducing variables, time pressure, and realistic scenarios rather than shooting large groups at known distances in perfect conditions.
How do I know if I am ready for bow season?
You are ready for bow season when you can consistently place first arrows in a 6-inch circle at your maximum intended hunting distance from realistic positions while wearing full hunting gear under time pressure. If you cannot achieve this consistency, reduce your maximum hunting range or continue practicing until you can.
Do I need to practice every day during bow season?
Brief practice sessions 1-2 times per week during season maintain skills and confidence without causing fatigue. Shoot 10-15 arrows focusing on shot confirmation and mental preparation. Avoid making equipment changes or practicing extensively during active hunting periods.
Should I practice in the rain?
Yes, practice in light to moderate rain if you plan to hunt in wet conditions. Rain affects arrow flight, sight visibility, and equipment function. Discover these issues during practice rather than during a hunt. Avoid practicing in heavy rain that could damage equipment or create unsafe conditions.
How far should I practice shooting for bowhunting?
Practice regularly at distances from 10-40 yards, with most practice time spent at 20-30 yards where ethical shot opportunities most commonly occur. Practice occasionally at 50+ yards to build skill and make closer shots feel easier, but recognize that ethical hunting range is typically 30-35 yards or less for most bowhunters.
What is the best time of day to practice for bowhunting?
Practice during the same hours you plan to hunt, typically early morning and late evening, to adapt to low-light conditions and understand how reduced visibility affects target acquisition and sight picture. At least 30% of practice sessions should occur during dawn or dusk hours.
Can I use a bow simulator instead of outdoor practice?
Bow simulators and indoor ranges provide valuable practice for form and consistency but cannot replace outdoor practice in realistic hunting conditions. Use simulators for off-season maintenance and form work, but transition to outdoor field practice at least 6-8 weeks before season.
How do I practice if I do not have access to 3D targets?
Use paper targets with vital zone markings placed at unknown distances in varied terrain. Focus on range estimation, awkward shooting positions, and realistic scenarios rather than target type. A paper plate at an unmarked distance provides more hunting-relevant practice than a 3D target at a known distance.
Should I practice shooting sitting down?
Ground hunters and western hunters who shoot from sitting positions should dedicate 20-30% of practice time to seated shooting. This position requires different muscle engagement and often a different anchor point than standing shots. Practice from the exact positions you will use while hunting.
Mastering how to practice for bowhunting in realistic scenarios transforms range accuracy into field success by deliberately introducing the variables, challenges, and pressure encountered during actual hunts. The gap between shooting tight groups at known distances in perfect conditions and making ethical shots on game in the field is significant, but it closes through focused practice that simulates hunting reality.
Effective bowhunting practice prioritizes quality over quantity, emphasizes first-arrow accuracy over group size, and progressively introduces complexity through unknown distances, awkward positions, varied angles, full hunting gear, and time pressure. Dedicate the majority of practice time to 3D targets positioned at unmarked distances, shoot regularly from elevated positions if you hunt from treestands, and always practice in the clothing and conditions you will hunt in.
Take action now:
The bowhunters who consistently fill tags are not necessarily the most accurate range shooters but rather those who have prepared for the specific challenges of field conditions through realistic scenario practice. Start implementing these strategies today, and arrive at opening day with the skills, confidence, and preparation needed to make ethical, accurate shots when opportunities arise.


