Newsletter Subscribe
Enter your email address below and subscribe to our newsletter
All voices matter
All voices matter
 ByTravis
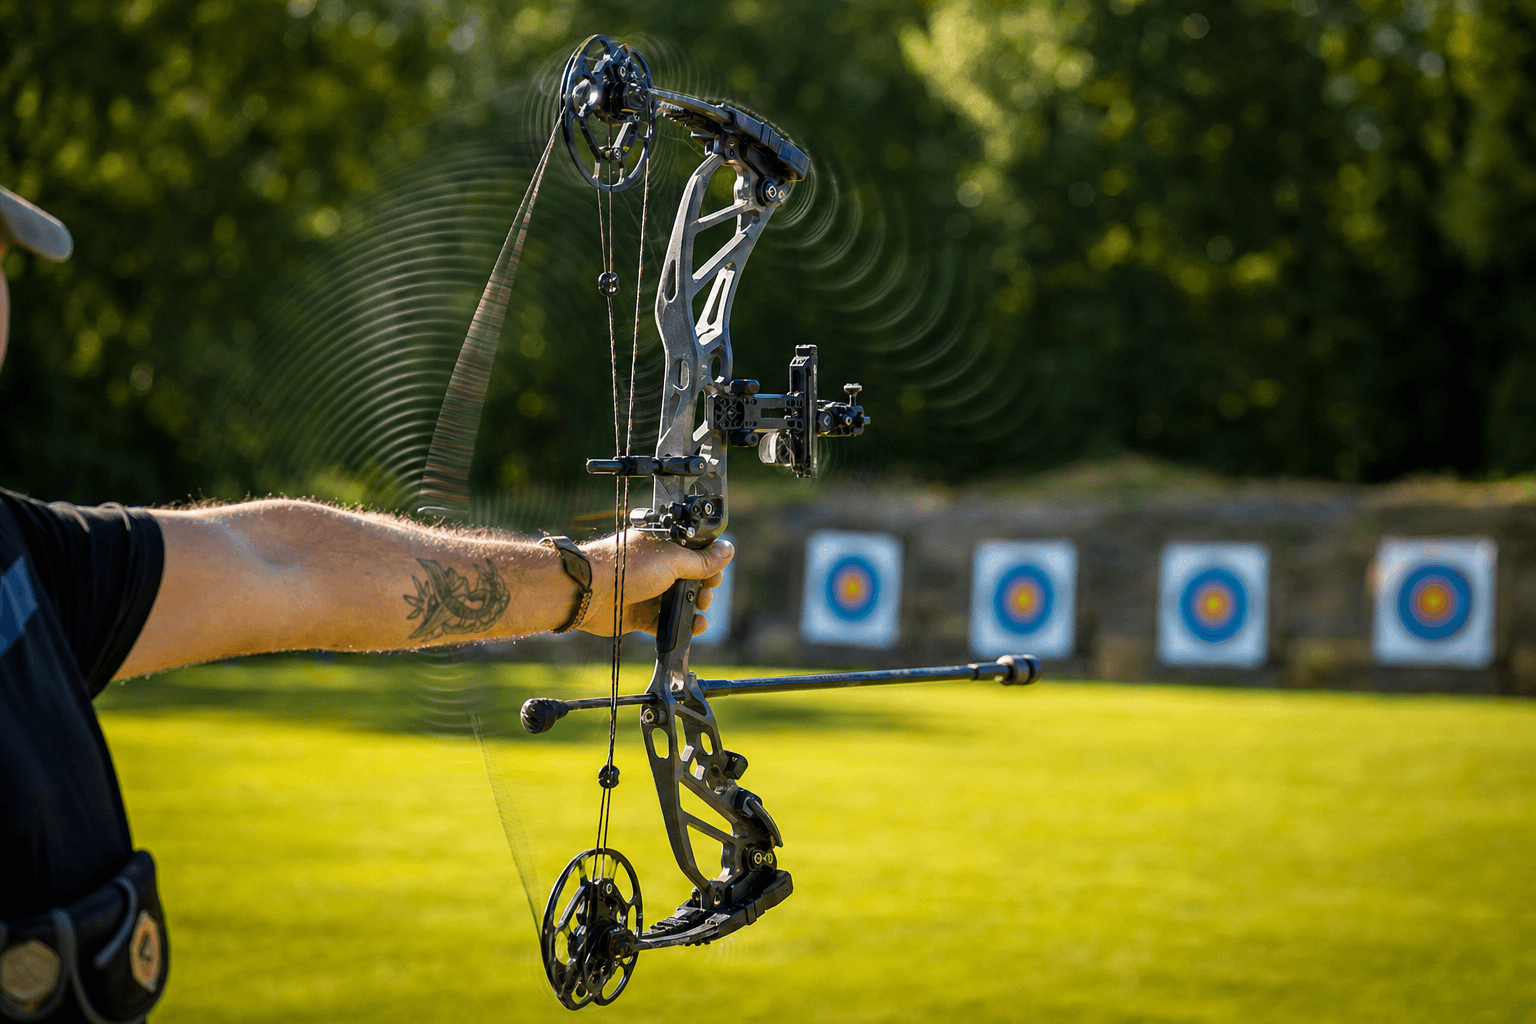
Bow vibration after the shot happens because 15-30% of the bow's stored energy doesn't transfer to the arrow and instead dissipates through the limbs, riser, and string into your hand.
Affiliate Disclaimer: We are a participant in the Amazon Services LLC Associates Program, an affiliate advertising program designed to provide a means for sites to earn advertising fees by advertising and linking to Amazon.com. As an Amazon Associate I earn from qualifying purchases. We also participate in other affiliate programs.

Bow vibration after the shot occurs because releasing an arrow transfers only 70-85% of the bow’s stored energy to the arrow, leaving 15-30% of that energy to dissipate through the bow itself as vibration and noise. This residual energy travels through the limbs, riser, string, and into your hand as oscillating waves. While some vibration is normal in any bow, excessive shaking usually indicates tuning issues, improper arrow weight, loose hardware, or inadequate dampening accessories.
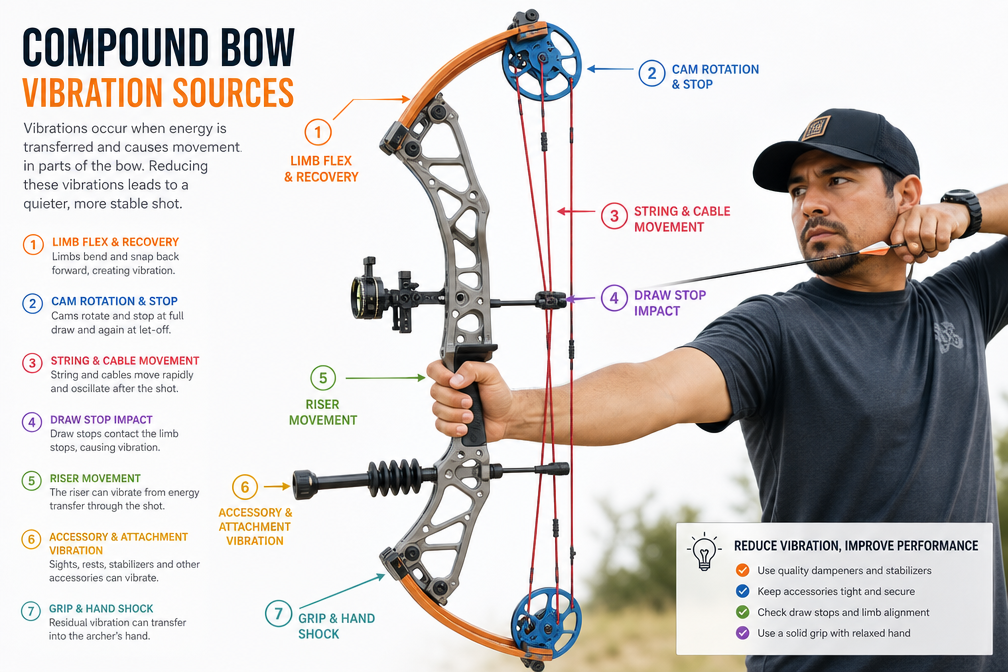
Bow vibration after releasing an arrow results from incomplete energy transfer during the shot cycle. When you draw a bow, the limbs store potential energy. At release, the string accelerates forward, converting that stored energy into kinetic energy. However, the arrow absorbs only a portion of this energy, typically 70-85% depending on arrow weight and bow efficiency. The remaining 15-30% has nowhere to go except back into the bow’s structure.
This residual energy manifests as vibration that travels through multiple pathways:
The severity of vibration depends on how efficiently your setup converts energy to arrow flight. A well-tuned bow with proper arrow weight minimizes leftover energy, while mismatched components leave more energy to rattle through the system.
Common mistake: Many archers assume vibration always means something is broken. In reality, every bow vibrates to some degree, the question is whether the vibration level is normal for your setup or indicates a correctable problem.
Yes, some degree of bow vibration is completely normal and unavoidable in archery. Physics dictates that any mechanical system transferring energy will experience residual oscillation. The key distinction is between normal operational vibration and excessive shaking that indicates a problem.
Normal vibration characteristics:
Excessive vibration warning signs:
Modern compound bows with proper dampening accessories should produce minimal felt vibration. If you’re experiencing uncomfortable hand shock or your bow sounds like a tuning fork after each shot, your setup needs attention. Beginners often worry unnecessarily about normal vibration, while experienced archers can immediately recognize when vibration exceeds acceptable levels for their equipment.
Choose this benchmark: If you can comfortably shoot 50-100 arrows in a practice session without hand fatigue or discomfort, your vibration level is acceptable. If your hand feels numb or sore after 20 shots, you have an excessive vibration problem that needs correction.
Bow vibration and hand shock are related but distinct phenomena that archers often confuse. Understanding the difference helps you diagnose and address the right problem.
Bow vibration refers to the physical oscillation of the bow’s components, limbs, riser, string, and accessories, after the shot. You can see this vibration if you watch the bow carefully, and you can measure it with accelerometers. Vibration occurs throughout the entire bow structure and includes high-frequency oscillations that may or may not reach your hand.
Hand shock is the specific sensation you feel in your bow hand when residual energy transfers from the bow into your body. Hand shock represents the subset of bow vibration that travels through the grip and into your hand, wrist, and arm. It’s the subjective, felt experience of vibration, the stinging, jarring, or numbing sensation that makes shooting uncomfortable.
Key differences:
| Aspect | Bow Vibration | Hand Shock |
|---|---|---|
| Definition | Physical oscillation of bow components | Felt sensation in the archer’s hand |
| Measurement | Objective (accelerometer, high-speed video) | Subjective (archer’s perception) |
| Location | Throughout entire bow structure | Specifically at grip/hand interface |
| Reduction methods | Dampeners, stabilizers, tuning | Grip technique, dampeners, arrow weight |
A bow can vibrate significantly without producing severe hand shock if dampening accessories absorb the energy before it reaches the grip. Conversely, poor grip technique or a hard, unforgiving riser material can amplify hand shock even when overall bow vibration is moderate.
Practical example: Adding a quality stabilizer reduces both bow vibration and hand shock. Improving your bow arm position and grip relaxation primarily reduces hand shock without necessarily changing the bow’s physical vibration characteristics.
Reducing bow vibration requires a systematic approach that addresses arrow selection, bow tuning, and dampening accessories. Start with the fundamentals before adding equipment.
Step 1: Verify arrow weight
Arrow weight is the single most effective vibration control factor. Heavier arrows absorb more energy during the shot, leaving less residual energy to vibrate the bow.
Switching from a 350-grain arrow to a 450-grain arrow on the same bow typically reduces felt vibration by 30-40%.
Step 2: Check and tighten all hardware
Loose components amplify vibration and create rattling sounds.
Step 3: Inspect string and cables
Worn or improperly maintained strings increase vibration.
Step 4: Add or upgrade dampening accessories
Install vibration-absorbing components in order of effectiveness:
Step 5: Tune arrow spine and rest timing
Mismatched arrow spine causes erratic energy transfer and increased vibration. Paper tuning and walk-back tuning help verify proper arrow flight. For compound bows, ensure your drop-away rest timing allows the arrow to clear before the string reaches full forward position.
Common mistake: Adding dampening accessories to a poorly tuned bow masks symptoms without addressing root causes. Always verify proper arrow weight and tune before investing in premium dampeners.
For more on maintaining consistent form that complements vibration reduction, see our guide on how to follow through after the shot.
Stabilizers serve dual purposes: they add forward weight to balance the bow and absorb residual vibration through internal dampening systems. The best stabilizer for vibration control depends on your bow type, shooting discipline, and budget.
Key stabilizer features for vibration reduction:
Stabilizer categories and effectiveness:
Premium hunting stabilizers (typically $80-$150): Feature advanced internal dampening systems with multiple rubber or gel chambers. Brands like Bee Stinger, Mathews, and Stokerized offer models specifically engineered for vibration absorption. These provide the best vibration reduction per inch of length.
Mid-range options ($40-$80): Solid performers with basic internal dampening. Companies like Trophy Ridge, Axion, and Dead Center offer reliable vibration control without premium pricing. Expect 60-70% of the vibration reduction of premium models.
Budget stabilizers ($15-$40): Basic bars with minimal or no internal dampening. These add weight and balance but rely primarily on mass rather than engineered dampening. Still effective when combined with other vibration-reduction strategies.
Configuration recommendations:
Decision rule: Choose a stabilizer length based on your shooting environment first, then select the highest-quality dampening system you can afford within that length constraint. A well-made 8-inch stabilizer outperforms a cheap 12-inch bar for vibration control.
Adding a stabilizer typically reduces felt hand shock by 40-60% compared to shooting without one. Upgrading from a basic to a premium stabilizer provides an additional 15-25% reduction.
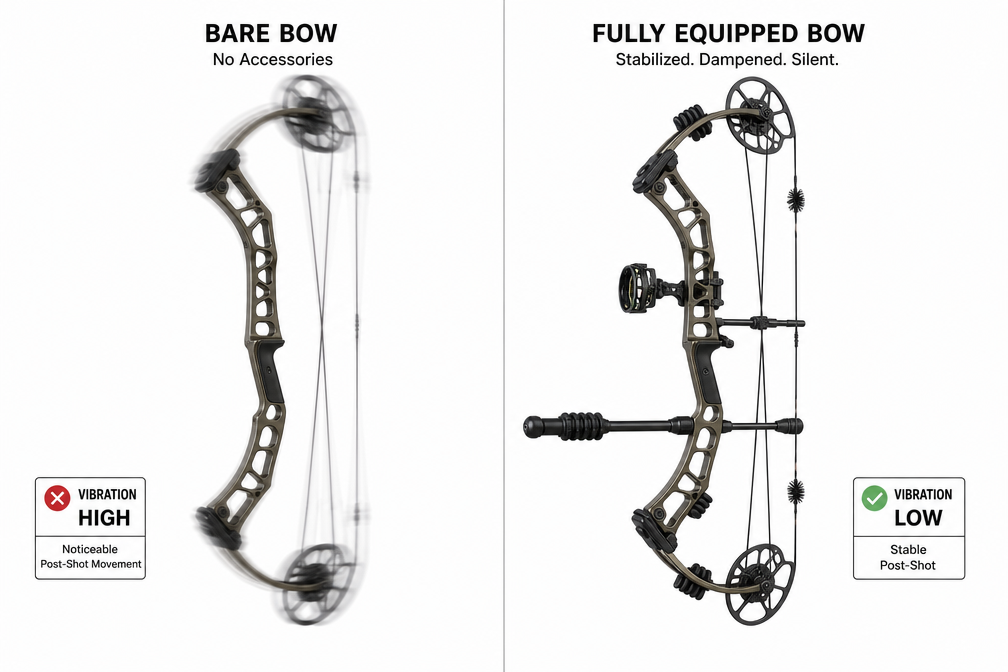
Bow vibration directly impacts accuracy through three mechanisms: physical bow movement during arrow departure, inconsistent energy transfer, and archer anticipation of uncomfortable hand shock.
Physical bow movement: Excessive vibration begins the instant you release, while the arrow is still in contact with the rest and string. If the bow oscillates significantly during the critical 15-20 milliseconds of arrow departure, those vibrations can deflect the arrow’s path. This effect is most pronounced at longer distances where small angular deviations at release translate to larger point-of-impact shifts downrange.
Inconsistent energy transfer: A bow that vibrates excessively often has tuning issues, mismatched arrow spine, improper rest timing, or cam synchronization problems. These underlying issues cause both the vibration and the accuracy problems. The vibration is a symptom rather than the sole cause, but both stem from the same root inefficiency.
Archer anticipation: This is often the most significant accuracy impact. If you expect painful hand shock, you unconsciously tense your bow hand, grip too tightly, or flinch before release. These anticipatory movements destroy accuracy far more than the vibration itself. Archers shooting high-vibration bows often develop target panic or other psychological barriers.
Quantifying the accuracy impact:
Edge case: Professional target archers shooting indoor competitions at short distances (18-20 meters) may tolerate slightly higher vibration because arrow flight time is so brief that bow movement has minimal effect. However, even these shooters prefer low-vibration setups for comfort during high-volume practice sessions.
Reducing vibration improves accuracy most dramatically for archers who have developed bad habits compensating for uncomfortable hand shock. Once you eliminate the anticipation factor, the direct physical accuracy impact of vibration is relatively small for most hunting and recreational shooting distances.
For more on developing consistent shooting fundamentals that complement proper equipment setup, see our guide on proper archery stance and posture.
Effective vibration reduction doesn’t require expensive accessories. Several low-cost or DIY solutions provide significant improvement for archers on a budget.
String silencers ($5-$15)
Rubber or yarn string silencers are the most cost-effective vibration reduction accessory. Install two silencers per string, positioned 6-8 inches from each axle. Rubber “cat whisker” style silencers cost $5-$10 and reduce string vibration by 30-40%. Installation takes five minutes with no special tools.
Limb dampeners ($8-$20)
Adhesive rubber dampeners stick directly to limb faces and absorb limb oscillation. Products like LimbSaver or generic alternatives cost under $20 per set and install in seconds. Position them on the upper and lower limbs where vibration is most pronounced (typically mid-limb). These reduce overall bow vibration by 15-25%.
Increase arrow weight (free to $30)
Adding weight to existing arrows costs nothing if you have heavier field points, or $20-$30 for a set of heavier broadheads or outserts. Increasing arrow weight from 350 to 425 grains provides more vibration reduction than most dampening accessories, with the added benefit of improved penetration and quieter arrow flight.
DIY moleskin grip wrap ($5)
Wrapping your bow grip with moleskin or thin foam tape (available at any pharmacy) dampens vibration transmission to your hand. This doesn’t reduce bow vibration itself but significantly decreases felt hand shock. Cost: $3-$5 for enough material to wrap multiple bows.
Bicycle inner tube dampeners (free)
Cut sections of old bicycle inner tubes and wrap them around limbs, stabilizer bars, or the riser. While not as refined as commercial products, rubber inner tubes provide genuine dampening at zero cost. This solution works surprisingly well for archers experimenting with dampener placement before buying commercial products.
Budget stabilizer ($15-$30)
Even a basic stabilizer without advanced internal dampening provides vibration reduction through added mass. A simple 8-inch aluminum bar with end weight costs $15-$30 and reduces hand shock by 30-40% compared to no stabilizer.
Maintenance and tuning (free)
Before buying any accessories, ensure your bow is properly tuned and all hardware is tight. Tightening loose limb bolts, replacing worn strings, and correcting arrow spine mismatch costs nothing but provides dramatic vibration reduction. Many archers spend money on dampeners when the real problem is a $15 string replacement.
Cost-effectiveness ranking:
Decision rule: If you’re on a tight budget, prioritize arrow weight first, add string silencers second, and install a basic stabilizer third. This combination costs $30-$60 and eliminates 60-70% of excessive vibration in most setups.
If your bow vibrates more with heavier arrows, you’re likely experiencing one of three specific issues: improper arrow spine, rest timing problems, or a perception shift rather than actual increased vibration.
Improper arrow spine for heavier setup
When you increase arrow weight by adding heavier points or using denser shaft materials, you change the arrow’s dynamic spine (how it flexes during launch). If the heavier arrow is too stiff for your bow’s draw weight and draw length, it won’t flex properly around the riser during the archer’s paradox. This creates erratic energy transfer and increased vibration despite the arrow’s greater mass.
Solution: Verify arrow spine using a spine chart that accounts for total arrow weight, not just shaft stiffness. You may need to switch to a more flexible spine when significantly increasing arrow weight.
Rest timing issues
Heavier arrows accelerate more slowly than light arrows. If your drop-away rest is timed for a fast, light arrow, a heavier arrow may still be in contact with the rest when the string reaches full forward position. This contact creates a jarring impact that transmits vibration through the rest mounting and into the riser.
Solution: Adjust rest timing to drop slightly earlier, ensuring complete clearance before string impact. This is especially common when switching from light target arrows to heavy hunting arrows on the same bow.
Perception vs. reality
In many cases, the bow isn’t actually vibrating more, it’s vibrating at a different frequency that feels more noticeable. Heavier arrows shift the bow’s resonant frequency lower, creating a deeper, more pronounced vibration that feels stronger even if the total energy is less. Light arrows produce higher-frequency vibration that may feel like a quick buzz, while heavy arrows create a slower, more rolling sensation that seems more severe.
Verification method: Have someone else shoot your bow with both arrow weights while you observe from the side. If the bow visibly shakes more with heavier arrows, you have a tuning problem. If the visual vibration is similar or less but feels worse to you, it’s a perception issue related to frequency change.
Expected behavior: Properly tuned bows should vibrate less with heavier arrows because more energy transfers to the arrow and less remains in the bow. If you’re experiencing the opposite, focus on spine selection and rest timing before concluding that heavier arrows are the problem.
For archers just starting out who may be uncertain about proper equipment setup, our guide on what draw weight should a beginner start with provides foundational equipment selection advice.
Yes, loose limb bolts are one of the most common and easily corrected causes of excessive bow vibration. Limb bolts secure the limbs to the riser and maintain proper limb preload. When these bolts loosen even slightly, the limbs can shift or rattle in their pockets during the shot cycle, creating dramatic vibration and potentially dangerous equipment failure.
How loose limb bolts create vibration:
Warning signs of loose limb bolts:
Checking and correcting limb bolt tension:
How often to check: Inspect limb bolt tension every 500 shots or monthly during active shooting seasons, whichever comes first. After any significant impact (dropping the bow, vehicle transport), check immediately.
Common mistake: Over-tightening limb bolts in an attempt to eliminate vibration. Excessive torque can strip threads or crack limb pockets. Tighten until snug with no play, then back out to your desired draw weight setting. If vibration persists after proper tightening, the problem lies elsewhere.
Edge case: Some older or budget bows have poorly machined limb pockets that allow play even with properly tightened bolts. In these cases, thin shims (plastic or metal) can be placed between the limb butt and pocket to eliminate movement. However, this is a last-resort solution, most quality bows don’t require shimming.
Tightening loose limb bolts typically reduces vibration by 50-70% when this is the primary issue, making it one of the highest-impact, zero-cost fixes available.
Use this systematic checklist to diagnose and correct bow vibration issues in under 10 minutes. Work through steps in order, testing after each correction.
Step 1: Visual inspection (2 minutes)
Step 2: Arrow weight verification (1 minute)
Step 3: Hardware tightening sequence (3 minutes)
Step 4: String and cable check (2 minutes)
Step 5: Dampening assessment (2 minutes)
Diagnostic decision tree:
If vibration is loud but not felt strongly in hand: Problem is likely string or cable vibration. Add or replace string silencers.
If vibration is felt as sharp hand shock: Problem is likely inadequate dampening or too-light arrows. Add stabilizer weight or increase arrow weight.
If vibration developed suddenly: Check for loose hardware first, especially limb bolts and sight mounting.
If vibration is inconsistent shot-to-shot: Likely a tuning issue (arrow spine, rest timing, or cam synchronization). Consider professional bow tuning.
If vibration is accompanied by noise: Identify noise source (string slap, limb contact, loose accessory) and address specifically.
When to seek professional help: If you’ve completed this checklist, corrected all identified issues, and still experience excessive vibration, your bow likely needs professional tuning for cam timing, arrow spine matching, or rest synchronization. These adjustments require specialized tools and expertise.
Most vibration issues resolve with this checklist. The most common culprits are loose limb bolts (30% of cases), inadequate arrow weight (25%), and missing or worn dampening accessories (20%).
Compound bows generally produce more vibration than recurve bows due to higher energy storage, mechanical cam systems, and abrupt deceleration at the end of the power stroke. However, modern compounds with proper dampening accessories can achieve vibration levels comparable to or lower than recurves.
Why compounds vibrate more:
Higher energy storage: Compound bows store significantly more energy than recurves of equivalent draw weight due to mechanical advantage from cams and cables. A 60-pound compound stores roughly 75-90 foot-pounds of energy, while a 60-pound recurve stores 50-60 foot-pounds. More stored energy means more residual energy available to vibrate the bow after the arrow leaves.
Mechanical shock: Compound cams decelerate abruptly when they reach the end of their rotation at full draw release. This sudden stop sends shock waves through the axles, limb pockets, and cables. Recurves have a smoother, more gradual energy release without mechanical components to create impact points.
Cable system: Compound bows have cables running through cable guards or slides, creating additional friction points and vibration transmission paths. Each cable contact point can amplify or transmit vibration. Recurves have only the string, eliminating these additional vibration sources.
Shorter limbs: Compound limbs are typically much shorter than recurve limbs, making them stiffer and less able to absorb vibration through flex. Longer recurve limbs act as natural shock absorbers.
Why well-tuned compounds can be quieter:
Modern compound bows incorporate extensive dampening technology, internal riser dampeners, limb dampeners, string stops, and stabilizers, that can reduce felt vibration below that of a bare recurve. A premium hunting compound with full dampening accessories often produces less hand shock than a traditional recurve with no dampeners.
Practical comparison:
Shooting experience differences:
Recurve vibration tends to be a smooth, rolling sensation distributed along the limbs. Compound vibration is often sharper and more concentrated in the riser and grip. Many archers find compound vibration more jarring even when total energy is similar, due to the frequency and concentration of the shock.
Decision rule: If vibration sensitivity is your primary concern and you’re choosing between bow types, recurves have an inherent advantage. However, if you prefer compound bows for other reasons (let-off, speed, hunting effectiveness), modern dampening technology can bring vibration to acceptable levels for most shooters.
For those exploring different archery styles and techniques, our comparison of gap shooting vs instinctive aiming discusses traditional recurve shooting methods.
Moderate bow vibration is not inherently damaging to a properly maintained bow, but excessive chronic vibration can accelerate wear and cause specific failure modes over time. The risk depends on vibration severity, bow quality, and maintenance practices.
Normal vibration effects (not harmful):
Well-designed bows are engineered to withstand the vibration generated during normal shooting. Modern materials, aluminum and carbon risers, fiberglass or carbon limbs, have excellent fatigue resistance. A bow experiencing typical post-shot vibration will not develop cracks, delamination, or structural failure from vibration alone, even after thousands of shots.
Potential long-term issues from excessive vibration:
Hardware loosening: Chronic severe vibration gradually loosens screws, bolts, and mounting hardware. Sight screws, rest mounts, and accessory bushings can work loose over time, requiring frequent retightening. This isn’t damage to the bow itself but creates maintenance burden and potential for lost accessories.
Serving wear: Excessive string vibration accelerates serving wear, particularly at the nocking point and peep sight. Frayed serving can lead to string failure if not caught during inspection. This is a maintenance issue rather than bow damage, but it increases string replacement frequency.
Limb delamination risk: In rare cases, extreme vibration combined with manufacturing defects can contribute to limb delamination (separation of laminated layers). This is almost always a pre-existing defect that vibration exacerbates rather than vibration creating the problem from scratch. Quality limbs from reputable manufacturers have extremely low delamination rates regardless of vibration.
Cam bearing wear: Compound bow cam bearings experience additional stress from vibration. Over many thousands of shots, excessive vibration can accelerate bearing wear, leading to rough cam rotation or increased noise. This typically takes 10,000+ shots to manifest and is more common in budget bows with lower-quality bearings.
Riser stress cracks: Aluminum risers can develop stress cracks at high-stress points (limb pockets, sight mounting holes) if subjected to extreme vibration combined with manufacturing defects or previous damage. This is extremely rare in modern bows and almost always involves pre-existing weakness.
Realistic timeline for vibration-related issues:
Protective measures:
Bottom line: Normal bow vibration will not damage your equipment. Excessive vibration is more of a comfort and accuracy issue than a durability concern for quality bows. However, addressing vibration protects your investment by reducing maintenance frequency and preventing the rare cases where chronic stress exacerbates existing weaknesses.
If you’re concerned about equipment longevity and maintenance, our guide on when should you retire an arrow covers similar safety inspection principles for arrows.
For beginner archers, some bow shaking after the shot is completely normal and expected. New archers often worry unnecessarily about vibration that experienced shooters would consider acceptable. However, beginners should learn to distinguish between normal operational vibration and excessive shaking that indicates equipment or technique problems.
Why beginners experience more perceived vibration:
Grip tension: New archers almost universally grip the bow too tightly, which amplifies hand shock. A death grip on the handle transmits every vibration directly into your hand and arm. Experienced archers use a relaxed grip that allows the bow to vibrate without transferring all that energy to the body.
Anticipation: Beginners often tense up before release, anticipating the bow’s movement and noise. This tension makes vibration feel more severe than it actually is. As you gain experience and confidence, the same vibration level becomes less noticeable.
Unfamiliarity: If you’ve never shot a bow before, you have no reference point for normal vibration. What feels like violent shaking to a beginner might be perfectly normal to someone who’s shot thousands of arrows.
Equipment factors for beginners:
Many beginner bows are budget models with minimal dampening accessories. A $200 starter compound without a stabilizer or string silencers will vibrate noticeably more than a $1,000 hunting bow with full dampening. This doesn’t mean your bow is defective, it’s performing as designed for its price point.
When beginner bow vibration is normal:
When to investigate further:
Improvement steps for beginners:
Realistic expectations: Your first bow will vibrate more than a premium setup, and that’s okay. Focus on developing proper form and technique rather than obsessing over vibration. As you progress in archery, you’ll naturally upgrade equipment and add dampening accessories that reduce vibration.
Decision rule: If you can comfortably shoot 20-30 arrows in a practice session without hand pain, your vibration level is acceptable for a beginner setup. If your hand hurts after 10 shots, address the issue before continuing to practice.
For beginners wondering about the broader learning curve in archery, our guide on how long does it take to get good at archery provides realistic expectations for skill development.
String silencers and limb dampeners address different vibration sources and work best when used together rather than as competing alternatives. Understanding what each accessory does helps you choose the right solution for your specific vibration problem.
String silencers:
String silencers are rubber or yarn accessories attached to the bowstring that dampen string oscillation after the arrow leaves. They work by adding mass to the string and creating friction that absorbs vibration energy.
What they reduce:
Effectiveness: String silencers reduce string-related noise by 40-60% and overall bow vibration by 15-25%. They’re most effective on bows where string vibration is the dominant noise source.
Cost: $5-$15 for a set
Installation: 5 minutes, no tools required
Best for: Recurve bows, traditional bows, and compounds where string noise is prominent
Limb dampeners:
Limb dampeners are adhesive rubber pads attached directly to limb faces that absorb limb oscillation. They work by adding mass to the limbs and dampening the flexing motion that occurs after the shot.
What they reduce:
Effectiveness: Limb dampeners reduce limb-related vibration by 30-40% and overall bow vibration by 20-30%. They’re most effective on compound bows with short, stiff limbs that vibrate at high amplitude.
Cost: $8-$20 for a set
Installation: 2 minutes, peel-and-stick application
Best for: Compound bows, especially models with aggressive cams and short limbs
Direct comparison:
| Factor | String Silencers | Limb Dampeners |
|---|---|---|
| Primary target | String vibration | Limb vibration |
| Noise reduction | High-frequency buzz | Low-frequency rumble |
| Best bow type | Recurve, traditional | Compound |
| Installation | Tie or slide onto string | Adhesive to limb face |
| Cost | $5-$15 | $8-$20 |
| Effectiveness alone | Moderate | Moderate to high |
Which to choose:
Choose string silencers first if:
Choose limb dampeners first if:
Best approach: Use both together for maximum vibration reduction. String silencers and limb dampeners address different vibration sources and don’t interfere with each other. Installing both provides 40-50% total vibration reduction for $15-$35, making this combination the most cost-effective dampening strategy available.
Common mistake: Choosing one or the other based on price alone. Since both are inexpensive, buying both provides better results than doubling up on one type. Two sets of string silencers don’t work twice as well as one set, but string silencers plus limb dampeners address multiple vibration pathways.
Edge case: Some modern compound bows have built-in limb dampening systems (rubber inserts or internal dampeners). On these bows, aftermarket limb dampeners provide minimal additional benefit. Check your bow’s specifications before purchasing.
For archers interested in optimizing their entire shooting system, our guide on archery exercises and muscles that improve your shot covers the physical conditioning side of performance improvement.
Why does my bow vibrate more in cold weather?
Cold temperatures stiffen rubber dampening accessories and bowstring materials, reducing their ability to absorb vibration. Rubber dampeners become hard and less effective below 40°F, while strings lose flexibility. Warm your bow gradually before shooting in cold conditions, and consider switching to cold-weather-rated string material if you regularly shoot in freezing temperatures.
Can a bow vibrate so much it breaks?
Catastrophic bow failure from vibration alone is extremely rare in modern bows. However, chronic excessive vibration can loosen hardware, accelerate serving wear, and potentially exacerbate pre-existing manufacturing defects. If your bow vibrates violently enough to cause concern, stop shooting immediately and have it inspected by a professional before continuing.
Does adding weight to my stabilizer reduce vibration more?
Yes, heavier stabilizers absorb more vibration energy than lighter ones, up to a point. Adding 2-4 ounces of weight to a stabilizer typically reduces vibration by 15-25%. Beyond 10-12 ounces total stabilizer weight, additional mass provides diminishing returns and may negatively affect bow balance and shooting comfort.
Why does my bow only vibrate with certain arrows?
Different arrows transfer energy differently based on weight, spine, and length. If your bow vibrates with some arrows but not others, the problematic arrows likely have mismatched spine for your setup or are too light. Verify that all your arrows meet the 5 GPP minimum and have appropriate spine stiffness for your draw weight and length.
Should I worry about bow vibration affecting my sight?
Excessive vibration can cause sight pins to loosen or shift over time, affecting accuracy. Quality sights with proper mounting should withstand normal bow vibration without issue. If your sight is moving or loosening, either your vibration is excessive or your sight mounting hardware needs tightening. Check sight screws every 100 shots during high-vibration periods.
Can I shoot a bow without a stabilizer?
Yes, you can shoot without a stabilizer, but you’ll experience significantly more hand shock and vibration. Stabilizers are not required for bow function but dramatically improve shooting comfort and consistency. Even a basic $20 stabilizer reduces vibration by 30-40% compared to shooting bare, making it one of the most cost-effective accessories available.
Does bow vibration scare deer when hunting?
Excessive bow noise and vibration can alert deer, especially at close range. However, the arrow typically reaches the target before the sound travels the distance, so vibration noise is more of a concern for follow-up shots than initial shot success. Reducing vibration through proper dampening makes you a more effective hunter by allowing quieter shooting and better accuracy.
Why does my bow vibrate more after I waxed the string?
Fresh string wax shouldn’t increase vibration. If vibration increased after waxing, you likely over-applied wax, creating buildup that adds mass unevenly or interferes with string silencer function. Remove excess wax with a clean cloth, leaving only a thin protective coating. Properly waxed strings should vibrate less than dry strings.
Can loose nocking points cause bow vibration?
Loose nocking points don’t directly cause bow vibration but can create inconsistent arrow release and erratic energy transfer, which manifests as variable vibration from shot to shot. If your vibration is inconsistent, check that your nocking point or D-loop is secure and positioned correctly. Consistent nocking point placement ensures consistent energy transfer and vibration patterns.
How often should I replace dampening accessories?
String silencers and limb dampeners degrade over time from UV exposure, temperature cycling, and repeated shock absorption. Inspect dampeners every 1,000 shots and replace when rubber becomes hard, cracked, or loses elasticity. Most dampeners remain effective for 2-3 years of regular shooting, but harsh environmental conditions accelerate degradation.
Does draw weight affect bow vibration?
Higher draw weights store more energy, which can create more residual vibration if not properly managed with appropriate arrow weight and dampening. However, the relationship isn’t linear, a well-tuned 70-pound bow with proper arrows may vibrate less than a poorly tuned 50-pound bow with light arrows. Focus on the ratio of arrow weight to draw weight (GPP) rather than draw weight alone.
Why does my bow vibrate differently when shooting broadheads vs field points?
Broadheads have different aerodynamics and weight distribution than field points, which can change arrow spine behavior and energy transfer. If your bow vibrates more with broadheads, they may be causing the arrow to flex differently during launch, indicating a tuning issue. Properly tuned bows should show minimal vibration difference between field points and broadheads of the same weight.
Bow vibration after the shot is a normal physical consequence of energy transfer, but excessive vibration signals correctable equipment or tuning issues. Understanding that 15-30% of your bow’s stored energy remains in the system after arrow departure helps you recognize that some vibration is inevitable, while also identifying when vibration exceeds acceptable levels.
The most effective vibration reduction strategies address root causes rather than just symptoms. Start with proper arrow weight, maintaining at least 5-6 grains per pound of draw weight, which provides more vibration reduction than any accessory. Ensure all hardware is properly tightened, with special attention to limb bolts that commonly loosen over time. Add cost-effective dampening accessories in order of impact: stabilizer first, string silencers second, and limb dampeners third.
For archers experiencing uncomfortable hand shock or accuracy problems related to vibration, systematic troubleshooting using the checklist provided will identify the specific issue in most cases. Remember that beginner archers often perceive normal vibration as excessive due to grip tension and unfamiliarity, so develop a reference point through experience before investing heavily in premium dampening equipment.
Take these actions now:
Proper vibration management improves shooting comfort, accuracy, and equipment longevity. By addressing vibration systematically rather than ignoring it or masking symptoms with accessories alone, you’ll develop a quieter, more accurate, and more enjoyable shooting experience. Whether you’re a beginner learning proper form or an experienced archer fine-tuning your hunting setup, controlling bow vibration is an essential skill that pays dividends in every shooting session.