
Newsletter Subscribe
Enter your email address below and subscribe to our newsletter

All voices matter
All voices matter

 ByTravis
Rotating your elbow pit upward rather than facing it horizontally aligns your forearm and upper arm bones behind the bow, creating a stable skeletal structure.
Affiliate Disclaimer: We are a participant in the Amazon Services LLC Associates Program, an affiliate advertising program designed to provide a means for sites to earn advertising fees by advertising and linking to Amazon.com. As an Amazon Associate I earn from qualifying purchases. We also participate in other affiliate programs.

Bow arm elbow rotation refers to the vertical positioning of your elbow joint when holding a bow at full draw, with the elbow pit (inner crease) rotated upward rather than facing horizontally. Proper rotation aligns the bones of your forearm and upper arm in a straight line behind the bow, creating a stable skeletal structure that prevents string slap and improves accuracy. Most archers should rotate their elbow so the pit faces between 45 and 90 degrees upward, though the exact angle depends on individual joint flexibility and bow type.
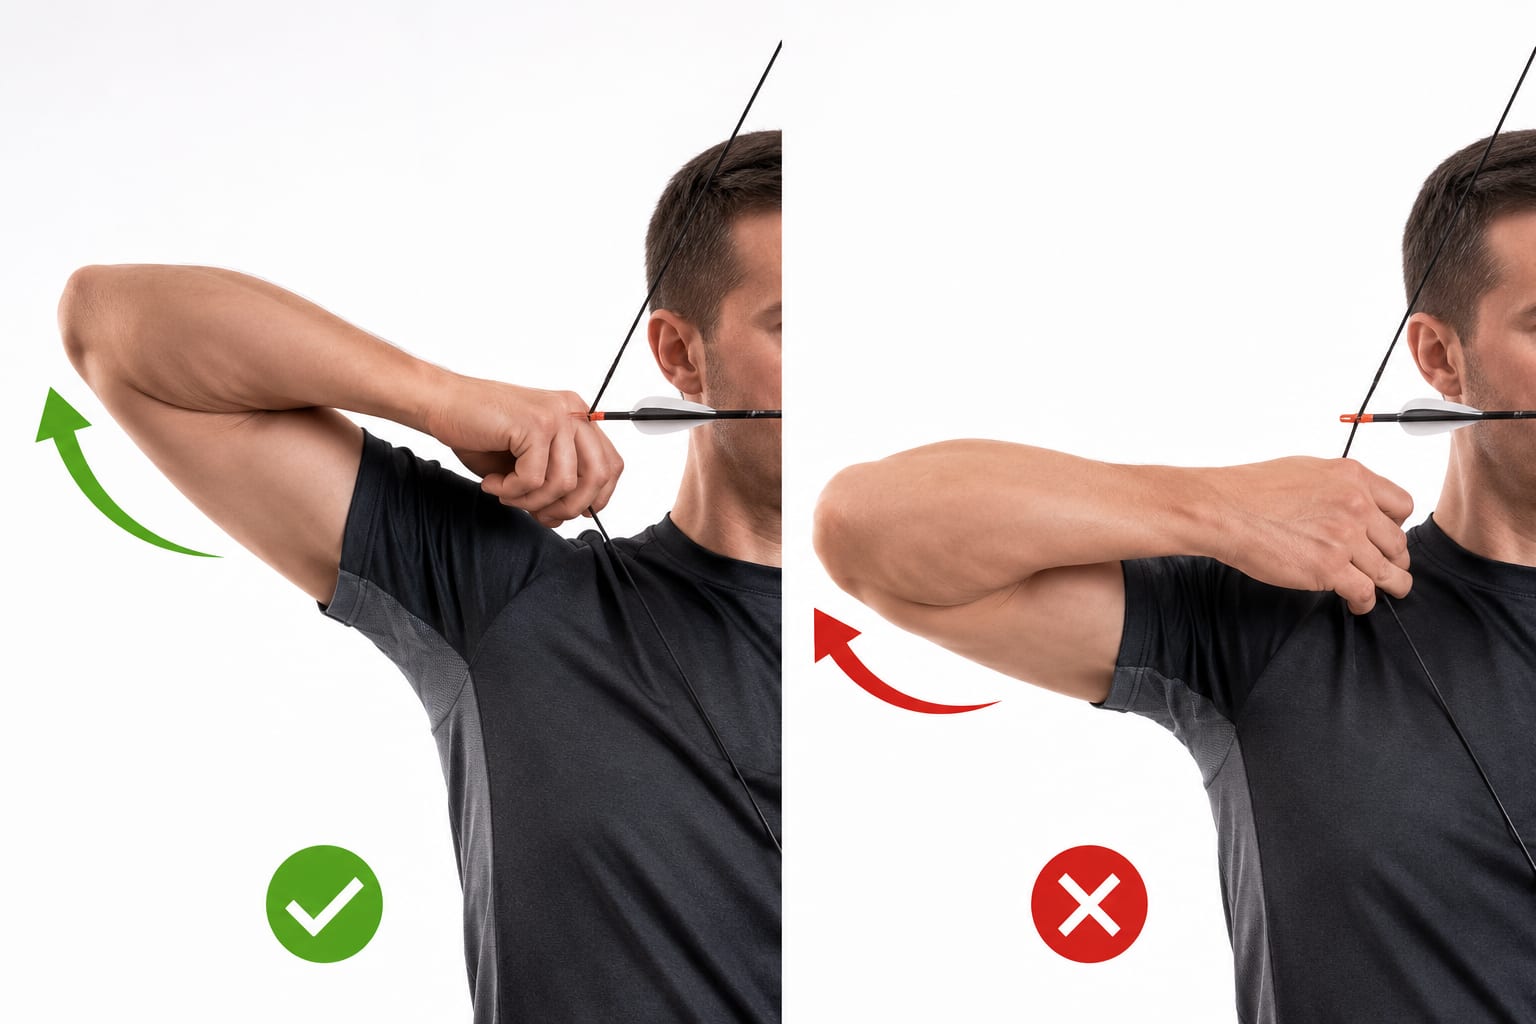
Proper bow arm elbow rotation means positioning your elbow joint so the inner crease (elbow pit) points upward at an angle rather than directly to the side. This rotation creates a vertical alignment of the elbow joint that places the bones of your forearm and upper arm in a straight line behind the riser, forming what coaches call a “bone-on-bone” structure.
When executed correctly, this position accomplishes three critical functions. First, it moves the soft tissue of your inner forearm out of the bowstring’s path during release. Second, it creates a rigid skeletal support system that requires minimal muscular effort to maintain. Third, it establishes a consistent reference point for shot-to-shot repeatability.
The rotation happens at the shoulder joint, not by twisting your forearm. Your entire arm rotates as a unit from the shoulder socket, bringing the elbow pit from a horizontal orientation toward vertical. The degree of rotation depends on your natural joint structure, flexibility, and the specific demands of your shooting style.
Key indicators of proper rotation:
You can verify correct elbow rotation by checking three physical markers before drawing the bow and one outcome marker after release. Before drawing, look at your bow arm extended toward the target: the elbow pit should face upward at roughly a 45-degree angle or more, the forearm should appear to continue the line of the arrow, and you should feel the weight of the bow resting on your skeletal structure rather than being held by muscle tension.
The definitive test comes after shooting. If your forearm shows no string marks, bruising, or redness along the inner surface after a practice session, your rotation is likely correct. Conversely, any contact between string and forearm indicates insufficient rotation or poor alignment.
Self-check procedure:
Many archers use the “thumb test” as a quick field check. With your bow arm extended and rotated properly, your thumb should naturally point upward or slightly outward. If your thumb points straight up toward the sky, you may have rotated too far. If it points horizontally across your body, you need more rotation.
Elbow rotation and arm straightness are related but distinct concepts in archery form. A straight arm refers to the degree of extension at the elbow joint, ranging from slightly bent to fully extended or even hyperextended. Elbow rotation refers to the vertical positioning of that joint regardless of how straight the arm is.
You can have a straight arm with poor rotation (elbow pit facing sideways) or excellent rotation with a slightly bent arm. The ideal combination for most archers is a nearly straight arm with proper vertical rotation. The arm should be extended enough to create bone-on-bone alignment but not locked so rigidly that it creates tension or allows hyperextension.
Comparison of key differences:
| Aspect | Elbow Rotation | Arm Straightness |
|---|---|---|
| What it controls | Vertical position of elbow joint | Degree of extension at elbow |
| Primary benefit | Prevents string slap | Creates stable structure |
| Adjustment method | Shoulder rotation | Elbow extension/flexion |
| Common error | Horizontal elbow pit | Locked or hyperextended joint |
| Feel when correct | Relaxed, natural twist | Firm but not rigid |
The confusion between these concepts causes many beginners to lock their elbow rigidly straight while ignoring rotation, resulting in a straight but improperly oriented arm that still suffers string slap. The solution is to focus on rotation first, then adjust straightness to create a comfortable, stable position.
Elbow pain after archery typically results from one of three causes: string slap from insufficient rotation, hyperextension stress from locked joints, or muscular strain from holding the bow with muscle tension rather than skeletal structure. The location and type of pain helps identify the specific cause.
Pain on the inner forearm near the elbow, often accompanied by bruising or red marks, indicates string slap. This happens when the bowstring strikes the forearm during release because the elbow isn’t rotated enough to clear the string’s path. Pain in the elbow joint itself, particularly a deep ache in the back of the elbow, suggests hyperextension or locked joint stress. Pain in the shoulder or upper arm muscles indicates you’re holding the bow with muscular effort rather than proper bone alignment.
Pain diagnosis guide:
Address string slap pain by increasing elbow rotation and potentially using an arm guard during the correction period. Fix hyperextension pain by maintaining a slight micro-bend in the elbow and avoiding locked joints. Resolve muscular pain by focusing on relaxing the bow arm and letting your skeleton support the bow’s weight.
Fixing a hyperextended elbow requires maintaining a slight bend at the elbow joint while still achieving proper rotation and alignment. Hyperextension occurs when the elbow joint bends backward beyond straight, creating instability and potential for injury. Archers with naturally hyperextended joints (common in women and younger shooters) must actively prevent this overextension.
The solution is the “micro-bend” technique. Instead of locking your elbow completely straight, maintain a barely perceptible bend of 5-10 degrees. This small flexion prevents the joint from collapsing backward while still providing the straight-line bone structure needed for stability. The bend should be so slight that it’s almost invisible to observers but clearly felt by the archer.
Step-by-step correction process:
Some coaches recommend the “push-through” cue: imagine pushing your bow hand through the target while keeping your elbow soft. This mental image helps maintain the micro-bend without creating excessive tension. Others suggest thinking about “long but not locked” to distinguish between proper extension and hyperextension.

Beginners should start with a moderately rotated elbow position (45-60 degrees upward), nearly straight arm with a micro-bend, and relaxed shoulder dropped to its natural height. This conservative starting position prevents the most common beginner errors while allowing adjustment as technique develops.
The beginner-friendly position prioritizes safety and string clearance over maximum stability. New archers lack the body awareness to maintain subtle positions consistently, so a more pronounced rotation provides a larger margin for error. As muscle memory develops over 4-6 weeks, the position can be refined toward the archer’s optimal alignment.
Beginner setup checklist:
Beginners should resist the temptation to copy advanced archers’ positions immediately. Elite shooters often use subtle variations optimized for their specific anatomy and equipment. Starting with the standard beginner position builds proper fundamentals that can be customized later.
Compound and recurve bows require slightly different elbow rotation approaches due to differences in grip design, draw weight distribution, and string angle at release. Compound shooters typically use 5-10 degrees less rotation than recurve archers because the compound’s let-off and mechanical release reduce string deflection during the shot.
Recurve bows demand more aggressive rotation (60-90 degrees) because the string follows a more dramatic arc during release, requiring greater clearance from the forearm. The finger release used in recurve also introduces more lateral string movement than a mechanical release. Compound bows, with their let-off and release aids, allow slightly less rotation (45-70 degrees) while still maintaining adequate clearance.
Key differences by bow type:
Recurve bow arm:
Compound bow arm:
Both styles share the fundamental principle of vertical elbow orientation. The difference is degree, not direction. A compound shooter who adopts recurve-level rotation won’t be harmed, though they may find it uncomfortable. A recurve shooter who uses compound-level rotation will likely experience string slap.
The most frequent error is maintaining a horizontal elbow pit throughout the shot, which positions the forearm directly in the string’s path. This happens because the horizontal position feels more natural to people unfamiliar with archery, as it matches how we normally extend our arms for daily tasks.
The second major mistake is rotating the elbow correctly at setup but allowing it to drift back to horizontal during the draw or at anchor. This rotation loss occurs when archers focus attention on their draw hand and back tension while neglecting bow arm maintenance. The elbow gradually rotates back to its comfortable horizontal position without conscious awareness.
Complete list of common errors:
The forearm twist error deserves special attention. Some archers try to achieve rotation by twisting their forearm (pronation/supination) rather than rotating the entire arm from the shoulder. This creates tension in the forearm muscles and fails to properly position the elbow joint. The rotation must originate at the shoulder socket, moving the entire arm as a unit.
Your bow arm elbow should point outward and downward at approximately a 45-degree angle from vertical when viewed from behind. This orientation results naturally from proper upward rotation of the elbow pit. The elbow point (the bony prominence on the back of your elbow) should never point inward toward your body or straight down toward the ground.
When the elbow pit rotates upward, the elbow point automatically rotates outward and down. These movements are opposite sides of the same rotation. If you’re unsure whether your rotation is correct, check the elbow point direction: it should angle away from your body toward the ground at roughly 45 degrees.
Directional guide:
The outward-and-down orientation creates the optimal balance between string clearance and structural stability. Too much outward rotation (elbow point facing almost horizontally outward) weakens the skeletal structure. Too little outward rotation (elbow point facing straight down) fails to clear the string path adequately.
Most archers should rotate their elbow pit between 45 and 75 degrees upward from horizontal, with the exact angle determined by individual arm anatomy, joint flexibility, and bow type. There is no single universal angle that works for everyone. The correct amount of rotation for you is the minimum needed to consistently clear the bowstring by at least one inch while maintaining stable bone-on-bone alignment.
Start by rotating to 60 degrees (elbow pit facing halfway between horizontal and vertical) and test with several shots. If you experience any string contact, increase rotation by 10-15 degrees. If the position feels unstable or you notice your shoulder elevating to maintain it, decrease rotation slightly. The goal is finding your personal sweet spot where clearance and stability both feel natural.
Rotation guidelines by body type:
Measure your rotation angle by having someone photograph your bow arm from the side at full draw. Draw a line along your forearm and another from your elbow to your shoulder. The angle between these lines indicates your rotation degree. Alternatively, use a smartphone level app placed on your forearm to measure the angle from horizontal.
Archers with hypermobile or double-jointed elbows must actively limit their range of motion to prevent excessive rotation or hyperextension. Hypermobility allows the elbow to move beyond normal ranges in multiple directions, creating inconsistency and potential injury if not controlled.
The key strategy is establishing artificial limits through muscular engagement and conscious positioning. Instead of allowing the joint to move to its full range, hypermobile archers should find a mid-range position and actively hold it there with light muscle tension. This requires more muscular effort than standard technique but prevents the joint instability that comes with extreme ranges of motion.
Specific techniques for hypermobile elbows:
Some hypermobile archers benefit from proprioceptive training exercises that improve joint position awareness. Simple drills like holding the bow arm position for 30-second intervals without the bow help build the muscle memory needed to maintain consistent positioning under the stress of shooting.
Bow arm position directly affects accuracy by influencing three critical factors: consistency of anchor point geometry, bow torque during release, and follow-through stability. Inconsistent elbow rotation changes the angle between your bow arm and draw arm, altering your anchor point relationship to your eye and the arrow’s alignment to the target.
Research and coaching experience suggest that correcting bow arm position improves accuracy by 15-30% for most developing archers. This improvement comes primarily from increased shot-to-shot consistency rather than any single “perfect” position. An archer who maintains 55-degree rotation on every shot will outperform an archer who varies between 40 and 70 degrees, even if 55 degrees isn’t theoretically optimal.
Accuracy impacts of bow arm position:
The psychological impact of proper bow arm position shouldn’t be underestimated. Archers who experience string slap develop anticipatory flinching, pulling shots off target before the arrow even releases. Eliminating string contact through proper rotation removes this psychological barrier, often producing immediate accuracy improvements.
Training proper elbow rotation requires deliberate practice over 4-6 weeks to override your body’s natural tendency to use horizontal elbow positioning. The training process combines awareness exercises, position drills without shooting, and gradual integration into live shooting with constant feedback.
Begin with static position holds without a bow. Stand in your shooting stance and extend your bow arm toward a target, focusing entirely on achieving and maintaining proper rotation for 30-60 seconds. Repeat this 10 times daily for the first week. This builds the basic muscle memory and proprioceptive awareness needed before adding the complexity of actually shooting.
Progressive training program:
Week 1-2: Position awareness
Week 3-4: Integration with shooting
Week 5-6: Reinforcement and refinement
Ongoing maintenance:
Resistance band exercises can accelerate the learning process. Attach a light resistance band to a fixed point and practice your bow arm position against the band’s tension. This builds the specific shoulder and upper back muscles responsible for maintaining rotation under the bow’s pressure.
String slap occurs when the bowstring strikes the inner forearm during release, almost always caused by insufficient elbow rotation that leaves soft tissue in the string’s path. The impact creates immediate pain, bruising, and often causes archers to develop a flinch that ruins accuracy even after the position is corrected.
The string’s path during release follows a slight arc toward the bow arm side due to the lateral forces of the release. Even if your forearm appears to clear the string at full draw, insufficient rotation can position it directly in the path of this arc. The faster the bow (higher draw weight or more aggressive cam system), the more dramatic the string slap when contact occurs.
Complete troubleshooting sequence:
Immediate solutions:
If string slap persists despite proper rotation, the issue may be equipment-related rather than form-related. A bow with too short a draw length, incorrect grip angle, or inappropriate brace height can make string clearance impossible regardless of technique. Consult a qualified bow technician if form corrections don’t resolve the problem within two weeks.
How long does it take to learn proper bow arm elbow rotation?
Most archers develop consistent elbow rotation within 4-6 weeks of focused practice, though basic competency appears within 1-2 weeks. The timeline depends on practice frequency, quality of feedback, and whether you’re learning from scratch or correcting an established bad habit. Correcting existing muscle memory typically takes 50% longer than learning fresh.
Can I shoot accurately without rotating my elbow?
You can achieve moderate accuracy without proper rotation, but you’ll hit a performance ceiling and likely experience string slap. Professional archers universally use proper rotation because it’s necessary for elite-level consistency. Recreational archers may get acceptable results with suboptimal rotation at close ranges but will struggle at distance.
Should my bow arm elbow rotation change between practice and competition?
No, your elbow rotation should remain identical in all shooting situations. Consistency is fundamental to archery accuracy. Any change in form between practice and competition introduces variables that harm performance. Practice should replicate competition conditions as closely as possible, including identical bow arm positioning.
What exercises strengthen the muscles needed for proper elbow rotation?
Shoulder external rotation exercises, resistance band rotations, and isometric holds in shooting position strengthen the relevant muscles. Specific exercises include banded external rotations, prone Y-raises, and wall slides with rotation. Perform 2-3 sets of 12-15 repetitions three times weekly.
Does bow arm elbow rotation differ for left-handed vs right-handed archers?
The principles are identical but mirrored. Left-handed archers rotate their right elbow using the same techniques and angles as right-handed archers use for their left elbow. The biomechanics and goals remain the same regardless of handedness.
Will an arm guard fix my string slap problem?
An arm guard protects your forearm from injury but doesn’t fix the underlying form problem causing string slap. Use an arm guard for protection while you correct your elbow rotation, but don’t rely on it as a permanent solution. Proper form eliminates string contact entirely.
How do I maintain elbow rotation when I get tired during long practice sessions?
Fatigue-related form breakdown indicates you’re using muscular effort rather than skeletal structure to hold your bow arm. Proper rotation should require minimal muscular effort because your bones support the bow’s weight. If rotation fails when tired, focus on achieving better bone-on-bone alignment and reducing unnecessary muscle tension.
Can shoulder injuries affect my ability to rotate my elbow properly?
Yes, shoulder injuries, particularly rotator cuff problems, can limit your ability to achieve and maintain proper rotation. Consult a sports medicine physician or physical therapist before attempting to shoot through shoulder pain. Modified rotation angles or temporary shooting breaks may be necessary during recovery.
Should I rotate my elbow differently for different shooting distances?
No, elbow rotation should remain constant regardless of distance. Changing your fundamental form for different distances introduces inconsistency and makes distance estimation more difficult. Adjust your aim point and sight settings for distance, not your body position.
What’s the difference between elbow rotation and shoulder rotation in archery?
Elbow rotation refers to the vertical positioning of the elbow joint itself (pit up vs. horizontal). Shoulder rotation refers to the opening of your chest and shoulders to align perpendicular to the target. Both are necessary, but they’re separate movements. Proper shoulder rotation enables proper elbow rotation but doesn’t automatically create it.
How do I know if I’m rotating too much?
Over-rotation symptoms include shoulder elevation, instability in your bow arm, difficulty maintaining the position throughout the shot, and a feeling that your arm is twisted uncomfortably. If your elbow pit faces completely vertical (90+ degrees) or your shoulder hunches toward your ear, you’ve rotated too far.
Does bow weight affect how much I should rotate my elbow?
Heavier bow weights don’t change the optimal rotation angle but do make it harder to maintain proper position throughout the shot. If you struggle to hold rotation with your current bow weight, reduce the weight until you can maintain proper form consistently, then gradually increase as your strength improves.
Mastering bow arm position through proper elbow rotation stands as one of the most important fundamentals in archery, directly affecting accuracy, consistency, and shooting comfort. The vertical rotation of the elbow pit, typically between 45 and 75 degrees upward from horizontal, creates the bone-on-bone skeletal alignment that prevents string slap while providing a stable platform for accurate shooting.
Success requires understanding that elbow rotation originates from the shoulder joint, not the forearm, and must be maintained consistently throughout the entire shot sequence. Individual anatomy, joint flexibility, and bow type all influence the optimal rotation angle for each archer, making personalized adjustment essential rather than copying a universal standard.
Action steps to implement immediately:
The investment of 4-6 weeks of focused practice on elbow rotation typically produces 15-30% accuracy improvements for developing archers while eliminating the pain and flinching associated with string slap. Archers with hypermobile joints or previous shoulder injuries may need additional time and modified techniques, but the fundamental principles remain the same.
Remember that proper elbow rotation works in concert with other form elements including stance, grip, anchor point, and release technique. Isolating and perfecting your bow arm position creates a stable foundation that allows these other elements to function optimally, ultimately producing the consistent, accurate shooting that every archer pursues.


