
Newsletter Subscribe
Enter your email address below and subscribe to our newsletter

All voices matter
All voices matter

 ByTravis
A safe backyard range needs at least 20-30 yards of clear space, a backstop that fully stops arrows, and compliance with local zoning and HOA rules.
Affiliate Disclaimer: We are a participant in the Amazon Services LLC Associates Program, an affiliate advertising program designed to provide a means for sites to earn advertising fees by advertising and linking to Amazon.com. As an Amazon Associate I earn from qualifying purchases. We also participate in other affiliate programs.

Building a safe backyard archery range requires a minimum of 50 yards of clear space (though 20-30 yards works for most recreational setups), a proper backstop that can stop arrows completely, and compliance with local zoning laws and HOA regulations. The essential components include a designated shooting line, an appropriate target system, an arrow-stopping backstop extending at least 6 feet beyond and above your target, and clear safety zones free of obstacles or foot traffic.
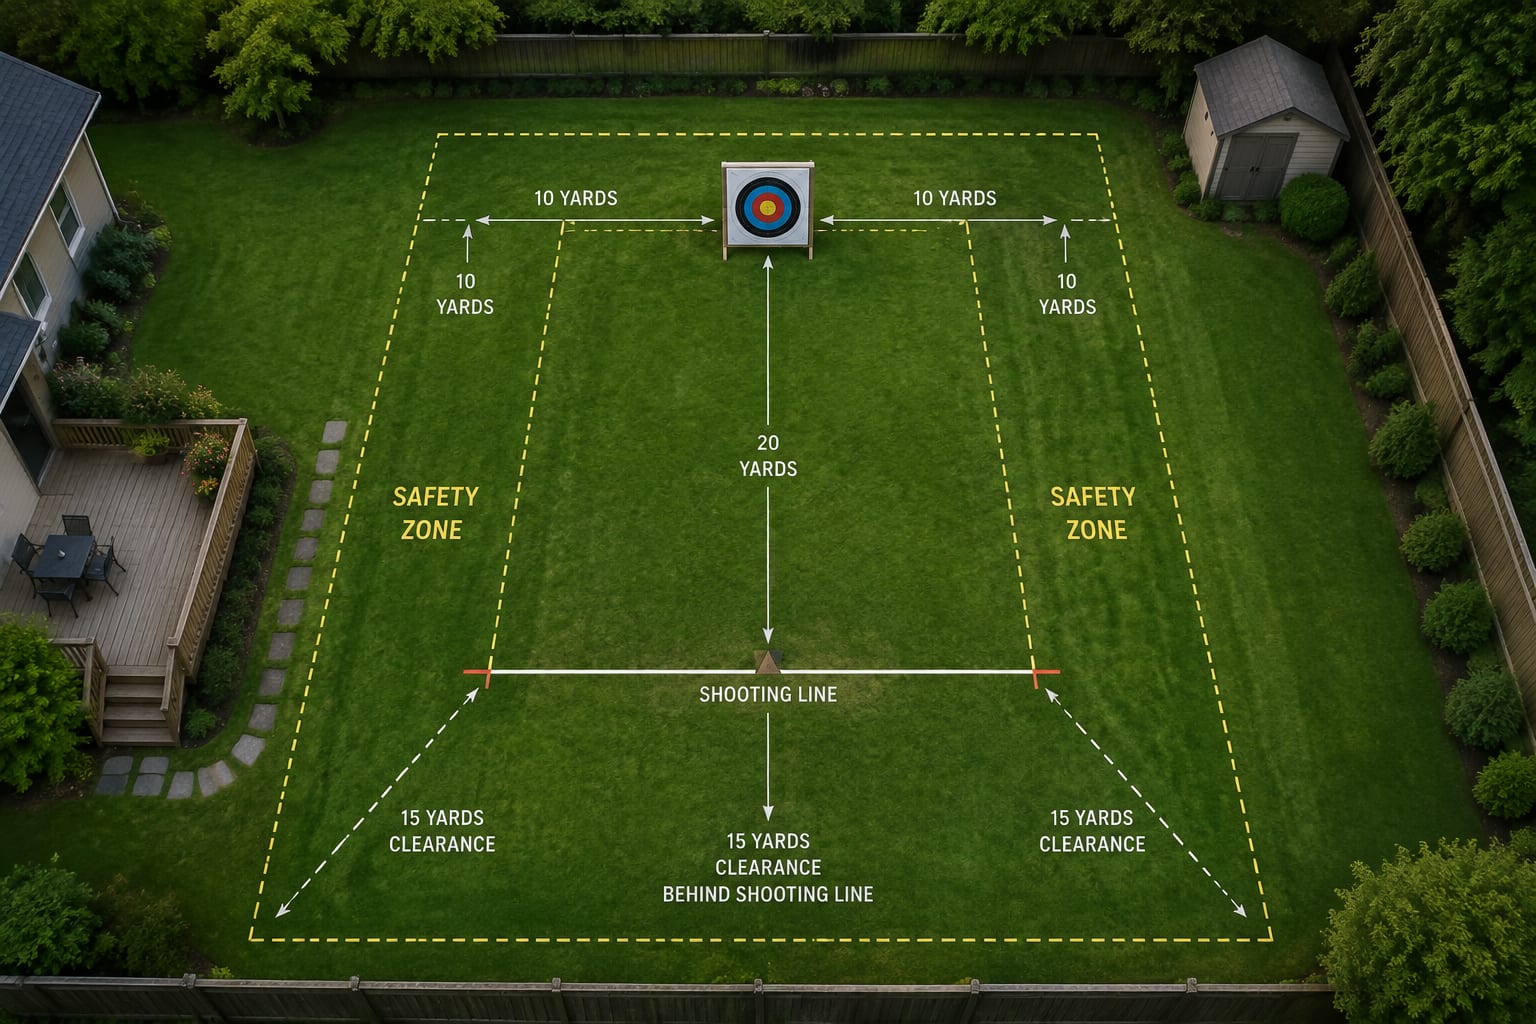
Legal requirements for backyard archery ranges vary significantly by location, but most jurisdictions regulate the discharge of projectiles within residential zones. You must check three levels of regulation: city or county ordinances, homeowners association (HOA) rules, and state hunting or weapons laws.
City and county ordinances often prohibit discharging bows within a certain distance of occupied structures, roads, or property lines. Common restrictions include:
HOA regulations frequently impose stricter rules than municipal codes. Review your covenants, conditions, and restrictions (CC&Rs) for clauses about:
State laws generally address archery in the context of hunting regulations rather than backyard practice. However, some states classify bows as weapons and restrict their use in residential areas. Contact your local code enforcement office and state fish and wildlife agency for definitive guidance.
Choose to notify neighbors even when not legally required. A courtesy conversation prevents complaints and potential legal disputes. Explain your safety measures and offer to demonstrate your setup.
A functional backyard archery range requires a minimum of 20-30 yards (60-90 feet) of clear depth for recreational shooting, though serious practitioners benefit from 40-50 yards. The space calculation includes the shooting line, target distance, and a mandatory safety zone behind the target.
Minimum dimensions for different shooting styles:
Width requirements depend on whether you plan to shoot multiple targets or accommodate multiple archers simultaneously. A single-lane range needs 10-15 feet of width to allow safe movement and equipment storage. Multi-lane setups require 6-8 feet per shooting position.
Overhead clearance matters for high-arcing shots. Ensure no tree branches, power lines, or structures interfere with arrow flight paths. A clear vertical corridor of at least 20 feet above the shooting lane prevents deflections.
Common mistake: Measuring only to the target face without accounting for the backstop depth and safety zone. Arrows that miss or pass through targets need additional stopping distance.
The backstop is the most critical safety component of any backyard archery range. Effective backstop materials must stop arrows completely, withstand weather exposure, and extend at least 6 feet beyond the target on all sides to catch errant shots.
Hay or straw bales remain the most popular choice for temporary and semi-permanent setups. Stack bales 4-6 feet high and 6-8 feet wide, creating a wall at least 2 feet thick. Advantages include low cost ($5-8 per bale), easy repositioning, and effective arrow stopping. Disadvantages include weather degradation, fire risk in dry climates, and the need for replacement every 1-2 years.
Foam archery backstops offer superior durability and arrow-stopping power. Closed-cell foam panels (4-6 inches thick) mounted on wooden frames create professional-grade backstops. These systems cost $300-800 but last 5-10 years with minimal maintenance. Foam stops arrows without excessive penetration, making arrow removal easier than with hay.
Earth berms provide permanent, maintenance-free backstops if you have space and can move soil. A properly constructed berm should be 6-8 feet tall, 10-12 feet wide at the base, and angled at 45 degrees. Compact the soil and plant grass or ground cover to prevent erosion. This option works best for rural properties with excavation equipment access.
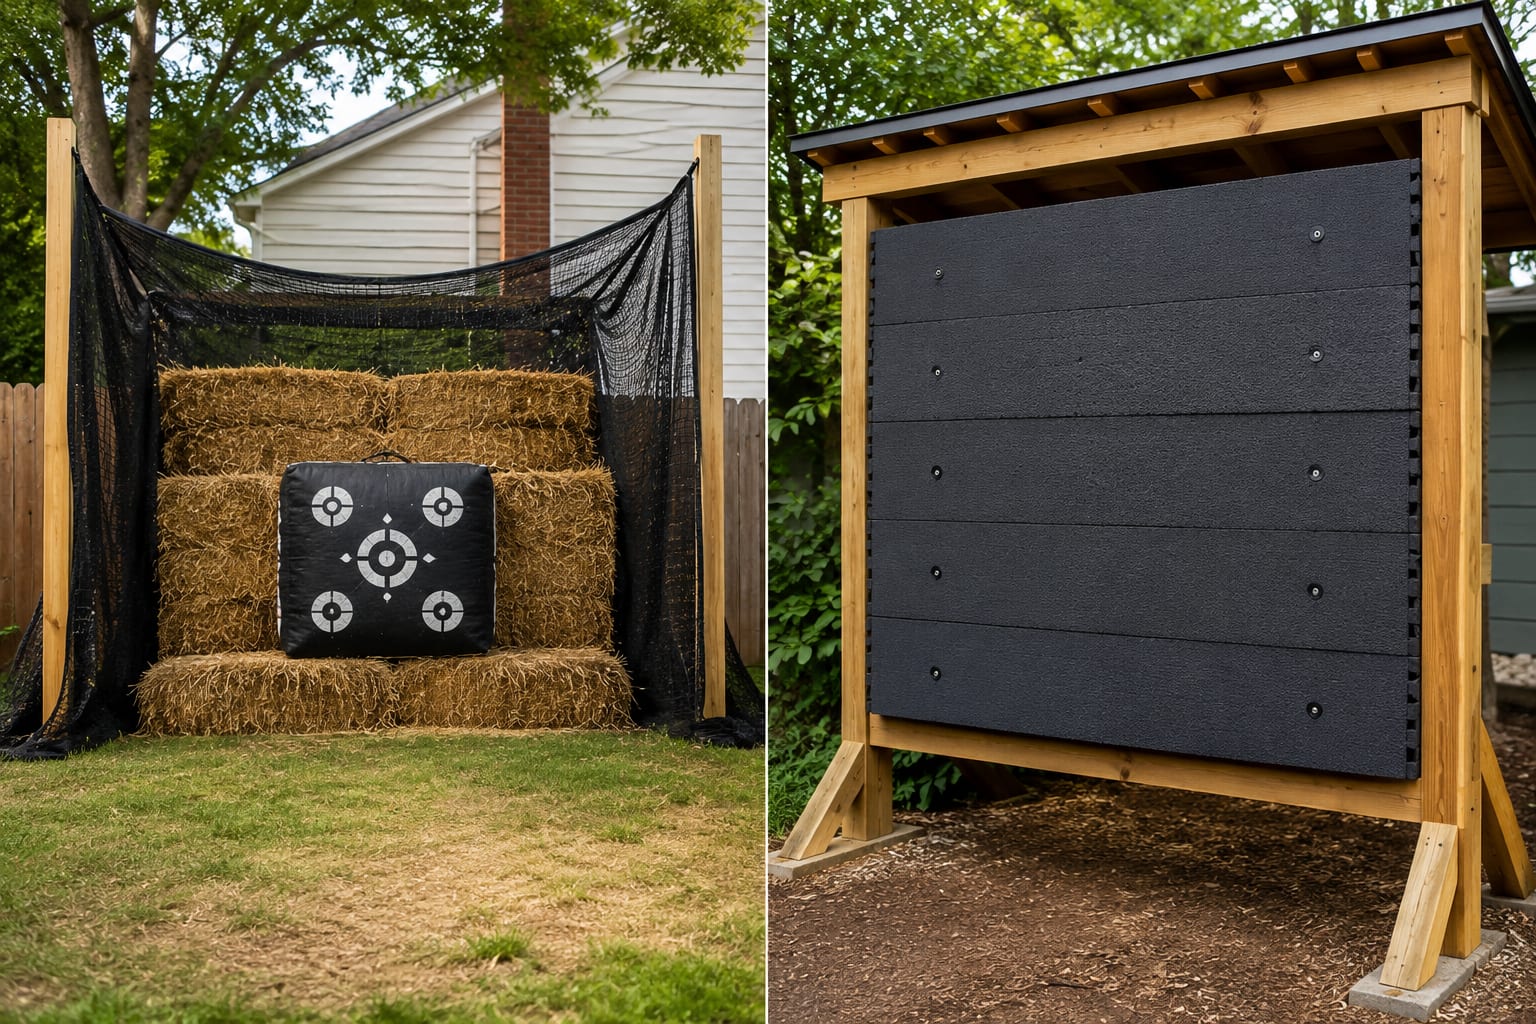
Carpet or rubber mat backstops work for low-poundage bows (under 30 pounds). Layer multiple pieces of dense carpet or rubber stall mats (3/4 inch thick) on a wooden frame. This budget option ($100-200) suits youth archery but won’t reliably stop adult compound bows.
Safety netting should supplement, not replace, solid backstops. Install archery netting (not sports netting) 10-15 feet behind your primary backstop to catch arrows that penetrate or deflect. Proper archery netting costs $150-400 for a 10×10 foot section.
Choose hay bales if you need a temporary setup, have budget constraints, and can replace materials annually. Choose foam panels if you want a long-term solution, shoot regularly, and can invest upfront. Choose an earth berm if you own rural property and want a permanent, zero-maintenance option.
Building a backyard archery range costs between $200 and $2,500 depending on whether you choose a basic portable setup or a permanent installation with professional-grade components. Most recreational archers spend $400-800 for a functional range that balances safety, durability, and convenience.
Budget setup ($200-400):
Mid-range setup ($500-1,000):
Premium setup ($1,200-2,500):
Ongoing costs include target face replacements ($20-60 annually), backstop material maintenance or replacement ($50-150 every 1-3 years), and potential liability insurance increases ($0-200 annually depending on your homeowner’s policy).
Cost-saving strategies include building your own target stands from scrap lumber, sourcing used hay bales from local farms, and starting with a minimal setup that you expand over time as skills and commitment increase.
Essential safety equipment for backyard archery includes personal protective gear for the archer and safety features for the range itself. At minimum, every archer should use an arm guard and finger protection, while the range requires a proper backstop, clear safety zones, and warning signage.
Personal protective equipment:
Range safety features:
Additional recommended equipment:
Common mistake: Assuming personal skill eliminates the need for protective equipment. Even experienced archers suffer equipment failures, and arm guards prevent painful injuries from unexpected string contact.
For households with children, add trigger locks for compound bows, locked storage for all archery equipment, and strict supervision rules. Never allow unsupervised access to the range or equipment.
Small suburban yards can accommodate archery ranges if they meet minimum space requirements of 60-80 feet depth and include proper safety measures. The key is adapting your shooting distance, target selection, and backstop design to fit available space while maintaining safety standards.
Space optimization strategies:
Minimum viable suburban setup:
A yard measuring 60 feet deep by 30 feet wide can support a functional archery range with:
Neighbor considerations become critical in suburban settings. Position your range to shoot away from neighboring homes, avoid early morning or late evening practice, and use sound-dampening backstop materials like foam rather than hard surfaces that create loud impact noise.
Choose a portable setup if your yard is borderline on space requirements. Portable targets and temporary hay bale backstops can be set up for practice sessions and removed afterward, reducing visual impact and neighbor concerns.
This setup is not suitable if your yard is smaller than 60 feet deep, if local ordinances prohibit projectile discharge, or if your property line sits within 50 feet of neighboring structures. In these cases, consider alternatives like archery clubs or public ranges.
The most common mistake when setting up a backyard archery range is building an inadequate backstop that doesn’t extend far enough beyond the target boundaries. Arrows that miss the target face or pass through worn targets need the same stopping power as center shots, yet many beginners build backstops that only cover the target itself.
Critical setup errors:
Insufficient backstop coverage: The backstop must extend at least 6 feet beyond the target on all sides. A 4-foot-wide target requires a 10-foot-wide backstop minimum. Vertical coverage should reach 2-3 feet above the target’s highest point.
Shooting too close to property lines: Even with a backstop, position your target at least 20-30 feet from any property boundary. This buffer zone accounts for deflections, ricochets, and the small possibility of backstop failure.
Neglecting overhead obstacles: Tree branches 15-20 feet above the shooting lane can deflect arrows unpredictably. Clear or trim any vegetation in the arrow flight path, and check for power lines that could be struck by high shots.
Using worn or damaged targets: Targets with holes or thin spots allow pass-through shots that hit the backstop with full force. Replace target faces when you can see daylight through arrow holes, typically every 3-6 months with regular use.
Inadequate target stand stability: Lightweight target stands tip over in wind or from arrow impact, creating safety hazards. Anchor stands with ground stakes, sandbags, or concrete blocks. A tipped target exposes the backstop gap underneath.
Failing to establish a shooting line: Without a clearly marked shooting position, archers may creep forward, reducing the safety zone behind the target. Mark your shooting line with paint, tape, or a physical barrier.
Ignoring arrow inspection: Damaged arrows can shatter on release, sending fragments toward the archer’s face and bow arm. Inspect every arrow before shooting for cracks, splinters, bent shafts, or loose components.
Shooting in poor lighting conditions: Dusk and dawn shooting makes it difficult to see the target clearly and impossible to spot obstacles or people entering the safety zone. Install adequate lighting or restrict shooting to daylight hours.
You don’t legally need neighbor permission to build a backyard archery range in most jurisdictions, but proactively informing adjacent property owners prevents complaints and maintains good relationships. Some HOAs and local ordinances do require neighbor notification or consent, so check your specific regulations first.
When notification is legally required:
When notification is strongly recommended:
How to approach the conversation:
Speak with neighbors in person rather than leaving a note. Explain that you’re setting up an archery range, describe your safety measures in detail, and offer to show them the completed setup. Address common concerns proactively:
If neighbors object, ask about specific concerns and whether modifications would address them. Options include adjusting shooting hours, adding visual screening, or repositioning the range. Document the conversation and any agreements in writing.
Common mistake: Assuming that legal permission means neighbor approval is unnecessary. Even when you have every right to build a range, neighbor complaints can trigger code enforcement investigations, HOA violations, or nuisance claims that create ongoing problems.
Preventing arrows from going over the fence requires a combination of proper backstop height, shooting angle management, and range design that accounts for worst-case scenarios. The backstop must be tall enough to catch high shots, and the shooting position should be configured to keep arrow trajectories well below fence height.
Backstop height calculation:
Your backstop should extend at least 2-3 feet above the highest point of your target. For a target with a 4-foot-tall face mounted so the center sits at 5 feet (typical for adult shooting), the backstop needs to reach 8-9 feet minimum. This accounts for:
Shooting angle management:
Position your shooting line so arrows travel slightly downward toward the target rather than upward. This is achieved by:
Additional safety measures:
Safety netting above the backstop: Install archery netting on poles extending 3-5 feet above your solid backstop. This creates a secondary barrier for arrows that clear the primary backstop. Use proper archery netting rated for arrow impact, not bird netting or sports netting.
Angled backstop tops: Design backstops with a forward-angled top section that deflects high shots downward rather than allowing them to continue upward. A 45-degree angle on the top 2 feet of backstop improves catch rates.
Distance reduction: Shooting at closer distances (15-20 yards instead of 30-40 yards) reduces arrow arc and velocity, making containment easier. This is especially important in yards with standard 6-foot privacy fences.
Shooting discipline: Establish and enforce a rule that no shot is taken unless the archer can clearly see the entire target face and backstop. This prevents shots taken at extreme upward or downward angles.
Choose to add overhead netting if your fence is 6 feet or shorter and your backstop can’t practically reach 9-10 feet. Choose a taller solid backstop if you have the budget and want a cleaner visual appearance without netting.
A backyard archery range can be safe for kids when properly designed with age-appropriate equipment, adult supervision, and clear safety rules. Children as young as 8-10 can safely practice archery with youth bows (10-20 pound draw weight) at reduced distances of 10-15 yards under direct supervision.
Safety requirements for kids:
Constant adult supervision: An adult with archery knowledge must be present and actively watching whenever children access the range. This isn’t passive supervision; the adult should stand behind the shooting line and maintain visual contact with both the archer and the safety zone.
Age-appropriate equipment: Youth bows with draw weights of 10-20 pounds for ages 8-12, and 15-25 pounds for ages 13-16. Bows that are too powerful for a child’s strength lead to poor form and control issues that create safety risks.
Reduced shooting distances: Kids should shoot at 10-15 yards maximum until they demonstrate consistent accuracy and safety awareness. Shorter distances reduce arrow velocity and make backstop containment easier.
One archer at a time: Unlike adult ranges where multiple archers can shoot simultaneously, kids’ ranges should allow only one child shooting at a time until they’re experienced enough to follow range commands reliably.
Physical barriers: Install a fence or rope barrier at the shooting line that prevents kids from walking forward while others are shooting. Make the rule absolute: no one crosses the shooting line until all bows are set down and the range is called clear.
Safety rules for children:
Equipment storage: All bows, arrows, and accessories must be stored in a locked cabinet or room when not in use. Kids should never have unsupervised access to archery equipment.
Common mistake: Allowing kids to “play” with archery equipment or treating it like a toy. Archery is a sport that requires discipline and respect for safety protocols. Establish serious rules from the first session.
The best target for outdoor archery practice depends on your bow type, draw weight, and practice goals, but foam layered targets offer the best balance of durability, arrow-stopping power, and ease of arrow removal for most backyard setups. These targets last 2-5 years with regular use and work well with compound, recurve, and traditional bows.
Target types compared:
Foam layered targets ($80-250) consist of compressed foam layers that stop arrows through friction. They excel at:
Best for: Regular practice with compound or recurve bows, draw weights 20-70 pounds.
Bag targets ($40-120) use synthetic fill material in a weather-resistant bag. They offer:
Drawbacks include harder arrow removal, shorter lifespan (1-2 years), and potential pass-through with high-poundage bows.
Best for: Occasional shooting, youth archery, budget-conscious setups.
3D animal targets ($80-300) simulate hunting scenarios with realistic animal shapes. They provide:
Drawbacks include higher cost, larger storage requirements, and the need for multiple targets to avoid shooting the same spot repeatedly.
Best for: Bowhunters preparing for season, archers wanting varied practice scenarios.
Straw/hay bale targets ($30-60 for bales plus target face) offer the most budget-friendly option:
Drawbacks include weather degradation, difficult arrow removal, and annual replacement needs.
Best for: Beginners, temporary setups, extremely tight budgets.
Target faces ($5-30) are paper or cardboard sheets with scoring rings that attach to any target type. Replace faces regularly to maintain clear aiming points and prevent shooting through worn spots.
Choose foam layered targets if you shoot regularly (2+ times per week) and want minimal maintenance. Choose bag targets if you shoot occasionally and prioritize portability. Choose 3D targets if you’re a bowhunter focused on realistic practice scenarios.
Your archery target should be positioned at least 30-50 feet from your house or any occupied structure, with the shooting line even farther away to ensure arrows never travel toward buildings. The exact distance depends on your shooting direction, backstop placement, and local building setback requirements.
Safe configuration:
The ideal setup places your house behind the shooting line, so arrows travel away from structures. For example:
This configuration means arrows travel in a direction that increases distance from the house with every foot of flight.
If you must shoot parallel to your house (target positioned to the side rather than away from the house):
Never shoot toward your house under any circumstances, even with a backstop. Equipment failures, deflections, or backstop gaps could send arrows toward windows, siding, or people inside.
Additional structure considerations:
Common mistake: Measuring distance from the target to the house but forgetting that the shooting line is 20-30 yards behind the target. The shooting line should be the reference point for house distance calculations when arrows travel away from structures.
Backyard archery ranges offer longer shooting distances and realistic outdoor conditions, while indoor setups provide weather protection and year-round accessibility. The better choice depends on your available space, climate, practice goals, and whether you prioritize convenience or realistic training conditions.
Backyard range advantages:
Backyard range disadvantages:
Indoor setup advantages:
Indoor setup disadvantages:
Cost comparison:
Choose a backyard range if you have adequate space, live in a moderate climate, and want to practice at realistic outdoor distances. Choose an indoor setup if you have limited outdoor space, experience harsh winters, or prioritize consistent year-round access over distance.
Hybrid approach: Many serious archers maintain both a basic indoor setup for form work and frequent practice, plus an outdoor range for distance shooting and realistic conditions. A garage-based indoor range ($200-400) combined with a minimal outdoor setup provides maximum flexibility.
If building a permanent backyard archery range isn’t feasible due to space, budget, or regulatory constraints, several alternatives provide regular archery practice without major property modifications. Portable setups, archery clubs, and public ranges offer varying levels of convenience, cost, and access.
Portable backyard setup:
A temporary range that you set up for practice sessions and dismantle afterward addresses many concerns about permanent installations:
This approach works well for archers with limited space, HOA restrictions on permanent structures, or concerns about neighbor reactions. Storage requirements are minimal (a shed or garage corner), and the setup can be positioned differently based on wind conditions or sun angle.
Archery club membership:
Local archery clubs provide professional facilities, coaching, and community for $100-400 annually:
Best for: Archers who want social interaction, competitive opportunities, and professional facilities without home setup responsibilities.
Public archery ranges:
Many state parks, wildlife management areas, and municipal recreation departments operate free or low-cost archery ranges:
Drawbacks include limited hours, travel time, and potential crowding during peak seasons.
3D archery courses:
Commercial 3D courses offer realistic hunting practice with life-size animal targets in natural terrain:
Best for: Bowhunters and archers who want varied, challenging practice scenarios.
Indoor archery ranges:
Commercial indoor ranges provide year-round access with professional amenities:
Best for: Urban archers without outdoor space, or those prioritizing convenience and weather protection over cost.
Choose portable backyard setup if you have space but can’t build permanently. Choose club membership if you want community and coaching. Choose public ranges if you shoot occasionally and want zero setup costs. Choose commercial indoor ranges if you live in an urban area or harsh climate.
What is the minimum safe distance for backyard archery?
The minimum safe shooting distance is 10 yards (30 feet) for youth bows under 20 pounds draw weight, and 20 yards (60 feet) for adult recreational bows. Add a 15-20 foot safety zone behind the target, making the total minimum yard depth 45-80 feet depending on bow type.
Can I practice archery in my backyard legally?
Backyard archery is legal in most areas if you comply with local ordinances regarding projectile discharge, maintain proper safety measures, and respect setback distances from property lines. Check with your city code enforcement office and HOA before building a range, as regulations vary significantly by location.
How tall should a backyard archery backstop be?
A backyard archery backstop should be at least 6-8 feet tall for targets with standard 4-foot faces, extending 2-3 feet above the highest point of the target. For added safety, especially with 6-foot fences nearby, consider 8-10 foot backstops or supplemental safety netting.
What happens if my arrow goes into my neighbor’s yard?
If an arrow enters your neighbor’s yard, you’re liable for any damage or injury it causes. Knock on their door, explain the situation, and ask permission to retrieve it. This scenario indicates your backstop is inadequate and must be improved before shooting again. Consider it a serious safety failure requiring immediate correction.
Do I need insurance for a backyard archery range?
Standard homeowner’s insurance typically covers backyard archery as a recreational activity, but verify with your insurance agent that your policy includes adequate liability coverage. Some insurers may require notification of the range or charge a small premium increase. Consider umbrella liability coverage ($1-2 million) for additional protection.
How much does it cost to maintain a backyard archery range?
Annual maintenance costs range from $50-200 for basic setups, covering target face replacements ($20-60), backstop material refresh ($30-100), and minor repairs. Professional setups with foam backstops and premium targets may cost $100-300 annually for upkeep and component replacement.
Can I shoot a compound bow in my backyard?
You can shoot a compound bow in your backyard if you meet the same safety and legal requirements as any archery setup: adequate space (60+ feet depth minimum), proper backstop, compliance with local ordinances, and appropriate safety zones. Compound bows require more robust backstops due to higher arrow velocity.
What type of arrows are safest for backyard practice?
Field points (practice tips) are safest for backyard practice, as they penetrate targets cleanly without excessive damage. Avoid broadheads (hunting tips) in backyard settings, as they create safety risks, damage targets quickly, and may violate local weapons ordinances. Use aluminum or carbon arrows appropriate for your bow’s draw weight.
How do I make my backyard archery range quieter?
Reduce noise by using foam targets instead of bag targets (foam produces a dull thud rather than a loud smack), adding sound-dampening material behind the target, shooting during reasonable hours (10 AM – 6 PM), and positioning the range away from neighboring homes. Foam backstops are significantly quieter than plywood or metal barriers.
Should I get permission from my HOA before building an archery range?
Yes, review your HOA covenants and submit an architectural review request if required. Many HOAs regulate outdoor recreational structures, and building without approval can result in fines or mandatory removal. Include detailed plans showing safety measures, dimensions, and visual screening in your request.
What’s the best target for stopping arrows completely?
Layered foam targets designed specifically for archery provide the best arrow-stopping performance, preventing pass-through even with high-poundage compound bows. Behind the target, a backstop of stacked hay bales (2+ feet thick), foam panels (4-6 inches), or a compacted earth berm ensures complete arrow containment.
How often should I replace my archery target?
Replace target faces when you can see through arrow holes or when groups start passing through worn areas, typically every 3-6 months with regular use. Replace the entire target when foam becomes compressed and arrows penetrate deeper than 6-8 inches, or when bag targets develop tears or loose fill, usually every 1-3 years depending on shot volume.
Building a safe backyard archery range requires careful planning, appropriate materials, and strict adherence to safety protocols, but the result provides convenient, cost-effective practice space for years. The essential components include adequate space (minimum 60-80 feet depth), a proper backstop extending 6 feet beyond the target on all sides, compliance with local regulations, and clear safety zones.
Start by verifying legal requirements with your local code enforcement office and HOA, then measure your available space to determine appropriate shooting distances. Invest in a quality backstop system using hay bales, foam panels, or an earth berm, and position your range to shoot away from structures and property lines. Choose targets appropriate for your bow type and practice goals, and establish clear safety rules for everyone who uses the range.
Take these next steps:
A well-designed backyard archery range transforms your practice routine, eliminates travel time to commercial ranges, and provides a private space to develop skills at your own pace. With proper safety measures and regular maintenance, your backyard range will serve as a valuable training facility for years to come.


