
Newsletter Subscribe
Enter your email address below and subscribe to our newsletter
All voices matter
All voices matter
 ByTravis
A bow stringer is the safest way to string a recurve - seat the pockets on each limb tip, step on the cord, and pull the bow upward while sliding the string into the grooves.
Affiliate Disclaimer: We are a participant in the Amazon Services LLC Associates Program, an affiliate advertising program designed to provide a means for sites to earn advertising fees by advertising and linking to Amazon.com. As an Amazon Associate I earn from qualifying purchases. We also participate in other affiliate programs.
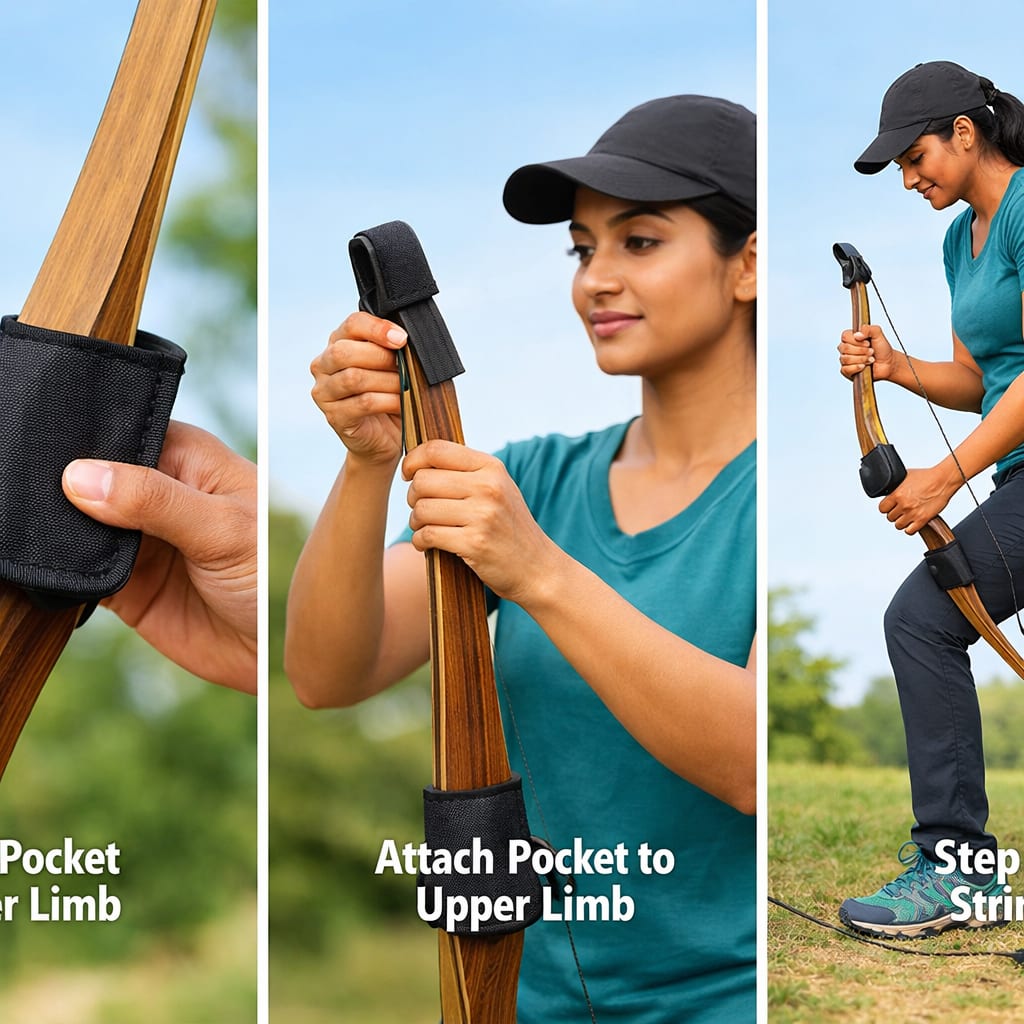
A bow stringer is the safest tool for stringing a recurve bow. Place the larger pocket on the lower limb tip and the smaller pocket on the upper limb tip, step on the cord, and pull the bow upward while sliding the string into the limb grooves. This method prevents limb twist, personal injury, and bow damage that commonly occur with alternative stringing techniques.
A bow stringer is a cord with two pockets designed to safely bend recurve limbs while you seat the bowstring. The tool distributes force evenly across both limbs, preventing the twisting and cracking that damages bows when archers use body-leverage methods.
The stringer works by creating a controlled mechanical advantage. When you step on the cord and lift the bow, both limbs flex simultaneously at the same rate. This balanced flexion keeps the limbs aligned in their natural plane of movement.
Why bow stringers matter for recurve archers:
Recurve bows store significant energy in their limbs. A 40-pound bow requires roughly 40 pounds of force to flex the limbs enough to seat the string. Without a stringer, that force gets applied unevenly, creating torsional stress the limbs weren’t designed to handle. For beginners learning proper recurve technique, a bow stringer is essential safety equipment, not an optional accessory.
The bow stringer is significantly safer than the step-through method. The step-through technique causes limb twist in approximately 60-70% of attempts by novice archers and accounts for the majority of recurve bow damage claims reported to manufacturers.
The step-through method requires you to place one limb tip against your ankle and the other limb behind your opposite leg, then bend the bow by pushing your leg through while pulling back on the riser. This creates three critical problems:
Step-through method risks:
The bow stringer eliminates all four risks. Both limbs flex together, you maintain full control throughout the process, the limbs stay aligned, and the string slides smoothly into position.
When the step-through method appears in archery contexts:
Some traditional archers with decades of experience use the step-through method successfully. However, they’ve developed precise body mechanics through thousands of repetitions. For the vast majority of archers, especially those working with modern takedown recurves featuring expensive carbon-foam limbs, the risk isn’t justified when a 15-dollar tool eliminates it entirely.
Stringing a recurve bow with a bow stringer takes six clear steps. Start with the bow unstrung and the bowstring’s larger loop already seated in the lower limb groove.
Complete stringing process:
The key is maintaining steady upward pressure while seating the string. If you release tension before the string fully seats, the limbs will snap back and you’ll need to start over.
Critical technique points:
Once the string is seated, slowly lower the bow to reduce tension, then remove both stringer pockets. The entire process takes 30 seconds with practice. For archers just starting out, our guide on what draw weight beginners should use helps you choose a bow that’s easier to string while you’re learning.
The larger stringer pocket always goes on the lower limb, and the smaller pocket goes on the upper limb. This size difference accounts for the fact that most recurve bows have slightly different limb tip dimensions.
Correct pocket placement:
The pockets must sit firmly enough that they won’t slip off during the stringing process. If a pocket feels loose, it’s either on the wrong limb or the stringer doesn’t match your bow’s limb tip size.
Common attachment mistakes:
Some bow stringers use a saddle design instead of pockets. The saddle sits over the lower limb string loop, while a pocket covers the upper limb tip. The principle remains the same: secure both ends before applying tension.
Stringing a recurve bow without a stringer risks immediate limb damage, personal injury, and voided manufacturer warranties. Modern takedown recurve limbs use laminated construction with wood, fiberglass, and carbon layers bonded together. Twisting these limbs during stringing can delaminate the layers, creating invisible damage that leads to catastrophic limb failure during a later shot.
Specific risks of stringing without a stringer:
The forces involved are substantial. A 35-pound recurve bow stores roughly 35 foot-pounds of energy in its limbs. When that energy releases uncontrollably because the bow slipped during stringing, it can cause serious harm.
Insurance and liability considerations:
Some archery ranges and clubs prohibit stringing bows without a stringer on their premises. The liability risk is too high. If you’re teaching someone to shoot, demonstrating proper stringing technique with a bow stringer is part of responsible archery safety instruction.
Beginner recurve archers should choose a double-pocket bow stringer with adjustable cord length and reinforced stitching. The most reliable designs use leather or heavy cordura pockets with nylon cord rated for at least 200 pounds of tension.
Key features in a quality bow stringer:
Most archery shops sell house-brand stringers in the 12 to 18 dollar range that meet these criteria. Premium stringers from specialty manufacturers cost 20 to 25 dollars and typically include lifetime warranties.
Stringer compatibility:
All standard bow stringers work with both takedown and one-piece recurve bows. The limb tip dimensions are standardized across most modern recurves. However, some traditional longbows with very narrow limb tips require specialized stringers with smaller pockets.
For archers just starting their journey, pairing a quality stringer with appropriate equipment is essential. Our beginner bow selection guide helps you choose gear that matches your skill level.
Yes, the same bow stringer works for both takedown and one-piece recurve bows. The limb tip dimensions and string groove designs are standardized across both bow types, so pocket-style stringers fit both configurations equally well.
The only consideration is bow length. Very short bows (under 54 inches) may require a shorter stringer cord to prevent excess slack, while very long bows (over 70 inches) benefit from longer cords that give you more working room. Most adjustable stringers accommodate the 62 to 70-inch range that covers the majority of adult recurve bows.
Stringer versatility:
The universal compatibility makes bow stringers excellent value. One 15-dollar tool serves your entire archery career, regardless of how many bows you own or how your equipment preferences change.
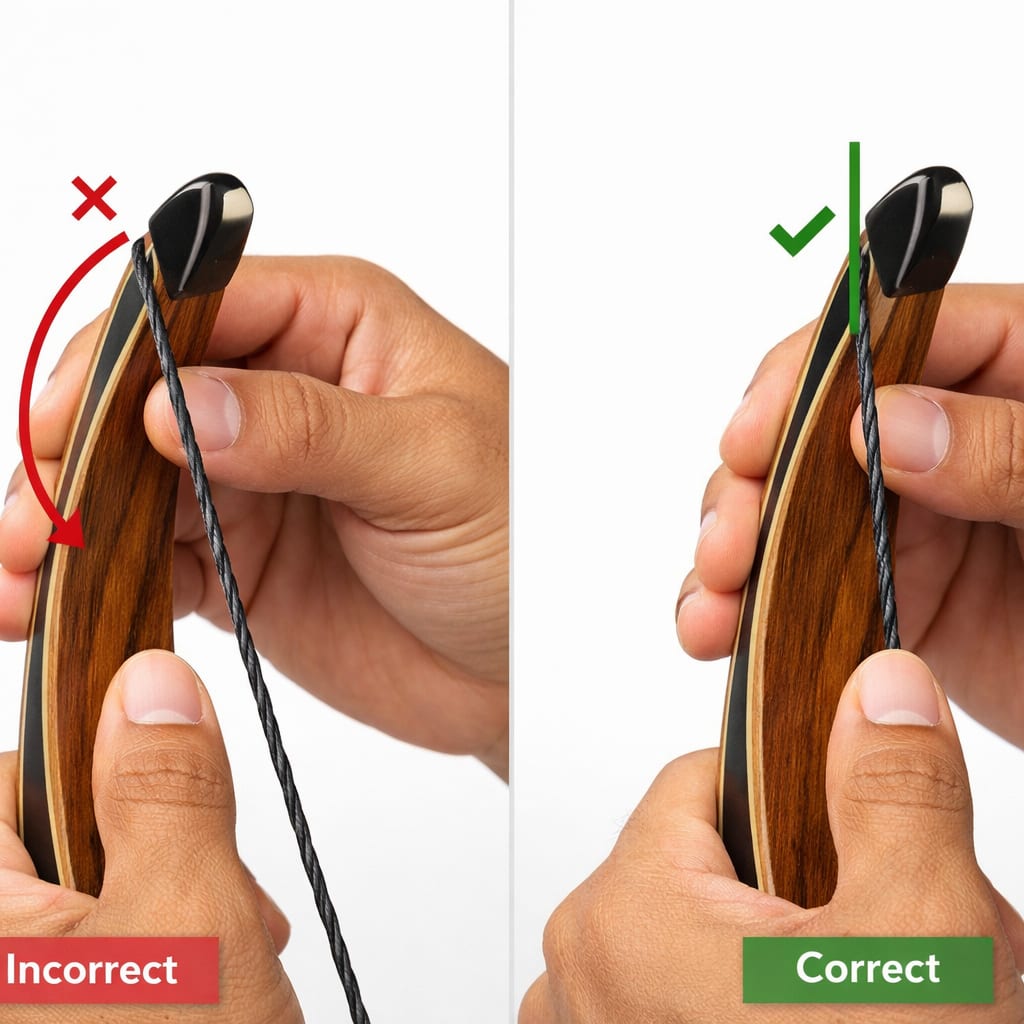
If your bow stringer keeps slipping off, you’re either using pockets that are too large for your limb tips, positioning the pockets incorrectly, or pulling at an angle instead of straight up. The most common cause is placing the pockets too far down the limb instead of at the very tip.
Solutions for slipping stringers:
Some archers find that slightly moistening the inside of leather pockets increases grip. However, this shouldn’t be necessary with properly sized pockets and correct technique.
When to replace your stringer:
Bow stringers wear out. If the pockets show visible stretching, the stitching is separating, or the cord is fraying, replace the stringer. A worn stringer that fails mid-use can cause the same injuries it’s designed to prevent.
The bow stringer cord should have minimal slack when you step on it, but you shouldn’t need to stretch it tight before beginning the lift. When you place your foot on the cord with the bow held at waist height, there should be just enough tension to keep the cord from sagging.
Correct stringer tension indicators:
If the cord is too long, you’ll need to lift the bow over your head to achieve full limb flex. This makes it difficult to see what you’re doing and reduces control. If the cord is too short, you’ll struggle to get enough lift, and the angle becomes awkward.
Adjusting stringer length:
Most quality stringers include adjustment points where you can shorten or lengthen the cord. Set the length so that stepping on the cord at its midpoint and lifting the bow to chest height produces full limb flex. This gives you the best combination of control, visibility, and mechanical advantage.
It is extremely difficult to twist limbs when using a bow stringer correctly, but it’s possible if you pull at a severe angle or rotate the bow during the stringing process. The bow stringer’s design specifically prevents limb twist by applying even pressure to both limbs simultaneously.
How limb twist occurs even with a stringer:
The solution is maintaining perfect vertical alignment throughout the stringing process. Keep the bow’s sight window (the cutout in the riser) facing directly toward or away from you. Don’t let the bow rotate in your hands.
Checking for limb twist:
After stringing your bow, sight down the string from behind the bow. The string should run perfectly centered through the riser’s sight window. If the string appears offset to the left or right, you may have introduced limb twist. Unstring the bow and repeat the process, paying careful attention to keeping everything aligned.
For archers working on their recurve bow fundamentals, proper stringing technique is the foundation of consistent shooting.
A good quality bow stringer costs between 12 and 25 dollars. Basic models from reputable manufacturers start around 12 dollars, mid-range stringers with premium materials cost 15 to 18 dollars, and top-tier stringers with lifetime warranties reach 25 dollars.
Price tiers and features:
The price difference reflects durability rather than functionality. A 12-dollar stringer works exactly the same as a 25-dollar stringer when both are new. The premium models last longer under heavy use and typically include better warranties.
Cost-benefit analysis:
Compared to the cost of replacing damaged limbs (150 to 400 dollars for quality takedown limbs) or medical bills from stringing injuries, even a 25-dollar stringer is inexpensive insurance. Most archers use the same stringer for years, making the per-use cost negligible.
Where to buy:
Local archery pro shops, online retailers, and major sporting goods stores all carry bow stringers. Buying from a pro shop gives you the advantage of staff who can demonstrate proper use and verify you’re getting the right size for your bow.
Yes, Olympic recurve archers universally use bow stringers. No competitive archer at the national or international level strings a bow without one. The equipment used in Olympic archery represents thousands of dollars in investment, and the precision required for competition-level accuracy demands perfect limb alignment.
Why competitive archers rely on stringers:
The World Archery Federation (the governing body for Olympic archery) doesn’t mandate bow stringers in its rules, but the practice is universal. You won’t find a single Olympic archer using the step-through method.
Professional standards:
If the world’s best archers, who have strung thousands of bows, still use stringers every single time, that tells you everything you need to know about best practices. The tool isn’t training wheels for beginners; it’s professional equipment for serious archers. For those interested in competitive shooting, understanding Olympic archery standards includes proper equipment care.
The most common mistakes when stringing a recurve bow with a stringer are reversed pocket placement, insufficient upward pull, and failing to verify string seating before releasing tension. Each mistake either damages equipment or creates safety hazards.
Top stringing errors and solutions:
Reversed pockets: Putting the small pocket on the lower limb and large pocket on the upper limb causes slipping
Inadequate lift: Not pulling high enough to fully flex the limbs makes string seating difficult
Angled pull: Lifting at an angle instead of straight up introduces limb twist
Rushing string seating: Trying to seat the string while limbs are still flexing
Skipping the final check: Releasing tension before verifying the string is fully seated
Incorrect foot position: Stepping on the edge of the cord instead of the center
The most dangerous mistake:
Releasing upward pressure before the string is fully seated causes the limbs to snap back with significant force. This can injure your hands or cause the partially-seated string to slip off and strike you. Always verify complete string seating before slowly lowering the bow.
You can easily string a recurve bow by yourself using a bow stringer. The process requires no assistance and takes 30 seconds once you’ve learned the technique. The bow stringer’s design specifically enables solo stringing by giving you mechanical advantage and control.
Why solo stringing works:
Some archers learning the process appreciate having an experienced archer watch their first few attempts to verify technique, but this is for education rather than necessity. Once you understand the steps, you’ll string your bow independently every time.
When assistance might help:
The independence that bow stringers provide is one of their key advantages. You can string your bow at home, at the range, or in the field without needing anyone else present.
A correctly strung recurve bow shows centered string alignment, equal limb curves, secure string placement in both grooves, and proper brace height. Check all four indicators before shooting.
Visual inspection checklist:
Testing string security:
Gently pull the string away from each limb tip. It should resist movement and snap back into the groove. If the string slides easily or pops out of the groove, it’s not properly seated.
Sound test:
A properly strung bow produces a clear, musical tone when you pluck the string. A dull thud or buzzing sound indicates the string isn’t seated correctly or the brace height is wrong.
What to do if something looks wrong:
If any indicator fails, unstring the bow and repeat the process. Never shoot a bow that shows signs of improper stringing. The string could slip during the shot, causing injury or equipment damage. For archers developing their skills, proper equipment setup is as important as proper shooting technique.
How long does it take to string a recurve bow with a bow stringer?
Stringing a recurve bow with a bow stringer takes 30 to 45 seconds once you’ve learned the technique. First-time users may need 2 to 3 minutes while they familiarize themselves with pocket placement and the lifting motion, but the process becomes quick and routine with practice.
Can a bow stringer damage my recurve bow?
A bow stringer cannot damage your recurve bow when used correctly. The tool is specifically designed to protect limbs by distributing force evenly. Damage only occurs if you pull at extreme angles, use worn-out stringer pockets that slip, or attempt to string the bow with the pockets placed incorrectly.
Do I need different stringers for different draw weights?
No, you do not need different stringers for different draw weights. A single bow stringer works across all draw weights because the tool doesn’t bear the bow’s stored energy; it simply provides leverage to flex the limbs. The same stringer handles a 20-pound youth bow and a 50-pound competition bow equally well.
How often should I replace my bow stringer?
Replace your bow stringer when the pockets show visible stretching, the stitching begins to separate, or the cord shows fraying. With normal use (stringing a bow 2 to 3 times per week), a quality stringer lasts 3 to 5 years. Archers who string and unstring daily may need replacement every 1 to 2 years.
Can you use a compound bow stringer on a recurve bow?
No, compound bow stringers use completely different mechanisms (typically bow presses) and do not work on recurve bows. Recurve bow stringers are specific to recurve and traditional bow designs. The two bow types require different stringing tools due to their fundamentally different construction.
Is it safe to leave a recurve bow strung all the time?
Leaving a recurve bow strung continuously is not recommended. Constant tension gradually weakens the limbs and can cause permanent set (loss of power). Unstring your bow after each shooting session. Modern takedown recurves are designed for frequent stringing and unstringing, which is why a bow stringer is essential equipment.
What’s the difference between a saddle-style and pocket-style bow stringer?
A saddle-style stringer uses a leather saddle that sits over the lower limb’s string loop and a single pocket on the upper limb, while a pocket-style stringer uses two pockets that cover both limb tips. Pocket-style stringers are generally more secure and easier for beginners, while saddle-style stringers are slightly faster once you master the technique.
Can children use a bow stringer safely?
Yes, children can use a bow stringer safely with proper instruction and supervision. The tool actually makes stringing easier for young archers because it requires less strength than alternative methods. Ensure the child can comfortably lift the bow to chest height and understands the step-by-step process before attempting solo stringing.
Do traditional longbows need a bow stringer?
Yes, traditional longbows benefit from bow stringers just like recurve bows. While some longbow designs have straighter limbs that are less prone to twist than recurves, using a stringer still provides the safest stringing method and protects the bow from damage. Some longbows with very narrow limb tips require specialized stringers with smaller pockets.
What should I do if my bow stringer cord breaks while stringing?
If your bow stringer cord breaks while stringing, immediately stop pulling upward and carefully lower the bow. The limbs will return to their unstrung position. Inspect the bow for any damage before attempting to string it again with a different stringer. A broken stringer cord indicates the tool was worn out and should have been replaced earlier.
Can you make your own bow stringer?
You can make your own bow stringer using paracord and leather pouches, but commercial stringers are inexpensive (12 to 25 dollars) and engineered for safety. Homemade stringers risk using inadequate materials or incorrect pocket sizing. Unless you have leatherworking experience and understand the force requirements, purchasing a manufactured stringer is the safer choice.
How do you store a bow stringer when not in use?
Store your bow stringer in a cool, dry place away from direct sunlight. Hang it on a hook or coil it loosely in your bow case. Avoid storing it compressed or folded tightly, as this can weaken the cord and deform the pockets. Proper storage extends the stringer’s lifespan and ensures it’s ready when needed.
Learning how to string a recurve with a bow stringer is a fundamental skill that protects both your equipment and your safety. The process takes less than a minute, costs minimal investment in a quality stringer, and eliminates the significant risks associated with alternative stringing methods. By placing the larger pocket on the lower limb, the smaller pocket on the upper limb, stepping on the cord, and pulling straight upward while seating the string, you ensure consistent, safe results every time.
The bow stringer isn’t optional equipment for serious archers. From beginners learning their first shots to Olympic competitors protecting thousand-dollar limbs, the tool represents the standard practice across all skill levels. The small investment in a quality stringer pays for itself the first time it prevents limb damage or personal injury.
Take these next steps:
Master this essential technique, and you’ll have the foundation for a lifetime of safe, enjoyable archery. For continued learning, explore our resources on recurve archery fundamentals and archery safety practices to build your skills systematically.


