
Newsletter Subscribe
Enter your email address below and subscribe to our newsletter

All voices matter
All voices matter

 ByTravis
A torque-free grip rests the bow on the meaty pad of your thumb with relaxed fingers, keeping your wrist straight - this prevents the twist that sends arrows left or right.
Affiliate Disclaimer: We are a participant in the Amazon Services LLC Associates Program, an affiliate advertising program designed to provide a means for sites to earn advertising fees by advertising and linking to Amazon.com. As an Amazon Associate I earn from qualifying purchases. We also participate in other affiliate programs.

A torque-free bow grip requires placing the bow’s pressure point at the meaty pad of your thumb while keeping your fingers relaxed and open, allowing the bow to rest in your hand rather than being squeezed. Your wrist should remain straight and aligned with your forearm, with minimal tension in your hand muscles. This technique prevents the twisting force (torque) that causes arrows to veer left or right at release.
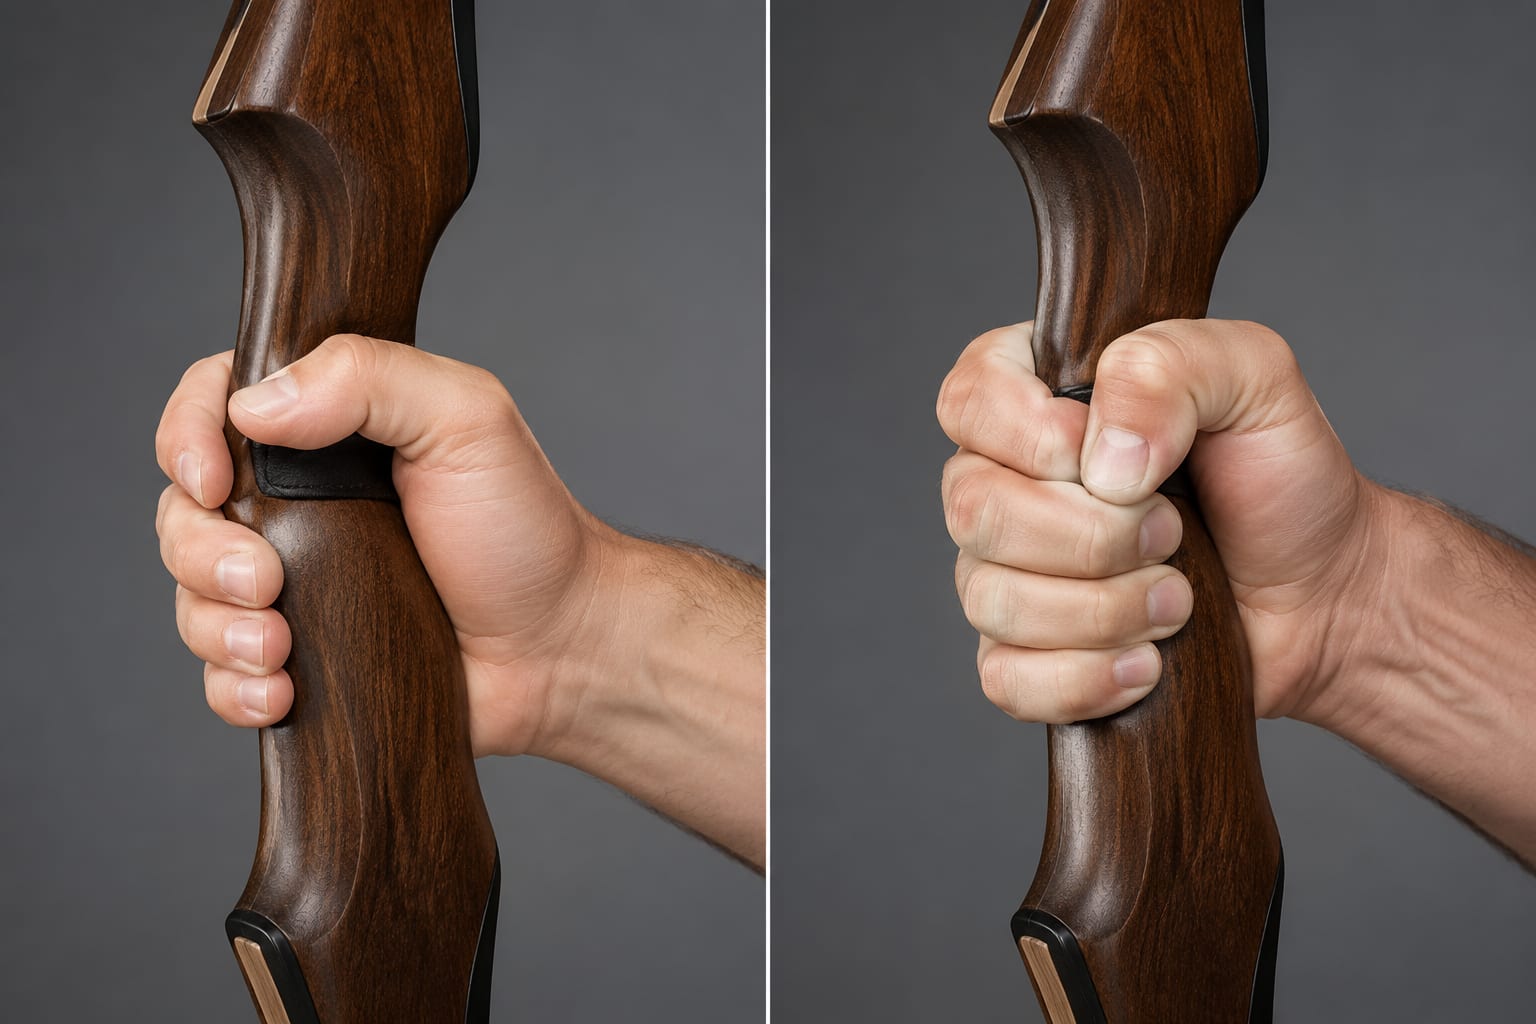
Torque in archery refers to the rotational twisting force applied to the bow handle during the shot cycle. When you grip the bow incorrectly or apply uneven pressure, you create a twisting motion that rotates the bow’s riser either clockwise or counterclockwise around its vertical axis. This rotation transfers directly to arrow flight, causing horizontal deviation from your intended point of aim.
Even small amounts of torque, just a few degrees of rotation, can move your arrow several inches off target at 20 yards and dramatically more at longer distances. The problem compounds because torque typically occurs at the moment of release when the bow’s stored energy transfers to the arrow, making it nearly impossible to correct mid-shot.
Why torque destroys accuracy:
Torque matters most for archers seeking tight groupings and competitive scores. Casual shooters may not notice minor torque at close range, but anyone shooting beyond 30 yards or pursuing hunting accuracy will see immediate improvement by eliminating it.
The correct hand placement positions the bow’s pressure point against the meaty pad at the base of your thumb (the thenar eminence), creating a single, consistent contact point. Your hand should approach the bow at approximately 45 degrees, with your thumb pointing toward the target and your lifeline (the crease running from thumb to wrist) aligned with the bow’s pressure point.
Step-by-step hand placement:
The bow should feel like it’s balancing on that single thumb-pad contact point. Your fingers serve no gripping function, they simply exist in space, relaxed and open. This feels unstable at first, which is why wrist slings are essential for this technique.
Common mistake: Placing the bow too deep in your palm creates multiple contact points and forces your wrist to bend, both of which introduce torque. The pressure point should never touch your palm’s center or the base of your fingers.
A high grip positions your hand higher on the bow’s handle, closer to where the arrow rests, while a low grip places your hand lower on the handle’s throat. High grip placement reduces torque potential because it shortens the lever arm between your hand and the bow’s center of mass, giving you less mechanical advantage to twist the riser.
High grip is generally superior for torque-free shooting because:
Low grip can work for archers with specific hand anatomy or those shooting traditional bows with minimal grip contouring, but it requires exceptional consistency to avoid torque. The longer lever arm amplifies any grip pressure variations, making mistakes more costly.
Choose high grip if: You’re learning proper technique, shooting for accuracy, or struggling with horizontal arrow dispersion. Most modern compound and Olympic recurve bows are designed with high grip placement in mind.
Choose low grip if: You shoot traditional longbows or recurves with straight handles, have unusually large hands that don’t fit high on the grip, or have already mastered torque-free technique with low placement.
You should hold your bow with just enough pressure to keep the bow from falling forward before the shot, typically described as “firm but relaxed” or about 10-20% of your maximum grip strength. The bow should rest in your hand rather than being actively gripped, with all holding force coming from the single contact point at your thumb pad.
After the shot, you should hold the bow with zero grip pressure, allowing it to jump forward into your wrist sling. This post-shot relaxation is critical because any attempt to catch or control the bow during release introduces torque at the exact moment the arrow is leaving the rest.
Grip pressure guidelines:
Think of your bow hand as a shelf or hook rather than a gripper. The bow sits on this shelf, held in place by the forward pressure of the draw rather than by your fingers wrapping around it.
Test your grip pressure: Have someone try to gently lift the bow out of your hand at full draw. If they can’t, you’re gripping too tightly. If the bow falls out easily, you need slightly more thumb-pad pressure (or you need a wrist sling).
Death grip, squeezing the bow handle tightly with your entire hand, is the single most common cause of torque-related accuracy problems among archers. When you squeeze the grip, you create multiple pressure points across your palm and fingers, each applying force in slightly different directions and magnitudes. This multi-directional pressure inevitably twists the bow, and because grip tension varies from shot to shot, the direction and amount of torque becomes unpredictable.
Death grip causes these specific problems:
The fix requires conscious relaxation and often feels wrong initially. Archers with death grip habits report that proper technique feels like they’re “barely holding the bow” or “about to drop it.” This sensation is correct, you should feel like the bow might fall if not for the forward pressure of the draw.
Breaking the death grip habit:
Recurve and compound bows use the same fundamental grip principles, relaxed hand, single pressure point, straight wrist, but compound bow grips typically offer more hand support and contouring, while recurve grips are often slimmer and less defined. The core technique remains identical: the bow rests on your thumb pad with fingers open and relaxed.
Recurve-specific considerations:
Compound-specific considerations:
Both bow types benefit from aftermarket grip modifications. Many archers replace factory grips with slimmer profiles, custom wood grips, or even remove the grip entirely to shoot off the bare riser. These modifications reduce the surface area touching your hand, making it easier to maintain a single pressure point.
Common mistake: Compound shooters sometimes over-rely on the grip’s contouring and allow their hand to settle into a “comfortable” position that’s actually creating torque. Comfort and correctness aren’t always the same, verify your hand position produces straight wrist alignment regardless of how the grip feels.
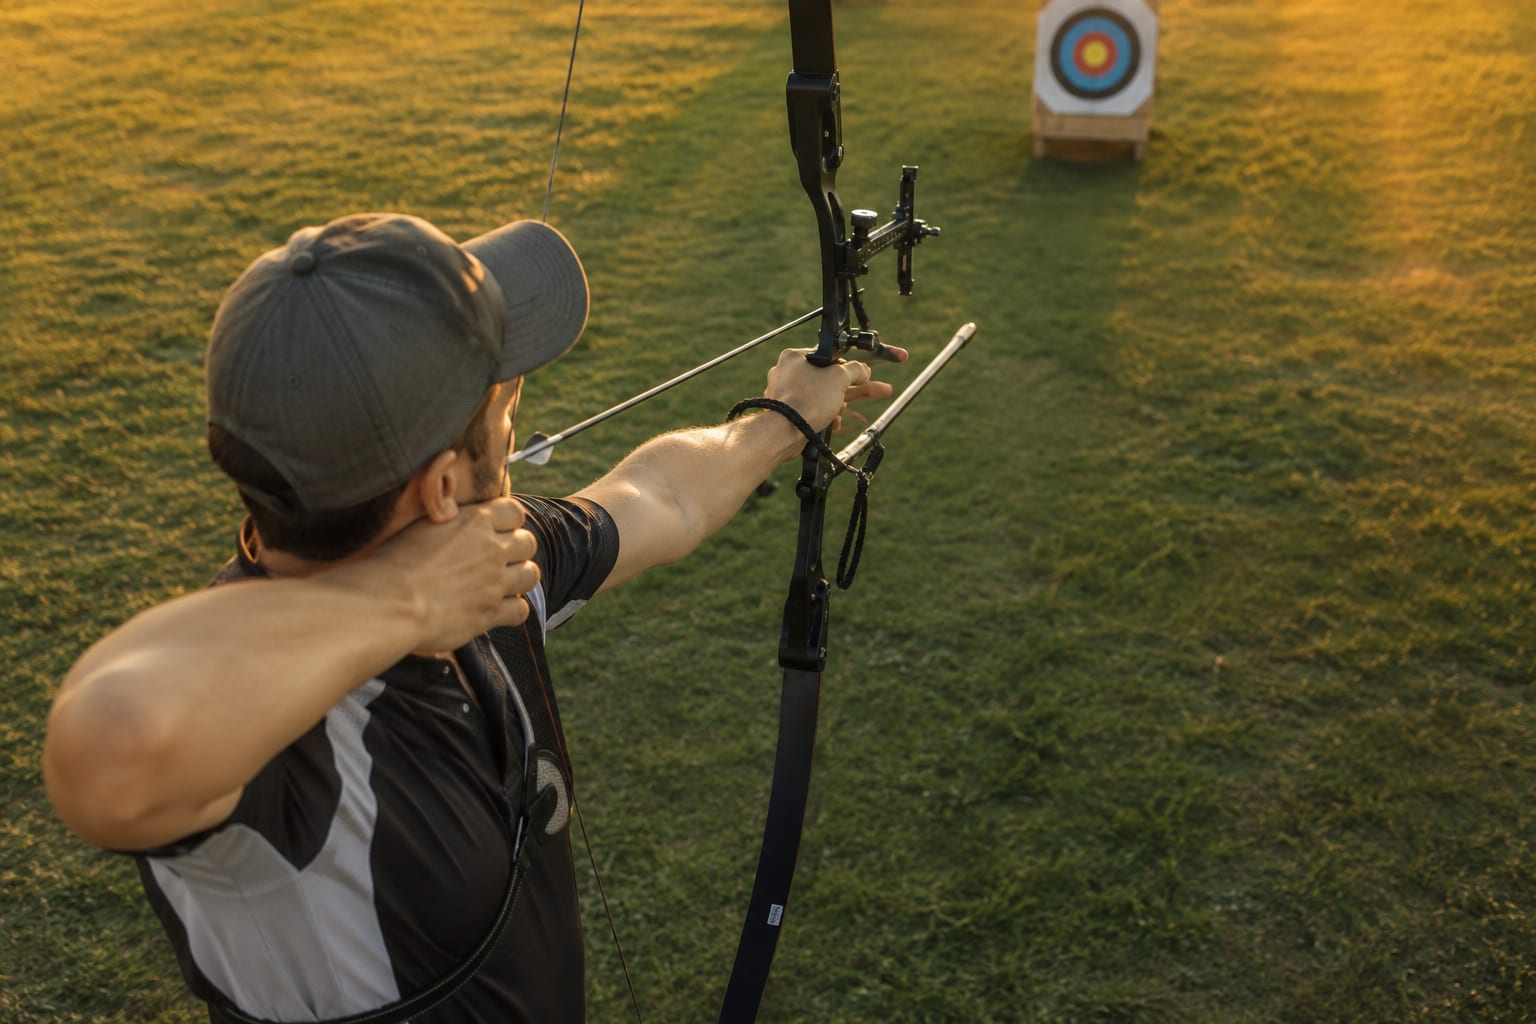
You can identify bow torque through several diagnostic methods: arrow impact patterns, bow reaction at release, video analysis, and specialized torque-testing tools. The most obvious sign is consistent horizontal deviation, arrows that group vertically but scatter left and right, or an entire group that sits left or right of your aim point despite correct sight settings.
Diagnostic methods:
Paper tuning: Shoot through paper at close range. Horizontal tears (left or right) often indicate grip torque, though they can also signal other tuning issues.
Bare shaft testing: Shoot arrows without fletching alongside fletched arrows. If bare shafts consistently impact left or right of fletched arrows, grip torque is a likely cause.
Video analysis: Record your bow hand at release in slow motion. Watch for finger movement, wrist rotation, or the bow twisting as the arrow leaves.
Witness marks: Apply chalk or powder to your palm and fingers, then shoot. Check which parts of your hand leave marks on the grip, you should see contact only at the thumb pad.
Torque indicator tools: Some bows accept aftermarket torque indicators (small levels or pointers) that show real-time grip rotation.
Physical sensations that indicate torque:
If you’re right-handed and arrows consistently hit left of your aim point, you’re likely applying clockwise torque (looking down from above). Left-handed archers with arrows hitting right are applying counterclockwise torque. The opposite patterns can also occur depending on where excess pressure is applied.
Beginners struggling with grip torque benefit most from slim, minimally contoured grips that provide less surface area for incorrect hand contact and make proper thumb-pad placement more obvious. Low-profile grips force you to find the correct pressure point because there’s nowhere else for your hand to comfortably rest, while heavily contoured grips can mask poor technique by feeling secure even when positioned incorrectly.
Recommended grip features for beginners:
Many coaches recommend that beginners practice with the factory grip removed entirely, shooting off the bare metal or carbon riser. This extreme approach eliminates all comfort and forces proper technique, if you’re not positioned correctly on the bare riser, the bow becomes uncomfortable or unstable immediately.
Grip products that help break bad habits:
Common mistake: Beginners often seek more comfortable or padded grips, thinking this will improve their shooting. In reality, comfort often enables poor technique. The grip should feel neutral or slightly uncomfortable until proper hand position becomes habitual.
Your thumb should not touch your fingers when gripping a bow correctly. Maintaining space between your thumb and fingers ensures your hand stays open and relaxed, preventing the closed-fist grip that creates torque. Your thumb should point forward toward the target, while your fingers curl naturally away from the grip without wrapping around it or making contact with each other.
The gap between thumb and fingers serves as a visual and physical indicator of proper technique. If you can see daylight between your thumb and index finger, your hand is open. If they’re touching or overlapping, you’re likely squeezing the grip and introducing torque.
Correct thumb and finger positions:
Some archers use a “hitchhiker” thumb position, pointing the thumb straight up or slightly back, but this is less common and typically seen only in traditional archery. The forward-pointing thumb provides better alignment and more consistent pressure-point contact.
Test for proper separation: At full draw, have someone slide a piece of paper between your thumb and index finger. If they can’t, your hand is too closed. Practice holding the bow with exaggerated finger extension until the open position feels natural.
A bow wrist sling attaches to your bow and loops around your wrist, catching the bow after release so you can shoot with a completely relaxed, open hand without dropping the bow. Wrist slings are essential for proper torque-free technique because they eliminate the subconscious need to grip the bow at release, the moment when even slight tension introduces torque and affects arrow flight.
Without a wrist sling, you must maintain some grip pressure throughout the shot to prevent the bow from falling forward after release. This necessary tension makes it nearly impossible to achieve a truly relaxed, torque-free grip. With a sling, you can let the bow jump forward freely at release, knowing it will catch safely in the sling.
Benefits of using a wrist sling:
Types of wrist slings:
Do you need one? Yes, if you’re serious about eliminating torque and improving accuracy. Wrist slings are standard equipment for Olympic recurve archers and increasingly common among compound shooters. The only archers who might skip them are traditional shooters who prefer the aesthetic of shooting without accessories, but even they sacrifice some accuracy potential.
Common mistake: Using a wrist sling but still gripping the bow tightly out of habit. The sling enables proper technique but doesn’t force it, you must consciously relax your hand to gain the benefit.
Open hand grip technique keeps fingers extended and relaxed, not touching the bow or each other, with the bow resting solely on the thumb pad. Closed hand grip wraps fingers partially or fully around the bow handle, creating multiple contact points. Open hand is superior for torque-free shooting because it maintains a single, consistent pressure point and prevents the multi-directional forces that cause bow rotation.
Open hand technique (recommended):
Closed hand technique (not recommended for accuracy):
The open hand technique feels unstable and unnatural at first, especially for archers transitioning from closed hand habits. This discomfort is normal and temporary, most archers adapt within 2-4 weeks of consistent practice. The accuracy improvement is immediate and measurable once the technique becomes comfortable.
Transitioning from closed to open hand:
Some archers use a hybrid approach with fingers slightly curved near the grip but not touching it. This can work if the hand remains relaxed, but it’s a compromise that still carries some torque risk compared to fully open fingers.
Arrows consistently hitting left of your aim point (for right-handed archers) typically indicate you’re applying clockwise torque to the bow, twisting the riser to the right from your perspective. This happens when you apply excess pressure with your palm heel or the base of your fingers, or when you push the bow away from your body during the shot.
Immediate fixes for left-hitting arrows:
Diagnostic drill: Shoot a group of arrows with your normal grip, then shoot another group while consciously focusing only on keeping your fingers completely open and relaxed. If the second group moves right (closer to center), grip torque was your problem.
Left-handed archers with arrows hitting right should apply the same fixes, the torque direction is simply reversed. The underlying cause (excess pressure creating rotation) remains identical.
Advanced correction: If basic fixes don’t work, video your bow hand at release in slow motion. Watch specifically for:
Persistent left hits despite correct grip technique may indicate other issues like arrow spine, rest position, or sight alignment, but grip torque should always be ruled out first because it’s the most common cause.
The only pressure point for a torque-free bow grip is the meaty pad at the base of your thumb (the thenar eminence), positioned against the bow’s throat or pressure point at approximately 45 degrees to your hand’s natural angle. All holding force should concentrate at this single contact point, with zero pressure from your palm, fingers, or any other part of your hand.
Correct pressure point location:
Incorrect pressure points to avoid:
The pressure at your thumb pad should feel firm but not strained. If you’re pressing hard enough that your thumb pad turns white or feels sore after shooting, you’re applying too much force. The bow’s forward pressure from the draw should do most of the work, your thumb pad simply provides a stable shelf for the bow to rest against.
Pressure consistency drill: At full draw, consciously vary your thumb pad pressure from very light to very firm while maintaining aim. Notice how the sight picture moves as pressure changes. Find the minimum pressure that keeps the sight steady, this is your target pressure for every shot.
The most accuracy-destroying grip mistakes are death grip (squeezing tightly), low hand placement (gripping too far down the handle), bent wrist (not aligned with forearm), and inconsistent pressure (varying grip tension from shot to shot). Each of these errors introduces torque or creates variable bow reaction, preventing consistent arrow grouping.
Top grip mistakes and their fixes:
1. Death grip (squeezing the bow)
2. Low hand placement
3. Bent wrist
4. Inconsistent pressure
5. Fingers touching grip
6. Thumb pointing up or back
7. Gripping during release
8. Palm contact
Mistake diagnosis priority: If you’re experiencing accuracy problems, check these mistakes in order: death grip first (most common), then wrist alignment, then hand placement height, then pressure consistency. Fixing death grip alone often resolves 70-80% of torque-related accuracy issues.
How long does it take to learn proper bow grip technique? Most archers can learn the basic mechanics of proper bow grip in a single practice session, but developing consistent muscle memory typically requires 3-4 weeks of regular shooting. Expect temporary accuracy loss during the first 1-2 weeks as you break old habits. Full mastery where proper grip becomes automatic usually takes 2-3 months of consistent practice.
Can I use a bow grip without a wrist sling? You can shoot without a wrist sling, but it makes proper torque-free technique much harder because you must maintain some grip pressure to prevent dropping the bow. This necessary tension works against the relaxed, open-hand technique that eliminates torque. Wrist slings are inexpensive and universally recommended for accuracy-focused shooting.
Why does my bow twist left even with relaxed fingers? If your fingers are truly relaxed but the bow still twists left, check your wrist alignment, an inward-bent wrist creates rotation even without finger pressure. Also verify your thumb pad is positioned correctly at 45 degrees; if your hand is too vertical or too horizontal, the pressure angle can introduce torque despite relaxed fingers.
Should compound and recurve archers use different grip techniques? No, both compound and recurve archers should use the same fundamental technique: relaxed open hand, single pressure point at thumb pad, straight wrist alignment. The grip shapes differ between bow types, but the hand position and pressure principles remain identical for torque-free shooting.
How tight should my wrist sling be? Your wrist sling should be snug enough that the bow doesn’t slide more than 2-3 inches forward after release, but loose enough that it doesn’t restrict wrist movement or feel uncomfortable at full draw. Most archers adjust their sling so the bow rotates forward about 45 degrees after the shot, catching gently in the sling without jerking.
What if proper grip technique feels uncomfortable? Discomfort with proper grip technique is normal initially because you’re using muscles differently and fighting established habits. The technique should feel unstable rather than painful, if you experience actual pain, check that your wrist is straight and you’re not over-tensing your thumb. Discomfort typically resolves within 2-3 weeks as new muscle memory develops.
Can grip torque affect vertical arrow placement? Grip torque primarily affects horizontal arrow placement (left-right), but severe torque can create secondary vertical effects by changing the bow’s dynamic spine or causing inconsistent arrow rest contact. If you’re experiencing both horizontal and vertical dispersion, fix grip torque first before diagnosing other potential causes.
Do I need a special grip for my bow model? Most bows come with adequate factory grips, but many archers benefit from aftermarket grips that better match their hand size and anatomy. Slim, minimally contoured grips generally work best for learning proper technique. Custom-molded grips can help if you have unusual hand anatomy, but master basic technique with a standard grip first.
How do I practice bow grip without shooting arrows? Practice grip technique by drawing your bow and holding at full draw for 10-15 seconds while focusing entirely on hand relaxation and position. Use a mirror to check wrist alignment and finger extension. Have someone verify they can see daylight between your fingers and the grip. This drill builds muscle memory without the distraction of aiming or the expense of arrows.
What’s the difference between grip torque and bow torque? Grip torque refers specifically to the twisting force your hand applies to the bow handle. Bow torque is a broader term that includes any rotational force on the bow, which can come from grip issues, improper draw technique, or even bow design characteristics. Grip torque is the most common and controllable source of bow torque.
Can I fix grip torque if I have arthritis or hand injuries? Archers with arthritis or hand injuries can still achieve torque-free grip technique, often more easily than uninjured archers because the condition forces them to use minimal pressure. Focus on finding a comfortable hand angle that keeps your wrist straight, and use a well-padded wrist sling to eliminate any need for gripping strength. Consult with an archery coach experienced in adaptive techniques.
Why do professional archers’ grips look different from each other? While all professional archers follow the same core principles (relaxed hand, single pressure point, straight wrist), individual hand anatomy creates visible differences in grip appearance. Hand size, finger length, thumb angle, and wrist flexibility vary between people, so proper technique looks slightly different on each archer. Focus on principles rather than copying someone else’s exact hand position.
Mastering how to grip a bow torque-free is the foundation of consistent, accurate archery. The technique centers on three non-negotiable principles: maintain a single pressure point at your thumb pad, keep your fingers relaxed and open, and align your wrist straight with your forearm. These elements work together to eliminate the rotational forces that send arrows left or right of your intended target.
The transition to proper grip technique requires patience and deliberate practice. Expect 3-4 weeks of focused work before the relaxed, open-hand position feels natural, and accept that your scores may temporarily decline as you break old habits. The investment pays immediate dividends once muscle memory develops, most archers see grouping sizes shrink by 30-50% after eliminating grip torque.
Take these steps to implement torque-free grip technique:
Remember that grip technique is a skill that requires ongoing attention, not a one-time fix. Even experienced archers periodically review their grip fundamentals to prevent bad habits from creeping back. Make grip verification part of your pre-shot routine, and you’ll maintain the torque-free technique that separates good archers from great ones.


